BOGO (Buy One Get One) deals are deals where you let customers buy a certain number of products and they get another product as a result of that.
They’re extremely popular in retail settings and you’ve probably seen them at your local supermarket or shopping mall.
Running these kinds of deals in WooCommerce is practically impossible without the Advanced Coupons extension.
Here’s how you run a BOGO deal in WooCommerce with Advanced Coupons installed:
We’ve made it really simple for you, the store owner, to set up and execute on a BOGO deal. You can find the BOGO edit screen under the General tab and change the Discount type to Buy X Get X Deal (BOGO).
Click here for a full tutorial on how to create a WooCommerce BOGO coupon.
There are three ways for customers to “trigger” your BOGO deal, this is called the Customer Buys:
- Specific Products – customer must have specific products in the cart at specific quantities
- Any Combination of Products – customer can have any combination of a set of products as long as they meet the overall total quantity
- Product Categories – customer can have any products from the specified categories as long as they meet the overall total quantity
- Any Products – customer can have any product you have on your website as long as they meet the overall total quantity
For the “get” portion of a BOGO deal, you need to define the Customer Gets:
- Specific Products – customer gets a specific product/s at specific quantities
- Any Combination of Products – customer can choose from any combination of the defined products
- Product Categories – customer can choose from any products in the specified categories
- Any Products – customer can choose from any products on your website
- ✨ NEW: Same Products (Same Product BOGO) – you can now run Buy One Get One (BOGO) deals for the same product, with no extra setup or duplication.
When you specify the Customer Gets you can define whether they get the product/s with a price override that you define, a percentage-based discount, or a price amount off.
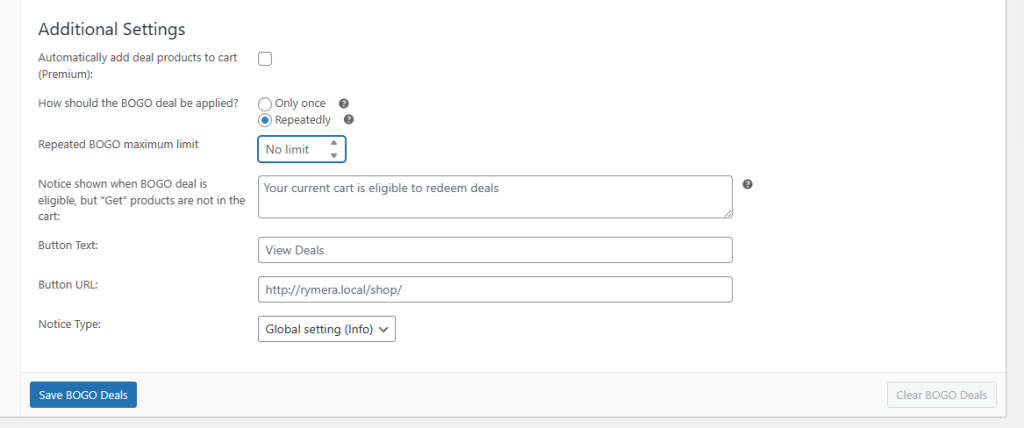
Additional Settings
You can specify if the BOGO deal should be applied only once or whether it should apply repeatedly for every time it matches the Trigger Type conditions that you set.
Eg. Buy 2 T-Shirts Get One T-shirt Free. If you set this to repeatedly, it will match and grant a free t-shirt for every 2 t-shirts you have in the cart. If it is set to match only once, it will only give 1 free t-shirt regardless of how many shirts are in the cart that matches the trigger conditions.
Showing A Notice To Customers When They Trigger The BOGO Deal (BOGO Notification Message)
When you have the Apply Type set to either “Any Combination of Products” or “Product Categories” you’ll be able to set a notice to show the customer when they add the coupon and activate the deal. This is called BOGO notification message.

We recommend you change the notice to tell them they have activated the deal and that they now need to go and add the required product/s to the cart in order to claim the deal.
Example Notice Text: “Congrats! You just activated the Buy 2 T-Shirts Get The 3rd Half Price deal. All you need to do to claim your half-price shirt is select which shirt you want as half price.”
Example Button Text: “Claim My Half Price Shirt”
Change the Button URL to point to where they can add the products. This could be a product category archive or even a landing page you have set up with those products shown.
The notice typesetting changes the display type of the WooCommerce notice.
NOTE: BOGO notification messages are only shown with “Any Combination of Products” and “Product Categories” Apply Types because “Specific Products” Customer Gets automatically add those products to the cart for the customer when the deal becomes active as in this case, the products they are set to receive are known to the system.
Repeatedly:
When this function is enabled for the bogo, the coupon will be triggered multiple times. For example you have a buy 1 get 1 deal and you have the repeat function enabled if the customer buys 3 they get 3 more.
It’ll first check if the rule is triggered and is given the free product so if you have a buy 3 get 1 free with the repeat function enabled. A customer can buy 6 and get 2 free.

Note that you are able to set the maximum limit for the repeat settings through the Repeated BOGO maximum limit option, to use it simply set the limit on the input box.
How To Automatically Apply The Deal
BOGO deals are compatible with the automatically apply coupon feature and the Cart Conditions feature. You’ll need to use both to apply the deal automatically.
To do so:
- Set the Cart Conditions to match the condition that you have set for the Trigger Type
- Check the box to apply the coupon automatically
Once you do this, whenever the Cart Conditions are matched (which are the same as the Trigger Type conditions for the BOGO deal) the coupon will be added and the BOGO deal will be triggered.
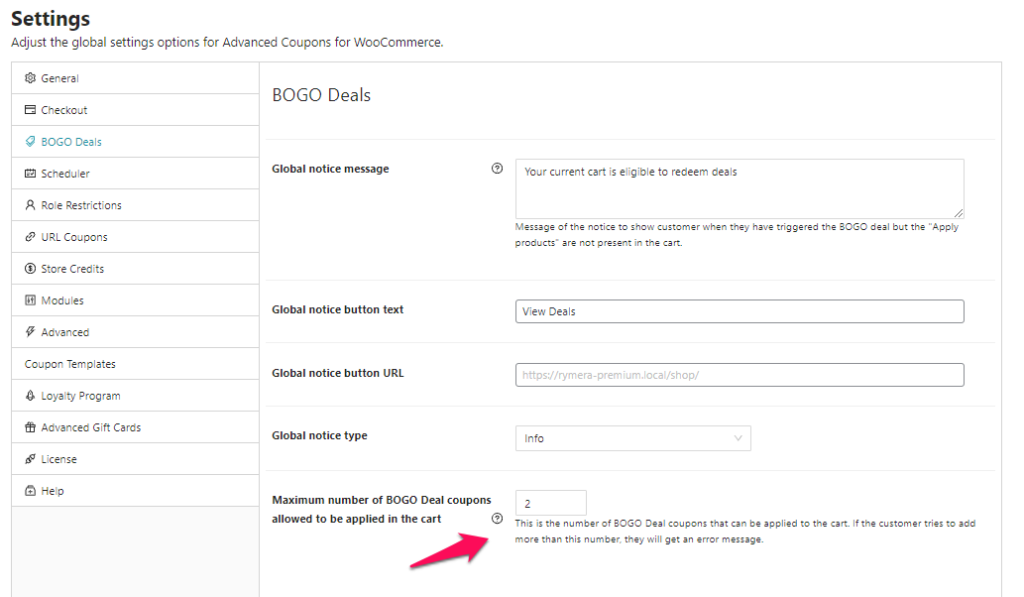
How To Apply More Than 1 BOGO Coupon?
By default, the Advanced Coupon plugin can only allow 1 BOGO Deal coupon to be applied to the cart. However, if you wish to allow multiple BOGO Deals coupons to be used in 1 order, simply go to Coupons > Settings > BOGO Deals and adjust the Maximum number of BOGO Deal Coupons according to your requirements.
Go forth and BOGO!
Now that you know how to add BOGO (Buy One, Get One) deals to WooCommerce, how will you test it out? Set up your first BOGO deal and inform your customers about it. These deals are incredibly effective, and now you have the ability to run them as well!
Help & Support
We have a dedicated support team for Advanced Coupons who know our products, WooCommerce, and the industry very well. You’re welcome to make use of their expertise at any time, worldwide.
If you are an existing customer please go to the support ticket request form and send us a message.
If you are a free plugin user, please send us a support request on the forum, we actively monitor the WordPress.org support forums for the free plugin and help our users there as best as we can.


