Shipping might not be the flashiest part of running a WooCommerce store, but it’s crucial to creating a satisfying shopping experience. In fact, industry insights reveal that 77% of shoppers have abandoned their carts due to unsatisfactory shipping options! If you want to win customer trust and keep those sales rolling, it’s important to understand how WooCommerce shipping options work.
No worries, that’s what we’re here for! In this comprehensive guide, we’ll break down everything you need to know about setting up shipping in WooCommerce. What’s more, we’ll show you how shipping can help elevate your store’s promotional strategy!
Pretty exciting, right? Let’s dive right in!
WooCommerce Shipping Basics (What You Need To Know)
WooCommerce offers store owners a lot of flexibility when it comes to configuring shipping options. The overall process is fairly simple:
- First, you’ll need to create shipping zones to define where you’ll ship to.
- Next, you can assign shipping methods and rates to each zone.
- Lastly, you can set up shipping classes to group products with similar shipping requirements.
Before going through this process, it helps to understand the platform’s basic shipping concepts. So, let’s take a quick look at the three main components that make up WooCommerce’s shipping system:
WooCommerce Shipping Zones
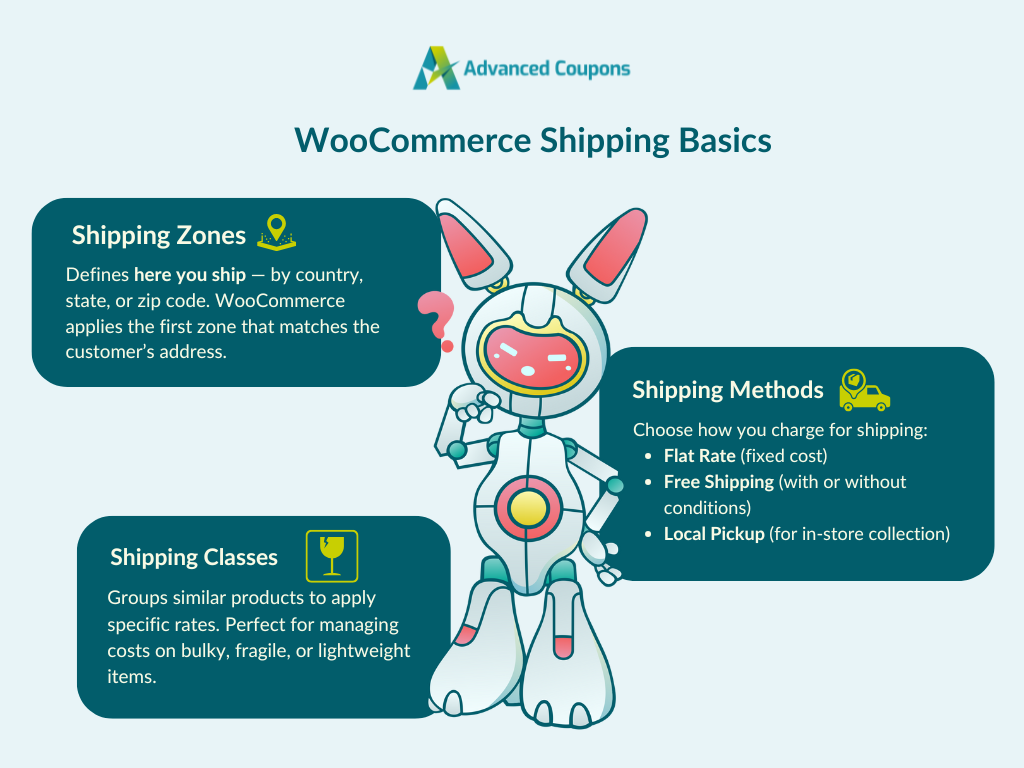
This is the foundation of your WooCommerce shipping setup. Shipping zones define where your business ships to. Each shipping zone corresponds to a specific geographic region, and they can be as broad or specific as you need. For instance, you can set up WooCommerce shipping options for a whole country, state, or specific zip code.
WooCommerce allows you to create as many zones as you need, and it automatically matches a customer to the first zone that fits their shipping address.
⚠️ IMPORTANT NOTE: If a shopper enters a shipping address that doesn’t match any of your configured zones, they won’t see any WooCommerce shipping options at checkout. This can lead to cart abandonment, so make sure to create a fallback zone (e.g., “Rest of the World”) to give customers a way to complete their orders.
WooCommerce Shipping Methods
WooCommerce shipping methods determine how you’ll ship orders and charge customers for delivery. You can apply a different shipping method for each zone, depending on your strategy, location, or customer preferences.
By default, WooCommerce offers three shipping methods:
- Flat rate: This option allows you to charge a fixed shipping cost for every order. It’s the simplest option, great if you have predictable shipping expenses or want to keep things straightforward for your customers.
- Free shipping: You can also offer shipping at no cost to buyers. To control when this applies, you can set conditions like a minimum order amount, required coupon, or both.
- Local pickup: This method lets customers pick up their order from a physical location. This is a great choice if you have a storefront or a warehouse.
You have full control over which methods to offer for each zone. For example, you might offer both Free Shipping and Local Pickup for local buyers, while using Flat Rate for the rest of the country.
WooCommerce Shipping Classes
If your store sells a wide variety of products, some items might cost more to ship than others.
WooCommerce shipping classes allow you to group products with similar shipping needs, so you can charge shipping rates accordingly. For example, you might want to:
- Charge more for fragile items that require special packaging
- Offer cheaper shipping for lightweight accessories
- Set specific rates for perishable goods that need faster delivery
To configure this, you can create a shipping class (e.g., “Bulky,” “Lightweight,” or “Fragile”) and assign it to products in your catalog. From your flat rate shipping method settings, you can define different costs per shipping class. This gives you more control over how shipping fees are calculated per order.
For a step-by-step guide on how to create, assign, and manage WooCommerce shipping classes, check out our detailed guide here. 👉
How To Set Up WooCommerce Shipping Options
We know the key concepts now, so we’re ready to dive into the action part!
Setting up WooCommerce shipping options is simple, especially when you break it down into doable steps. In this section, we’ll guide you through each part of the setup, from setting up shipping zones to adding shipping methods. Let’s go!
Step 1: Access WooCommerce shipping settings
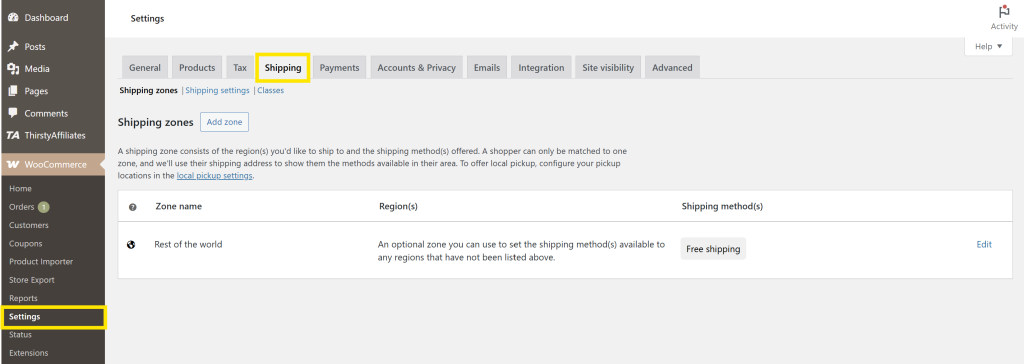
From your WordPress dashboard, head to WooCommerce > Settings > Shipping.
This is where you’ll manage all your store’s shipping options, from creating zones to configuring rates and methods.
Step 2: Create your shipping zone
To create your first shipping zone, click “Add zone.”
This opens the Add new zone screen, where you can name your zone and select the regions it will cover. In our example below, we’re creating a shipping zone for Australia. We’ll simply enter “Australia” as the zone name, then select Australia from the region dropdown list.
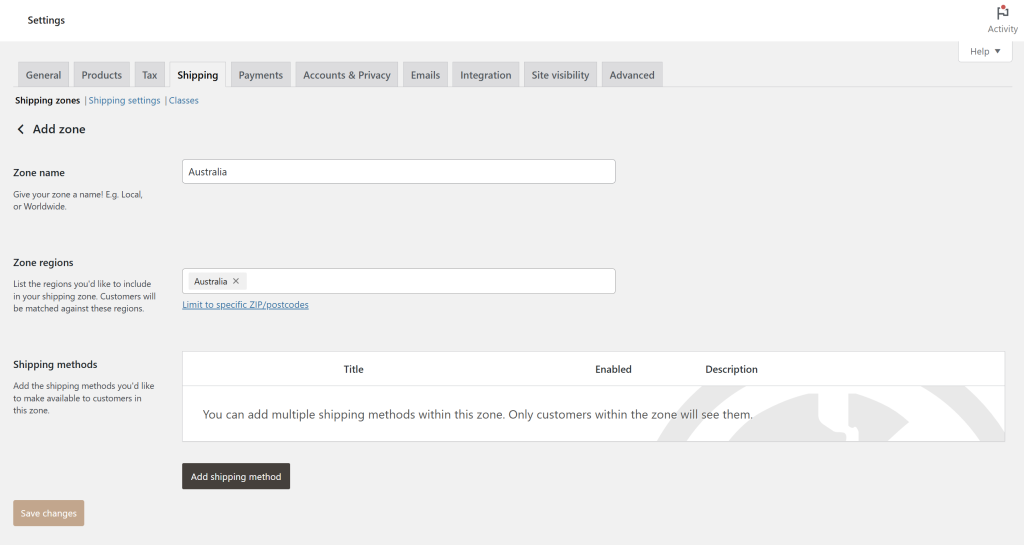
All shoppers in Australia will fall under this zone, regardless of their exact state or zip code.
🎯 POWER TIP: You can target certain states or individual postal codes if you need to set up custom rates or offer free shipping for specific regions. To do so, click “Limit to specific ZIP/postcodes” and enter your preferred ranges or codes!
Once you’re happy with the zone details, hit “Save changes.”
Step 3: Add your shipping method
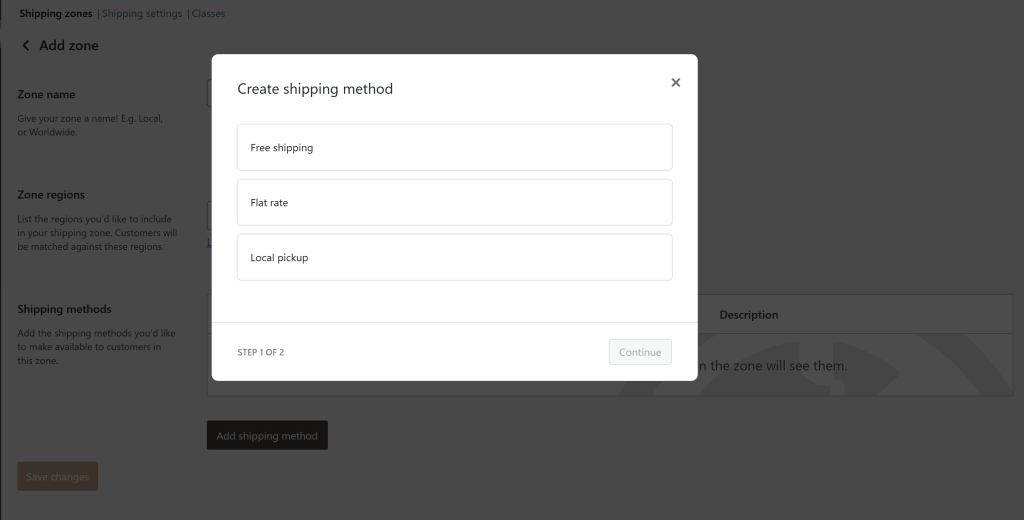
Now that we’ve configured our shipping zone, it’s time to add shipping options! To start, click “Add shipping method” – this opens a pop-up, where you can select between three default options: Free shipping, Flat rate, and Local Pickup.
Select your preferred method to add it to the zone and configure its settings. In the example below, we’ve selected Local Pickup, which allows customers to collect their orders from a designated location.
💡 Note that you can configure extra settings for each method.
- For Free Shipping, you can choose whether it applies automatically or only when customers meet certain conditions (like using a coupon or spending a minimum amount).
- With Flat Rate, you can define the cost per order, per item, or even based on shipping classes.
- For Local Pickup, you can set an optional cost or simply offer it at no cost.
Once you’re satisfied with your settings, click “Create and save.”
🎯 POWER TIP: You can add multiple WooCommerce shipping options in the same zone. Simply repeat the process to add more shipping methods to each zone.
Step 4: Testing your shipping setup
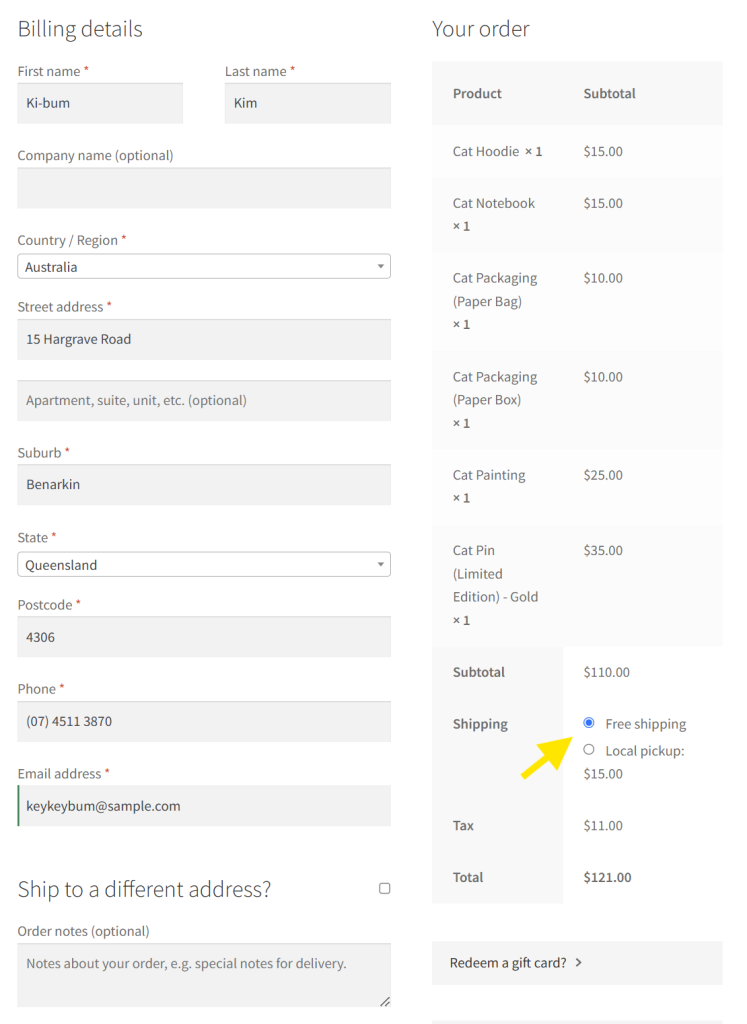
After adding our zones and methods, it’s time to check if they’re working right. To do this, head to your storefront (while logged out or in incognito) and try checking out an item. Then, type in a shipping address that matches one of your zones.
Double-check if the correct shipping methods and rates appear:
🛠️ Quick Troubleshooting Guide:
- No shipping options? Make sure the address matches a shipping zone and that the zone has at least one method added.
- Free shipping not showing? Check if any conditions set are met (like a coupon code or minimum order amount.)
- Wrong rate applied? Double-check the order of your zones (WooCommerce applies the first matching zone) and your flat rate configurations.
If everything looks good, congratulations! You’ve successfully set up your WooCommerce shipping options. 🎉
How WooCommerce Shipping Can Support Your Promotional Strategy
Shipping costs are one of the biggest causes of cart abandonment. According to insights from Baymard Institute, a whopping 39% of shoppers abandon their carts because extra costs like shipping and taxes are too high!
With the right setup, you can use shipping perks to drive more sales and improve your store’s average order values. Tools like Advanced Coupons make it easier to offer irresistible, targeted shipping incentives aside from free shipping. With this powerful plugin, you can:
- Offer shipping discounts: Create coupons that apply a fixed or percentage discount specifically to shipping costs. Great for encouraging hesitant buyers to complete their purchase.
- Set specific cart conditions: Control when your shipping discounts apply based on cart total, product category, user role, and so much more! This ensures that you’re offering free shipping perks to the right customers.
- Combine shipping perks with other deals: For example, pair BOGO offers with free shipping to sweeten the deal and make it a no-brainer for shoppers to click “checkout.”
Want to learn more about implementing these strategies? Check out our detailed guides below:
Frequently Asked Questions
What are the different shipping options in WooCommerce?
There are three default WooCommerce shipping options: Flat Rate, Free Shipping, and Local Pickup. Flat Rate lets you offer a fixed shipping charge per order (or item). Free shipping allows you to waive shipping costs across the board or under certain conditions, such as when the order hits a minimum order value. Lastly, Local pickup allows customers to claim their orders in person – a perfect option if you have a brick-and-mortar shop or a local pickup point.
How to set up shipping methods in WooCommerce?
To set up WooCommerce shipping methods, head to your WordPress dashboard > WooCommerce > Settings > Shipping. From here, you can create shipping zones, which are the areas your business can ship to. Once your shipping zones are in place, you can assign shipping methods like Flat Rate, Local Pickup, and Free Shipping to each zone.
You can further customize shipping settings for each method. For example, you can set a specific cost per order using Flat rate, or require a minimum order amount for Free Shipping.
What are shipping classes in WooCommerce?
Shipping classes allow you to group products with similar shipping needs, so you can apply appropriate shipping rates. If you sell a variety of items, for instance, you might want to create shipping classes like “Fragile”, “Heavy”, or “Perishable.”
You can assign WooCommerce shipping classes to individual items and define their rates under each shipping method. This gives you better control and flexibility over your shipping costs and ensures customers are charged fairly.
Conclusion
Setting up the right WooCommerce shipping options can have a huge impact on your customers’ shopping experience. By understanding how shipping zones, methods, and classes work, you can create a more streamlined checkout flow that reduces hesitation and cart abandonment. Fortunately, it’s simple and straightforward to set up, especially with a guide like this.
In this complete guide, we explored everything you need to know about WooCommerce shipping:
- WooCommerce shipping basics
- How to set up WooCommerce shipping options (Tutorial)
- Using WooCommerce shipping in your promotional strategy
Beyond logistics, shipping is also an integral part of your store’s promotional strategy. With plugins like Advanced Coupons, you can take your shipping setup even further by creating targeted free shipping offers, shipping discounts, and conditional shipping perks that boost conversions.
Do you have any questions about this topic? Let us know in the comments!


