If you want sale or campaign badges on your product images, you can build them in Advanced Promo Kit. This guide walks you through creating a label, including Style tab options such as animations and hover tooltips, so the badge looks the way you planned on the shop and product pages.
Prerequisites
- WooCommerce installed and active
- Advanced Promo Kit installed and active Advanced Promo Kit
- At least one published WooCommerce product
Step 1: open the Create Label screen
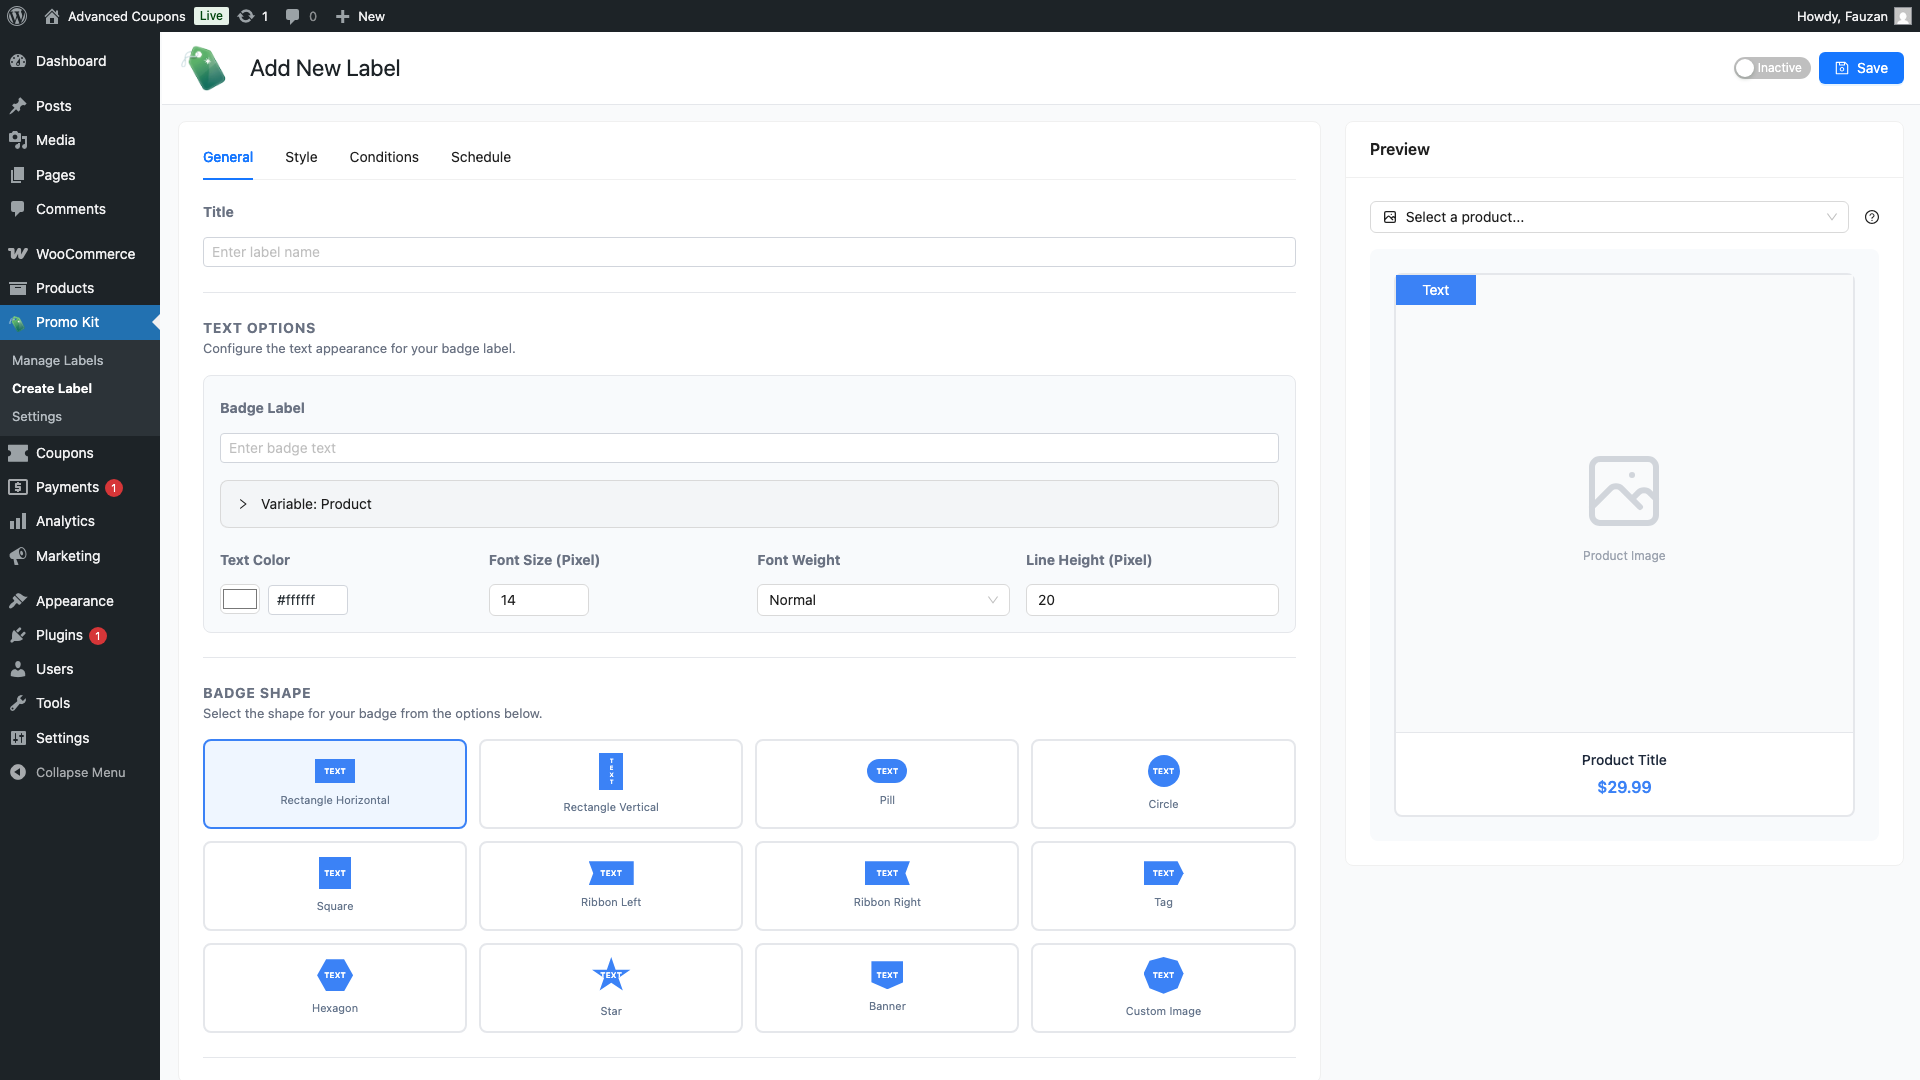
In your WordPress dashboard, click Promo Kit in the left-hand menu, then click Create Label.
Step 2: fill in the General tab
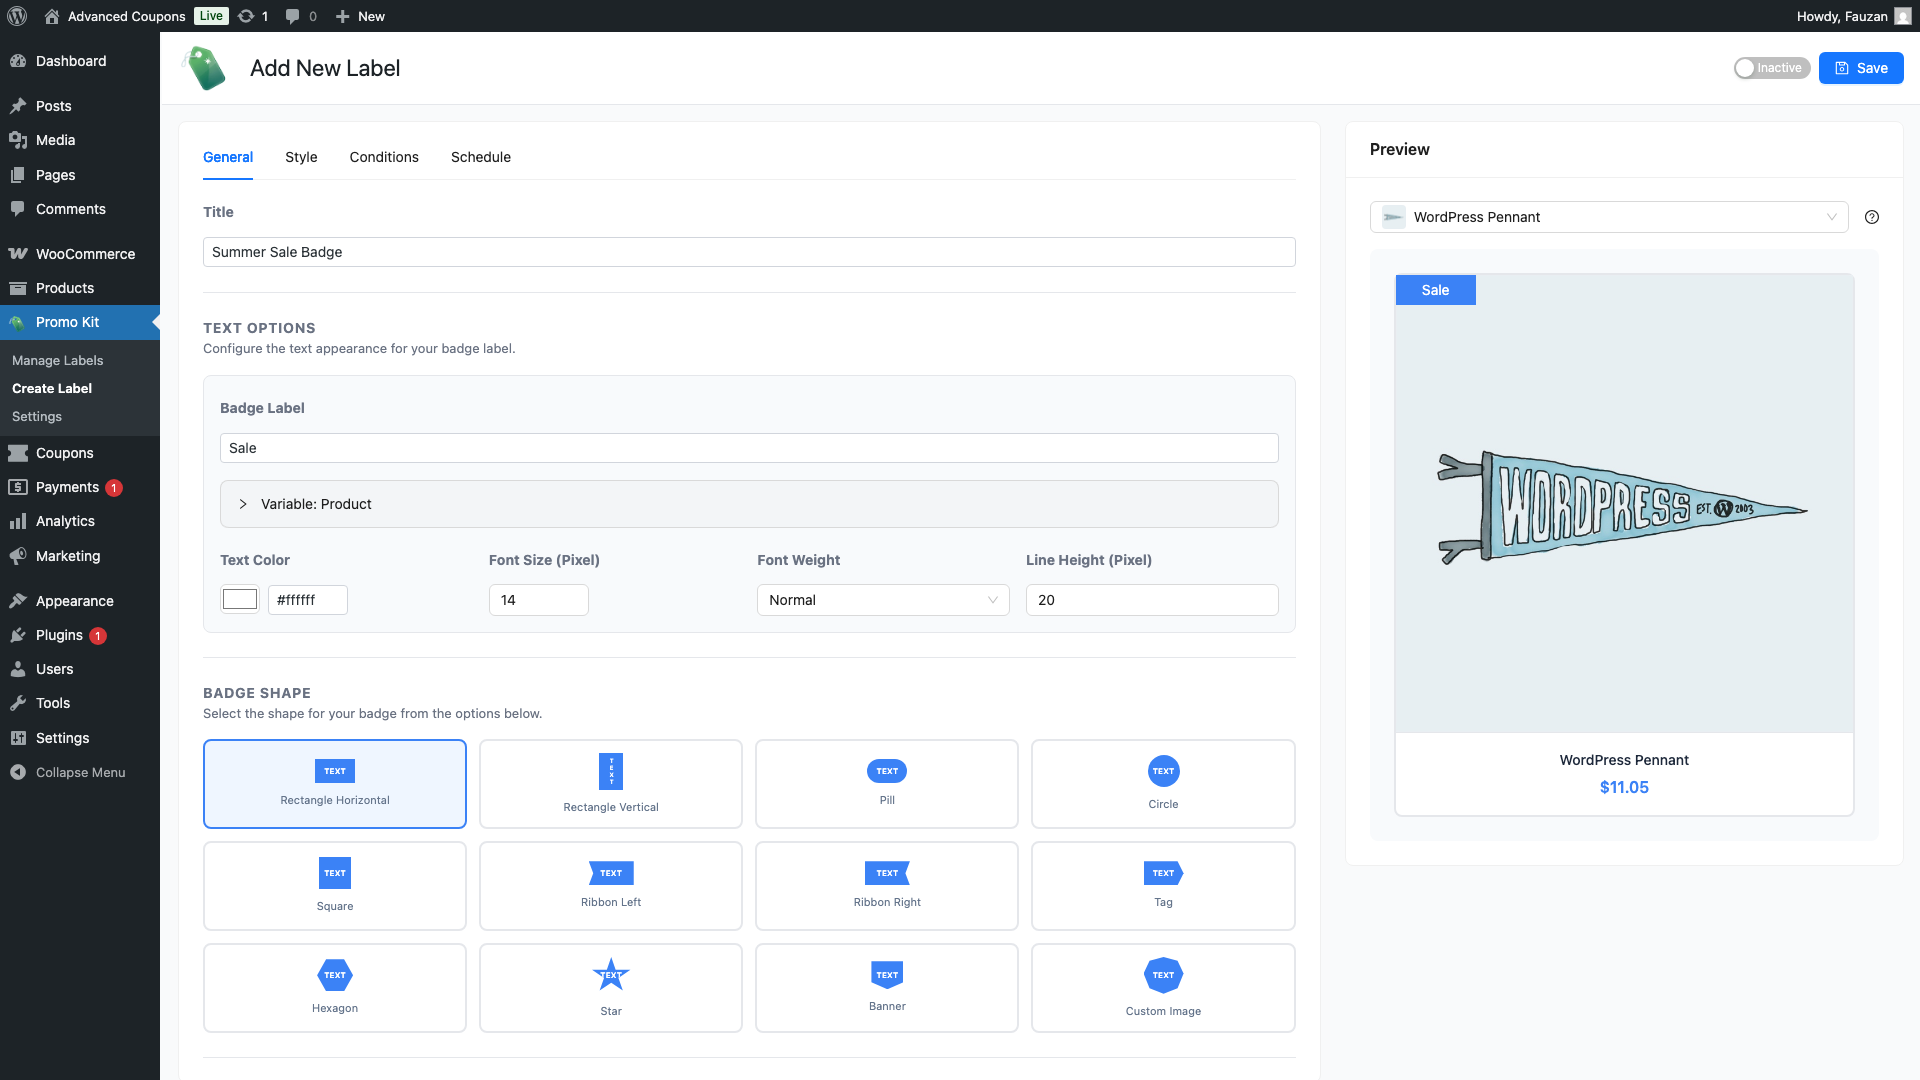
The General tab controls what your label says and what shape it takes.
- In the Title field, enter an internal name for this label. This is for your reference only and is not shown to customers.
- In the Badge Label field, type the text you want to appear on the badge: for example, SALE, NEW, or −20%. You can use dynamic variables (see the table below) to show live product data automatically. How to Use Dynamic Content Placeholders in Product Labels
- Under Text Options, set the font size (8 to 72 px), font weight (Normal, Bold, Semi Bold, or Light), and line height.
- Under Badge Shape, click the shape you want to use. There are 12 shapes available: Rectangle Horizontal, Rectangle Vertical, Pill, Circle, Square, Ribbon Left, Ribbon Right, Tag, Hexagon, Star, Banner, and Custom Image. If you choose Custom Image, an upload button appears so you can use your own image file as the badge.
Dynamic variables
Type any of these codes into the Badge Label field. Advanced Promo Kit replaces them with real values when the label is shown on a product in your store.
| Variable | Replaced with |
|---|---|
{product_price} | The product’s current price |
{regular_price} | The product’s regular (non-sale) price |
{sale_price} | The product’s sale price |
{discount_percent} | The percentage discount, e.g. 20% |
{discount_amount} | The fixed discount amount, e.g. $10 |
{stock_quantity} | The product’s current stock count |
Step 3: customise the style
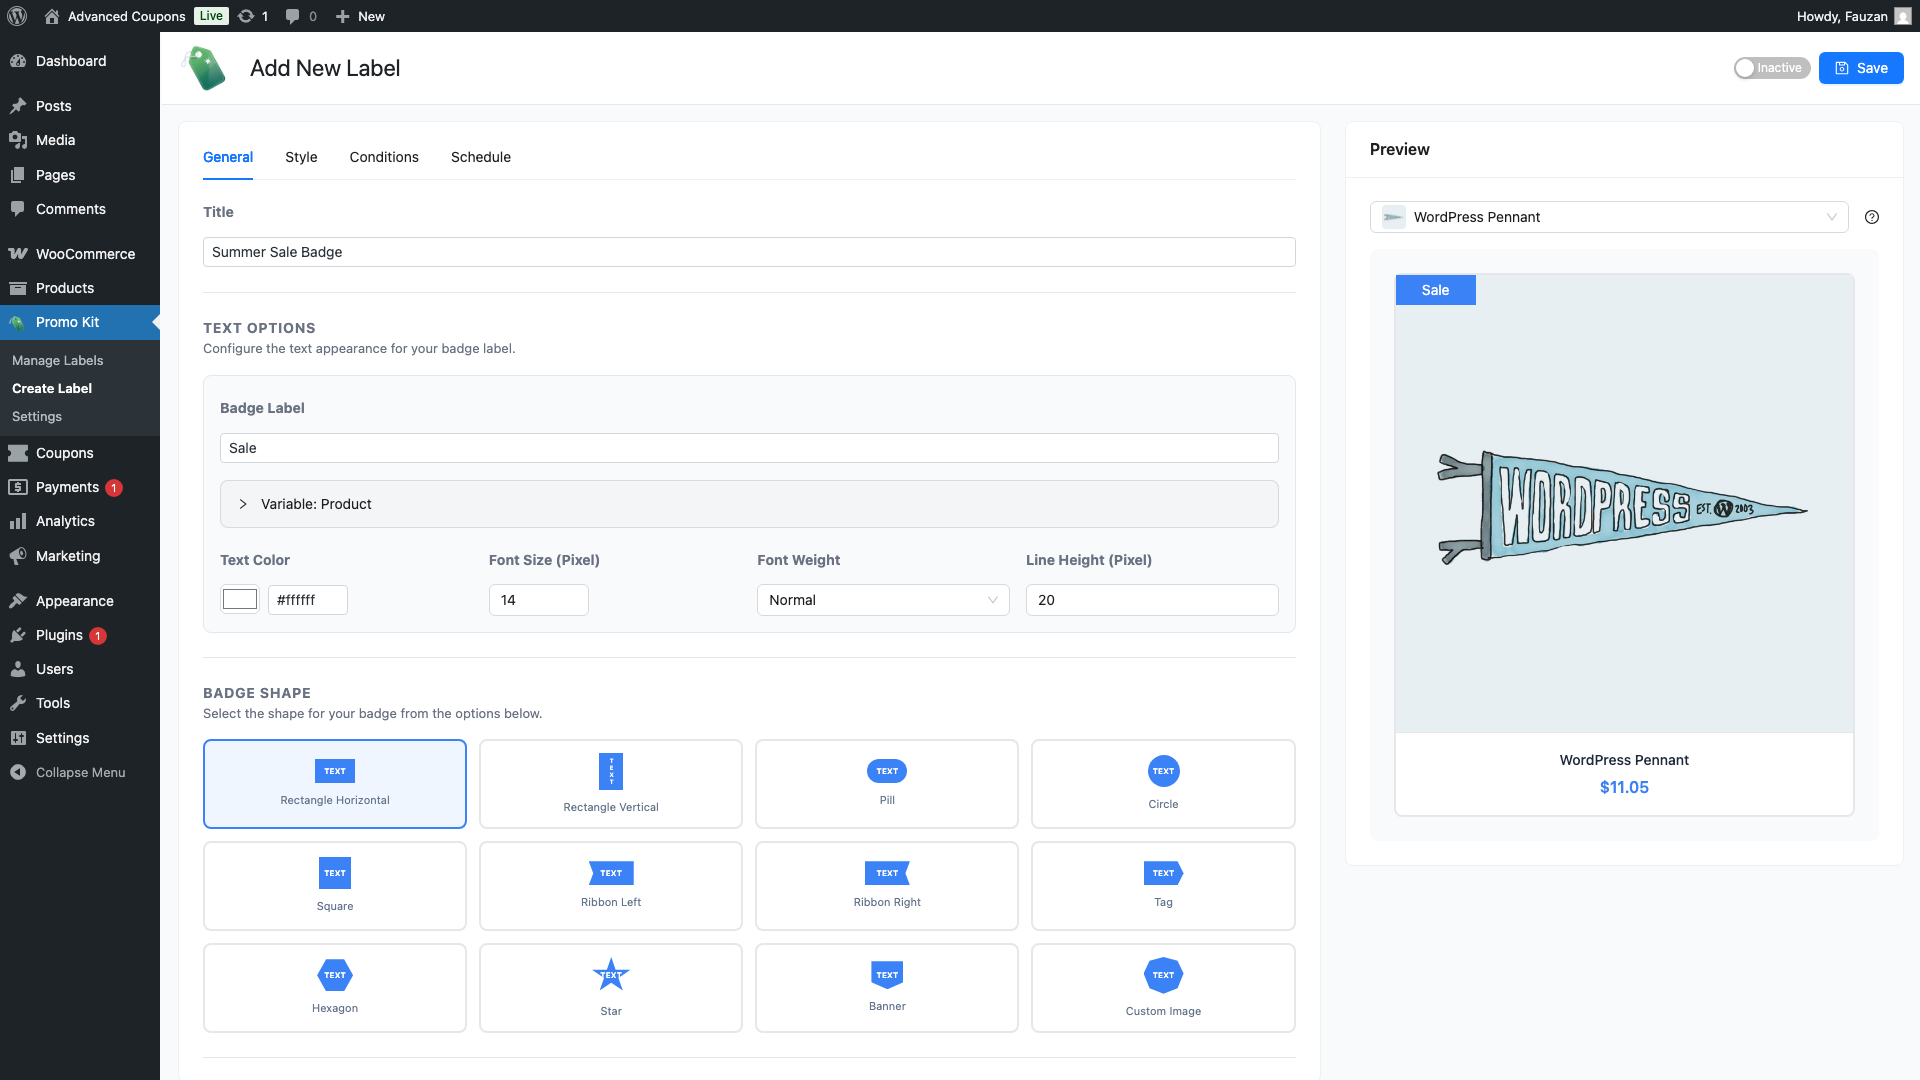
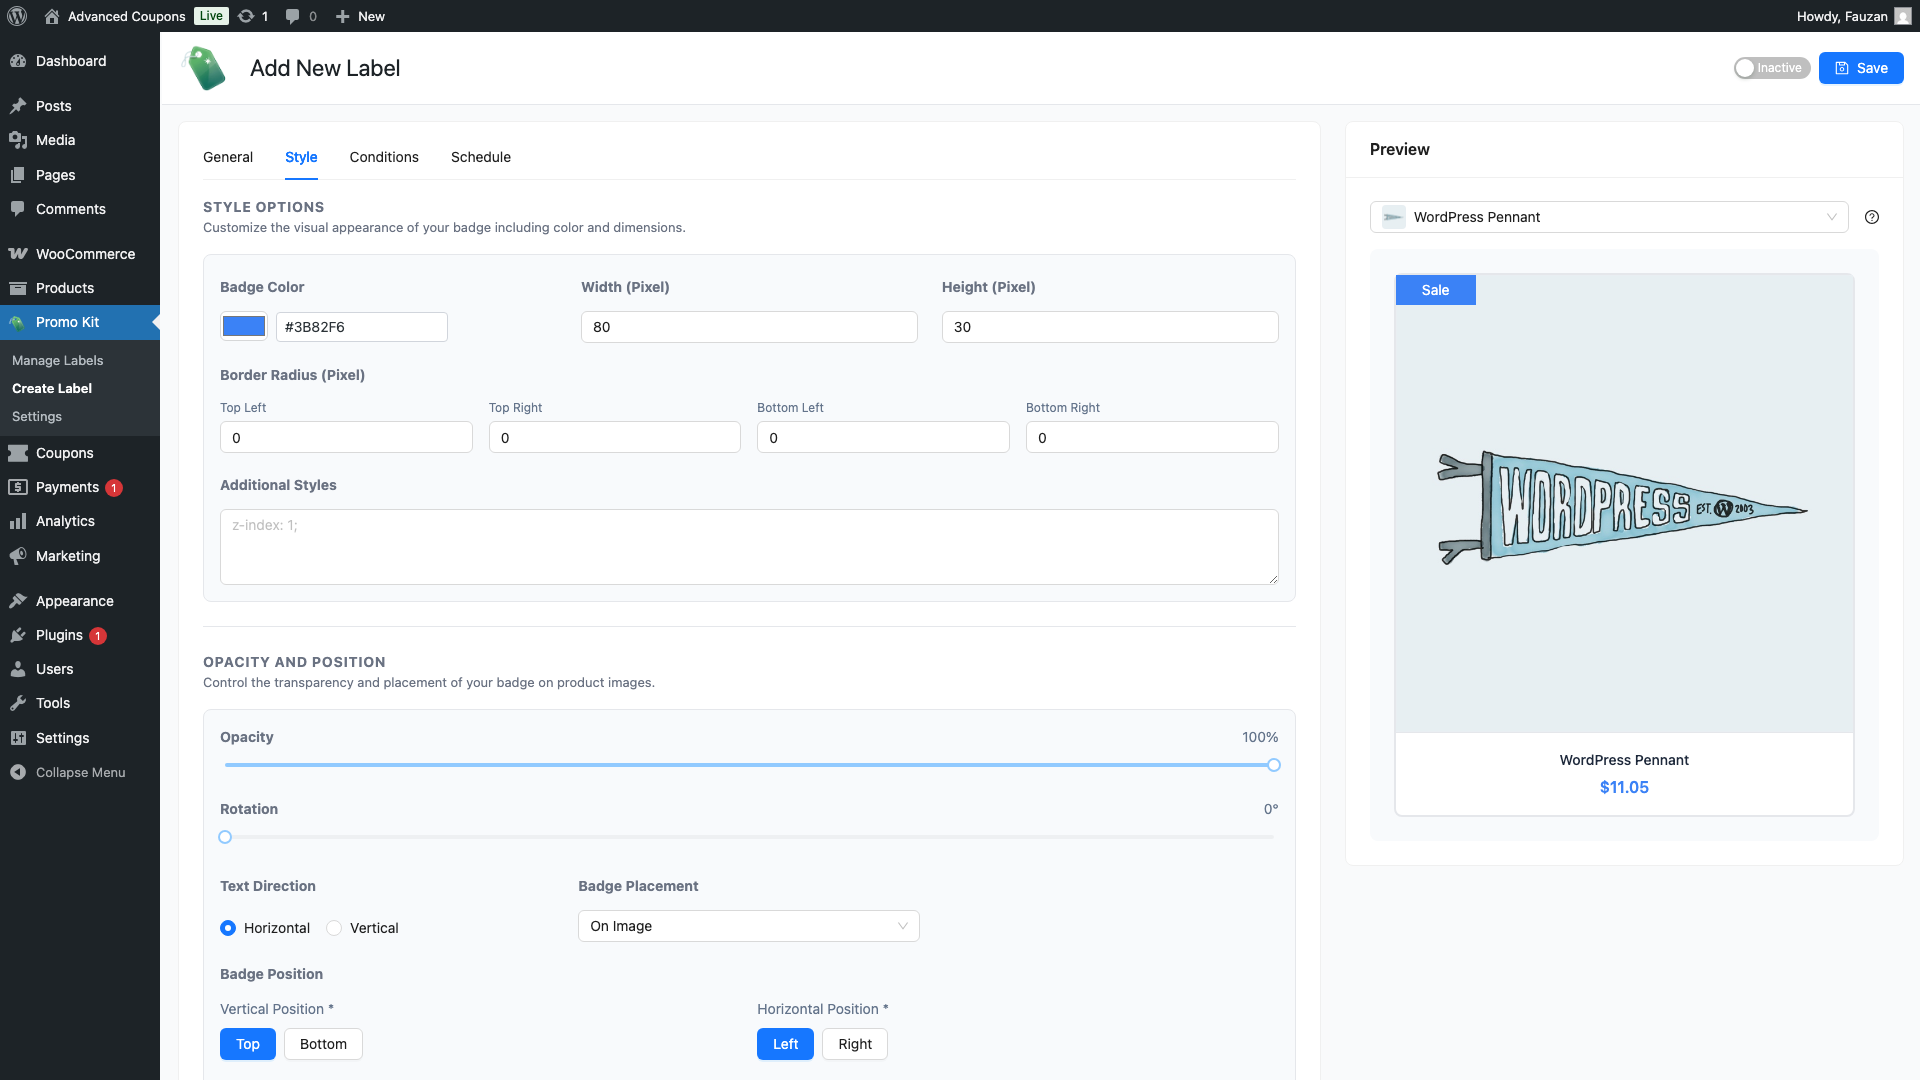
Click the Style tab to control how your label looks. The tab is divided into several sections.
Style Options
- Badge Color: click the colour swatch to open the colour picker and choose a background colour for your label.
- Width (Pixel) and Height (Pixel): enter pixel values (20–500 px) to set the badge size.
- Border Radius (Pixel): adjust each corner independently to round the edges.
- Text Padding (Pixel): set padding on each side of the badge text.
- Additional Styles: add any custom CSS you need for this specific label.
Opacity and Position
- Opacity: set the label transparency from 0 (invisible) to 100 (fully opaque).
- Rotation: rotate the badge between 0 and 360 degrees.
- Text Direction: choose Horizontal or Vertical.
- Badge Placement: choose On Image (overlapping the product image) or Out of Image (Below Card).
- Badge Position: choose top or bottom, and left or right, then enter pixel offsets to fine-tune where the badge appears.
Gradient and Shadow
Use these controls to give the badge a gradient fill and a drop shadow.
- Enable Gradient: apply a two-colour gradient fill. Choose Gradient Color 1, Gradient Color 2, and a Gradient Direction (Left to Right, Right to Left, Top to Bottom, Bottom to Top, or a diagonal).
- Enable Shadow: add a drop shadow with Shadow Color, Blur, Offset X, and Offset Y.
Animation
Use Animation Type to make the badge animate on the storefront. Options: None, Pulse, Flash, Shake, Bounce, Rotate, and Swing. Choose None to keep the badge still.
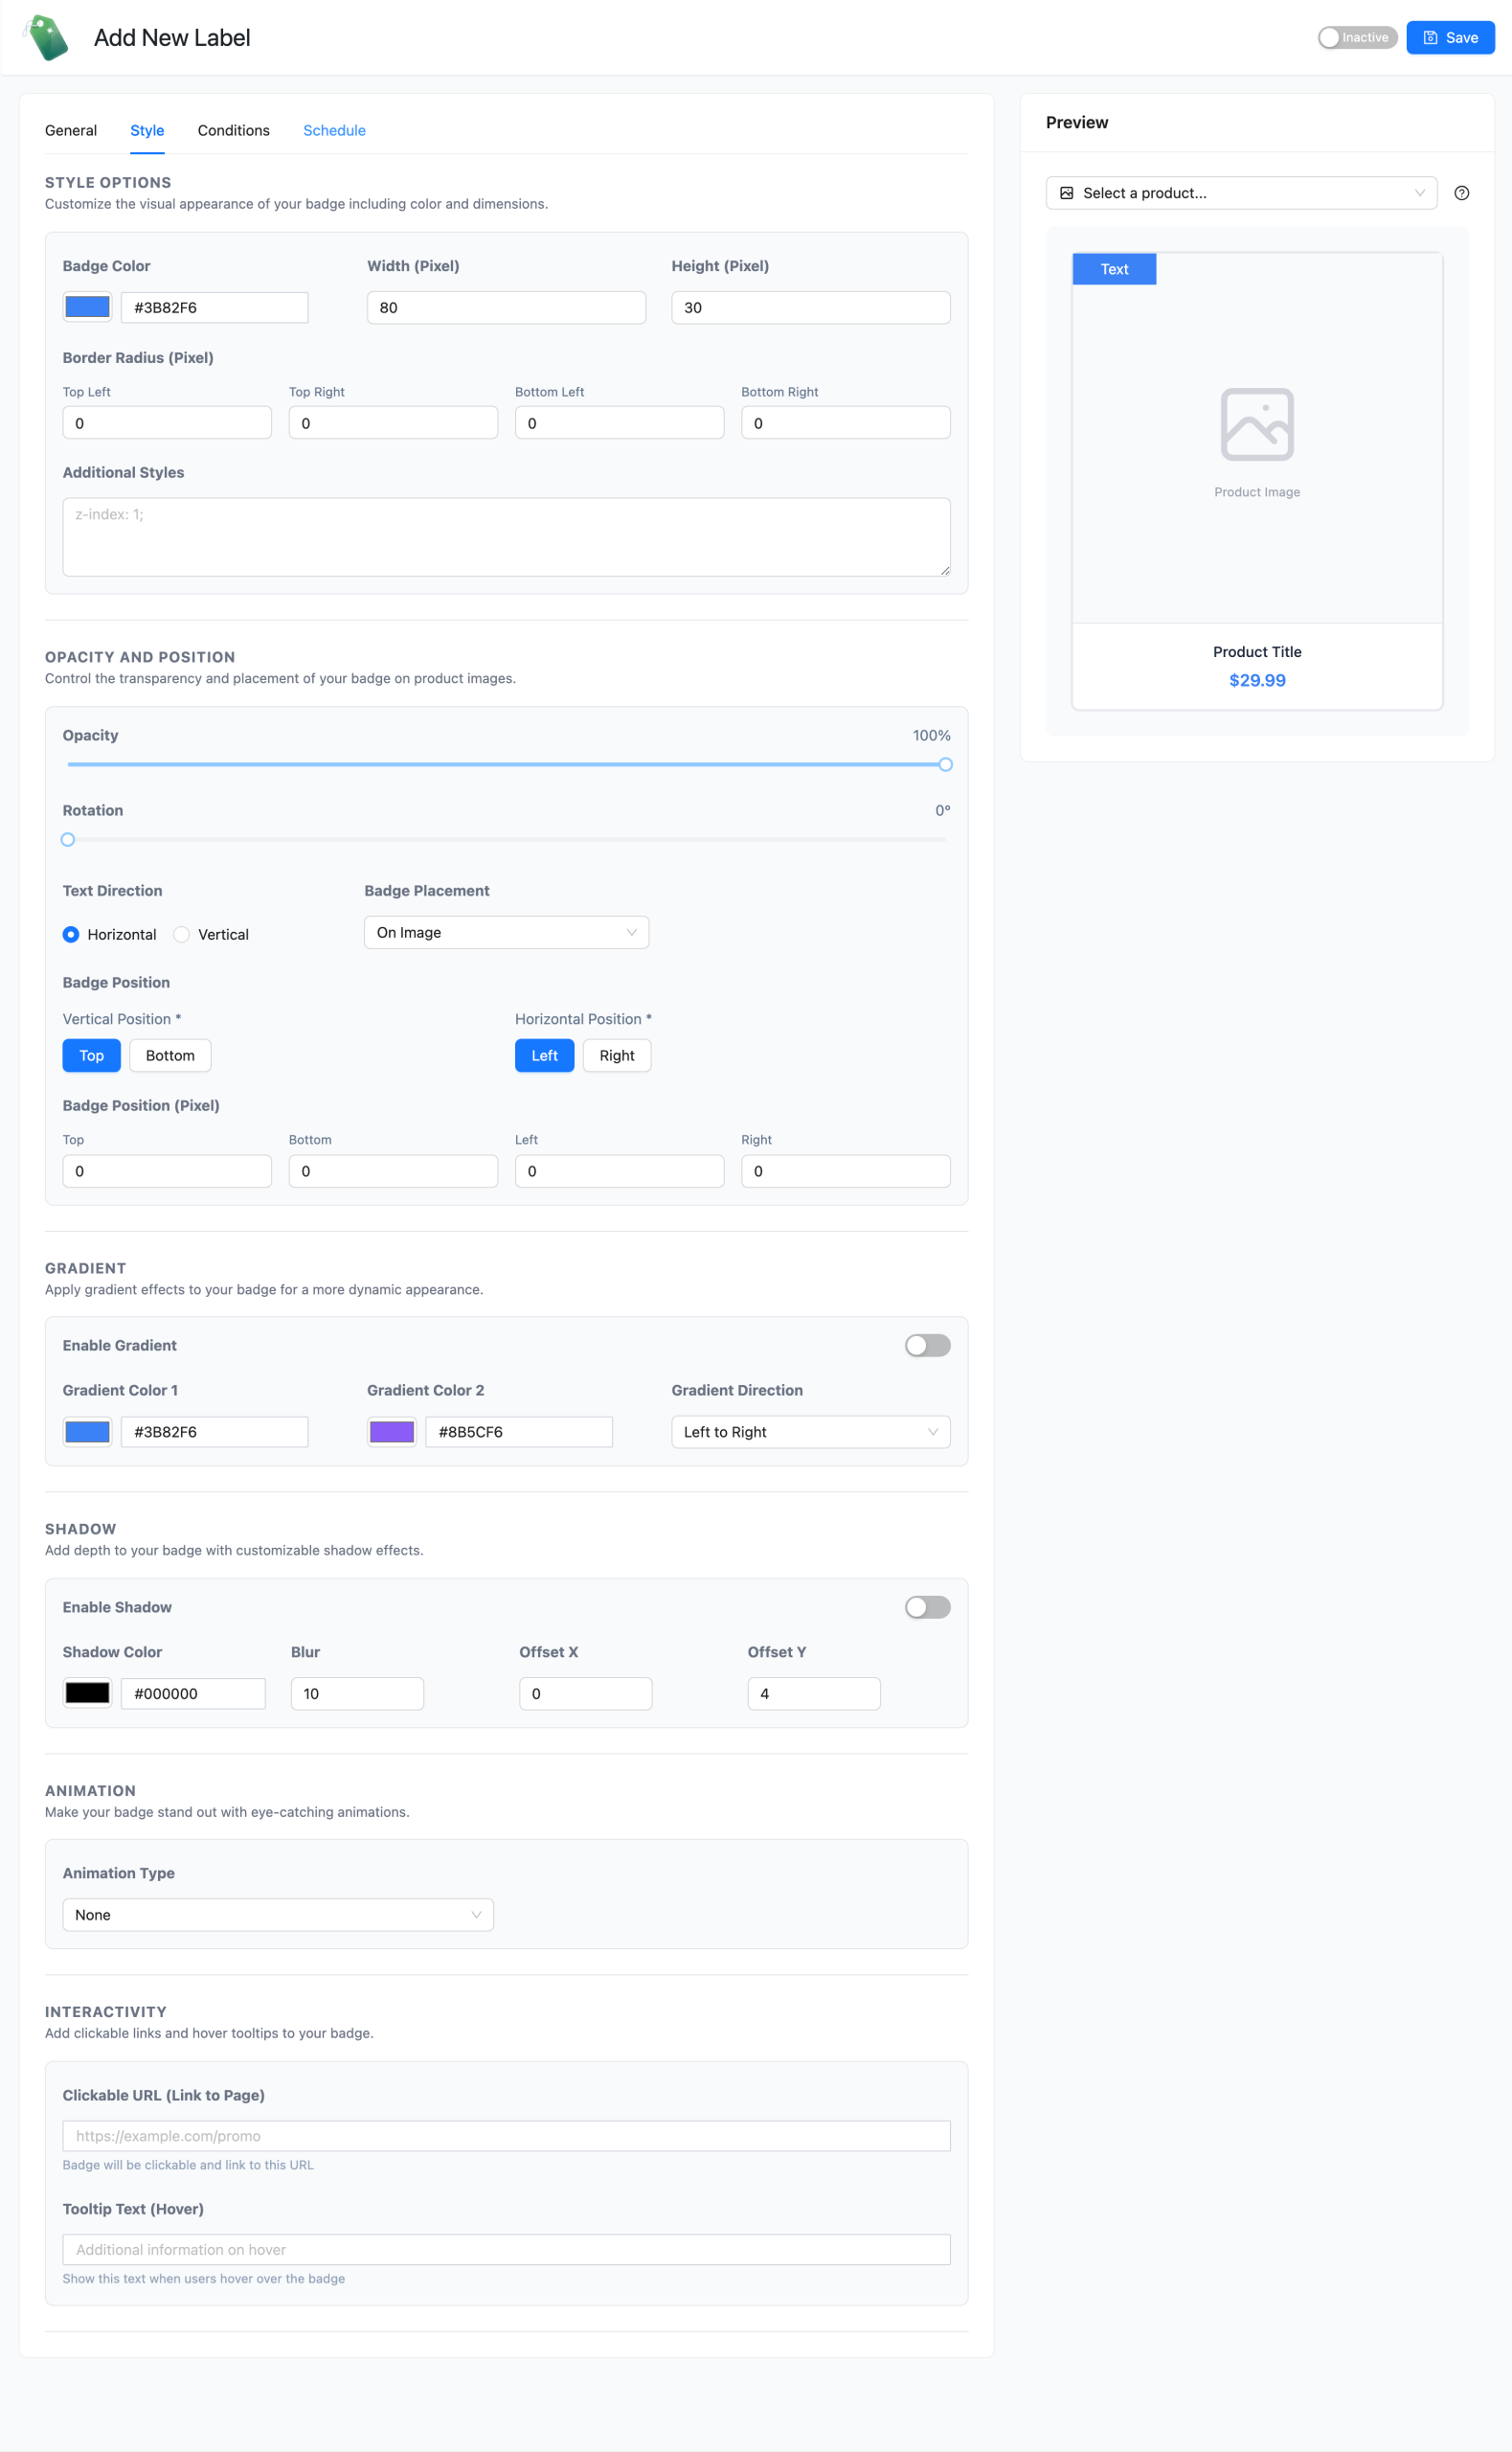
Interactivity
- Clickable URL (Link to Page): make the badge a link. Shoppers who click it go to the URL you enter.
- Tooltip Text (Hover): text that appears when a shopper hovers over the badge.
Step 4: set a schedule (optional)
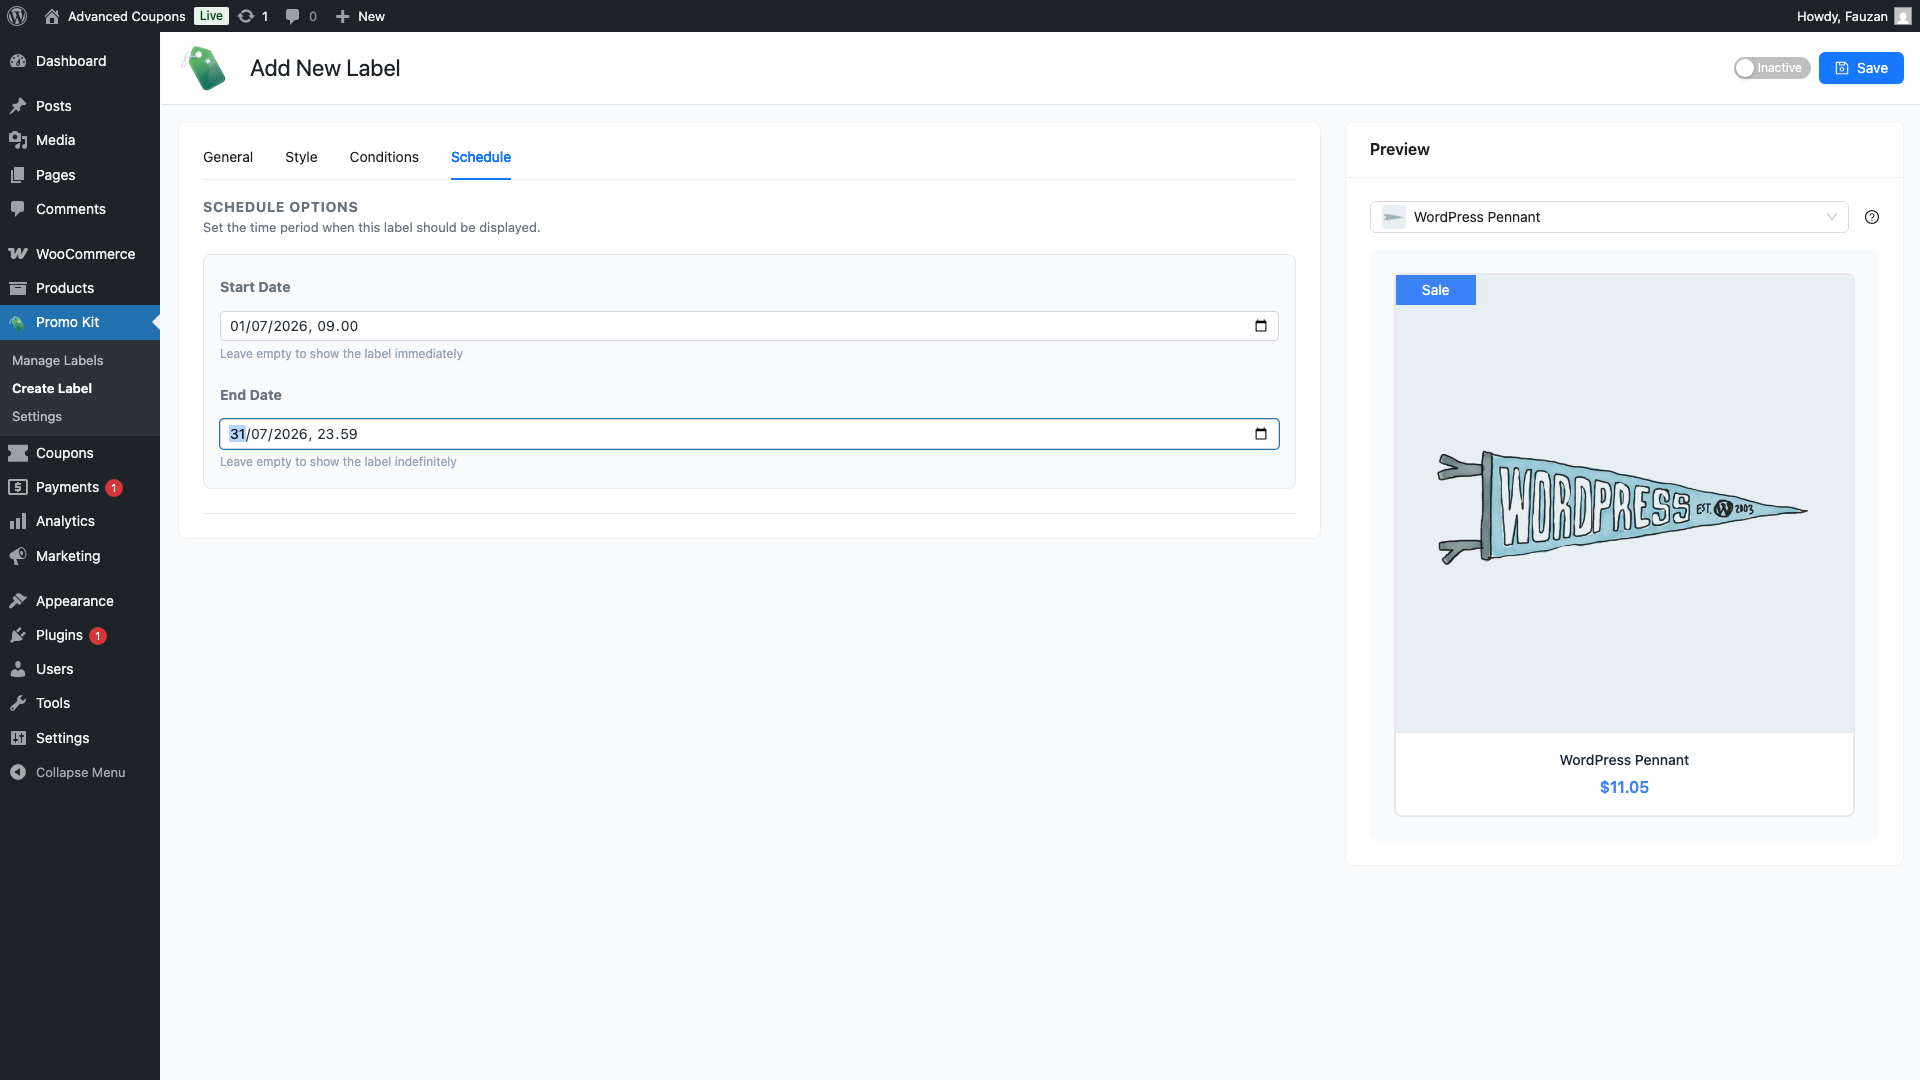
Click the Schedule tab if you want the label to appear only during a specific time window: for example, only during a weekend sale.
- Start Date: the date and time the label starts showing. Leave this empty to show the label immediately after saving.
- End Date: the date and time the label stops showing. Leave this empty to show the label indefinitely.
Step 5: save the label
Once you’re happy with your settings, click Save at the top of the screen. The label is created and will appear in your labels list. Set the toggle at the top of the screen to Active so the label shows on your storefront, because a new label starts inactive. You can edit it at any time by clicking it in the list.
Using the live preview
As you fill in the General and Style tabs, the live preview on the right side of the screen updates in real time. It shows a sample product with your label applied so you can see how it will look before saving.
The preview uses dummy product values. Dynamic variables like {discount_percent} will display the correct values for each real product in your store once the label is live.
Troubleshooting
The Create Label screen is covered by a licence message
Advanced Promo Kit needs an active licence. When the licence is missing or expired, the plugin covers the screen with a licence notice instead of letting you edit the label. Add or renew your licence key, then reload the page. The Style tab controls themselves are never greyed out, so a disabled-looking field is a browser or conflict issue, not a licence one.
The label does not show on the storefront
Set the toggle at the top of the Create Label screen to Active. A new label starts inactive. Then check display rules for that label. See How to set up label display rules and conditions in Advanced Promo Kit.
Frequently asked questions
How do I assign a label to specific products?
After saving a label, open the product you want to tag and find the Advanced Promo Kit metabox on the product edit screen. Build the label there. It applies to that product only and always takes priority over global labels. You can also use the Conditions tab when creating a label to automatically apply it to products that match criteria you define How to Set Up Label Display Rules and Conditions in Advanced Promo Kit: for example, all products in a particular category or on sale.
Can I use more than one label on the same product?
A product can have one product-specific label, plus any global labels whose conditions it matches. The Maximum Labels Per Product setting caps how many appear at once, and it defaults to 3. Each label has its own position settings, so you can stack or spread them across the product image.
My badge text looks cramped or cut off. How do I fix it?
Open the Style tab for your label and increase the Width (Pixel) and Height (Pixel) values. You can also reduce the font size under Text Options on the General tab. The default badge size is 80×30px, which suits short text, so longer labels including those that use dynamic placeholders need more room. A good starting point is 240 to 280px wide and 36 to 40px tall. Preview the result and adjust until the text fits comfortably.
Can I style labels differently on mobile?
No. Advanced Promo Kit does not have a separate mobile style panel. The same Style tab settings apply on every viewport. Control which products show a label with display rules, not with a device toggle. See How to set up label display rules and conditions in Advanced Promo Kit.
What’s next
- How to manage labels in Advanced Promo Kit
- How to set up label display rules and conditions in Advanced Promo Kit
- How to use dynamic content placeholders in product labels
- Advanced Promo Kit settings reference
Need help?
If you have a question or run into any issues, we’re here to help.
- Premium users: Open a support ticket
- Free users: Visit our community forum