WooCommerce remains a top choice among aspiring ecommerce store owners, thanks to its ease of use and flexibility. If you’re just starting out with setting up your store, you’re likely wondering about the best ways to list and organize your products. There are several WooCommerce product types you can choose from, depending on what your store offers.
In this article, we’ll walk you through the basics WooCommerce product types and how you can set them up. By the end, you’ll have a clear understanding of which types are best suited for your store, so you can set your store up for success from day one!
Ready to dive in? Let’s begin!
Types Of WooCommerce Products
WooCommerce allows you to choose from six default product types, depending on what you’ll sell in your store. Understanding each type will help you decide how to set up your listings to provide your customers with a seamless shopping experience.
Let’s take a close look at each one:
Simple product
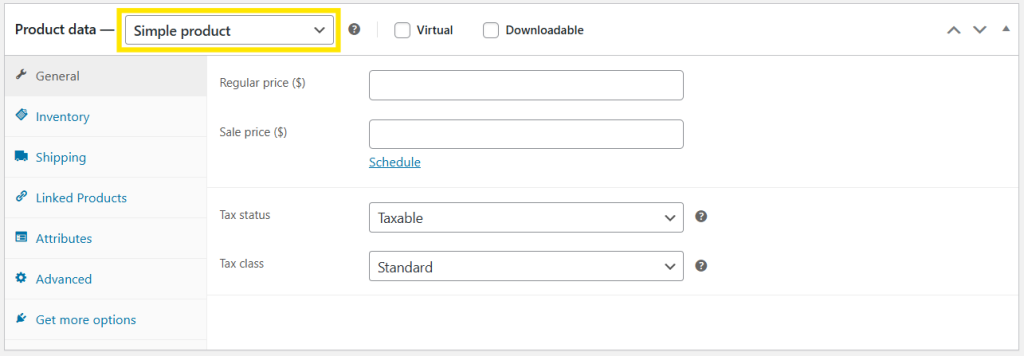
This is the most basic and straightforward product type in WooCommerce, and also the easiest to set up. Simple products are the perfect choice for individual products that don’t require variations or customization options, such as books or accessories.
Setting up simple products requires only a few key details, including the item name, price, description, and images. Additionally, WooCommerce allows you to configure relevant details like SKU (stock-keeping unit) numbers, shipping options, and inventory details.
Grouped product
Grouped products bundle related simple products together to provide a smoother shopping experience for customers. They’re great for setting up bundles and collections, such as kitchen tools or a skincare set.
Since they’re essentially a group of existing simple products, you don’t need to create new listings for each item–you simply select which products to include, letting customers view them on one product page.
With grouped products, shoppers have the choice to add each item to the cart individually or add all of them at once. This setup is perfect if you want to encourage customers to explore related items. It’s also an excellent strategy to increase average order values, as customers might be more inclined to purchase complementary products together.
External/Affiliate product
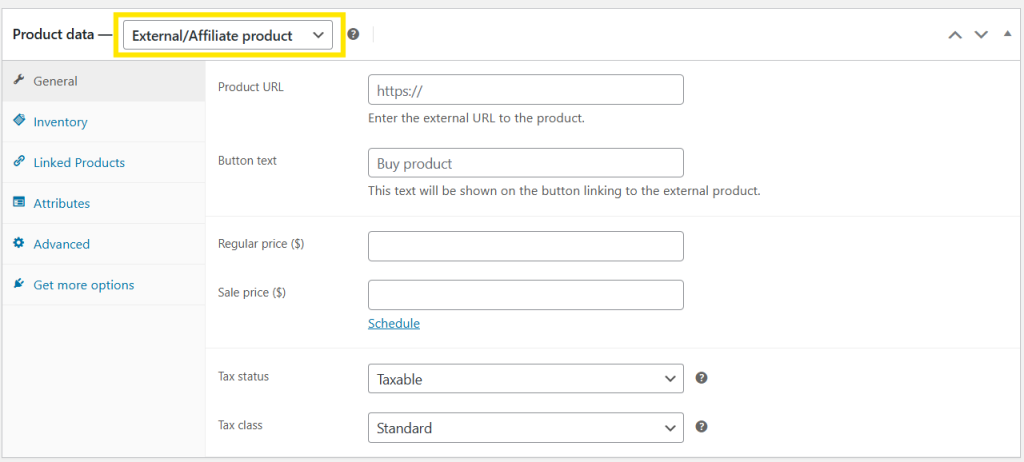
WooCommerce gives you the opportunity to sell and showcase products from other websites with the External/Affiliate product type. All you need to provide the product URL and button text, and customers will automatically be redirected to the external website to make their purchase.
Since the actual product showcased is already listed on the external website, there’s no need to add the usual product details required. However, you still have the option to do this.
This arrangement is perfect if you want to collaborate with other retailers and list affiliate products. It’s a smart way to expand your product offerings without shouldering extra inventory and fulfillment costs.
Variable products
If you’re offering items that come in different options or variations, you can set them up as Variable Products. This product type allows you to create a single product listing with multiple variations, such as a clothing item available in different sizes, colors, or materials.
When setting up Variable Products, you’ll need to configure product attributes (like size or color) and set up variations for each option. WooCommerce also gives you immense flexibility, allowing you to set a different price and stock levels for each variation.
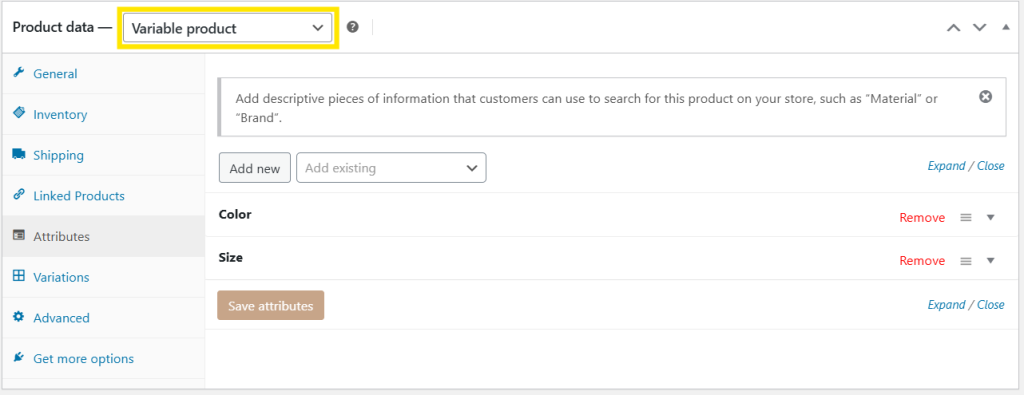
Setting up Variable Products can help you streamline the shopping experience as it allows you to display all variations of a product on one page. It also saves you time, reducing the need to create multiple listings for each variation of the product.
Virtual products
In some cases, store owners offer products that are “virtual” and don’t require shipping. Typical examples include consultation services, online courses, and software subscriptions. You can set these offerings up as Virtual Products in WooCommerce.
To do so, simply tick the “Virtual” option when creating a WooCommerce product. This option removes the Shipping tab from the configuration page. Since no shipping fulfillment is required for this type of product, you won’t need to add details for weight, dimensions, or shipping classes.
Downloadable products
Downloadable products allow you to list items that shoppers can immediately access after payment. These may include downloadable digital products like eBooks, printable resources, or music files.
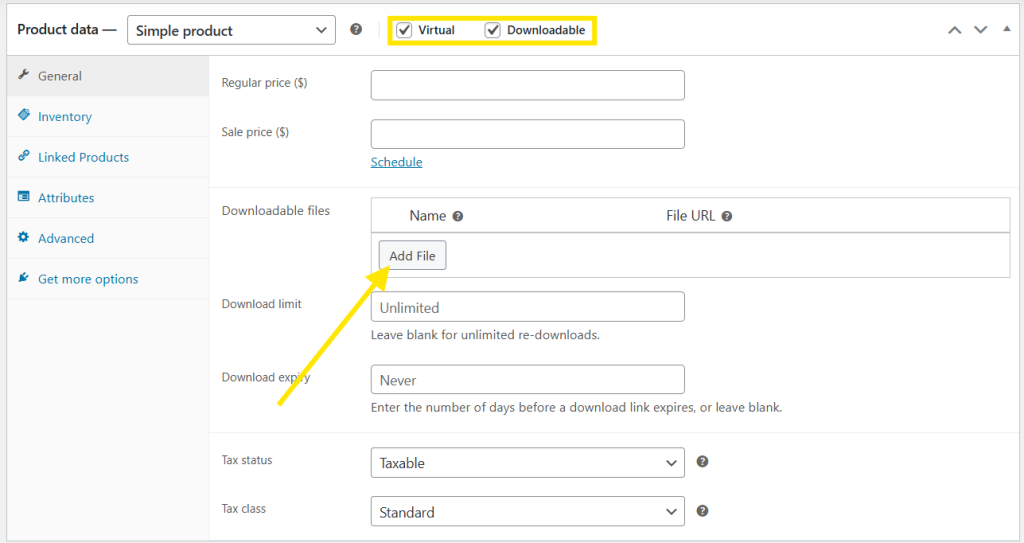
Configuring a downloadable product is simple–all you need to do is tick the “Virtual” and “Downloadable” options when creating a WooCommerce product. After doing so, you gain access to an “Add File” option, where you can directly upload the file. Additionally, you can set up settings like Download limits and expiry.
How To Add WooCommerce Products (Step-by-Step)
Now that we have an understanding of the default WooCommerce product types, you’re ready to add products to your store! In this section, we’ll walk you through the setup process.
Since each product type requires different configurations, we’ll focus on setting a simple product today to keep things straightforward. This is the best place to start, as simple products require minimal configurations while still covering the essentials. Let’s dive in!
Step 1: Create and name your product
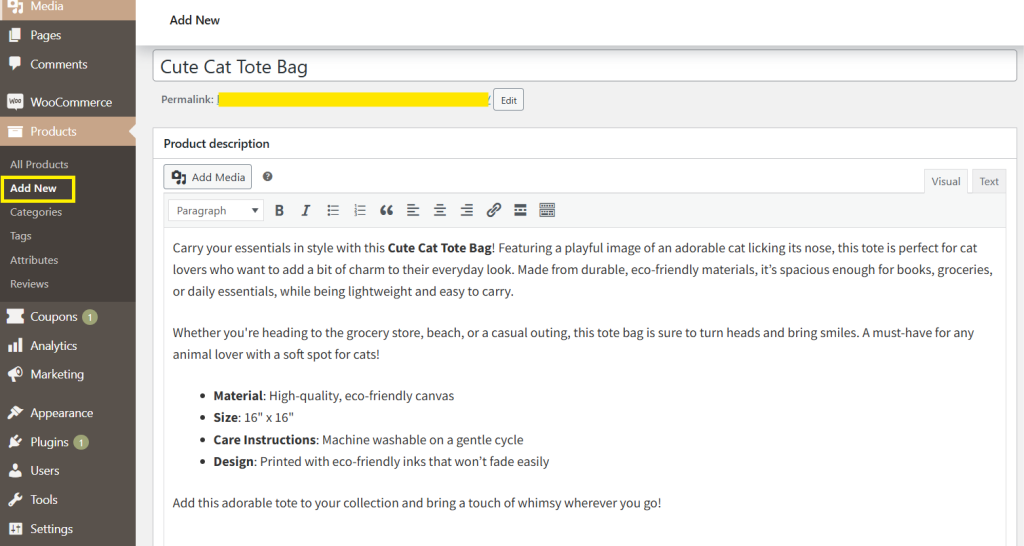
From your WordPress dashboard, head to Products > Add New. From here, you can input the Product Name and the Product Description. We recommend providing a detailed and informative description of your product to help customers visualize what they’re buying from your store.
After setting your product name and description, scroll down to product data and select “Simple Product” from the Product Type dropdown menu.
Step 2: Configure your product settings
After naming your product and choosing your product type, you can configure additional settings under the Product Data tabs. Let’s walk through each one below:
General
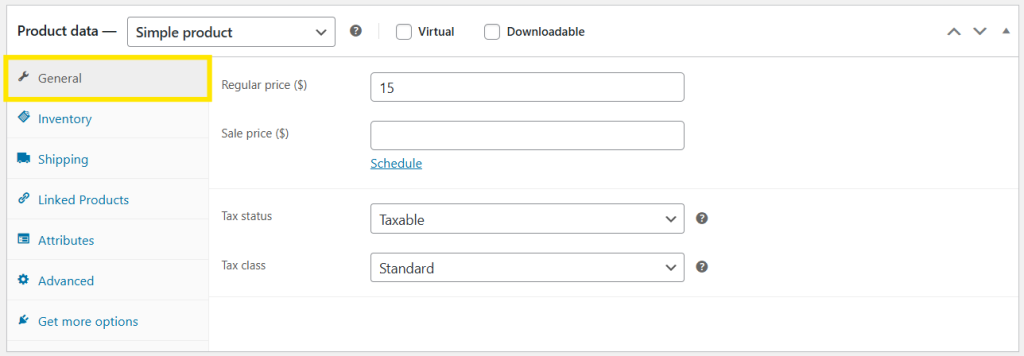
This is where you can set the price for your product, as well as add tax status and tax class. If you’re running a promotion, you can also add a Sale Price and schedule it for certain dates.
Inventory
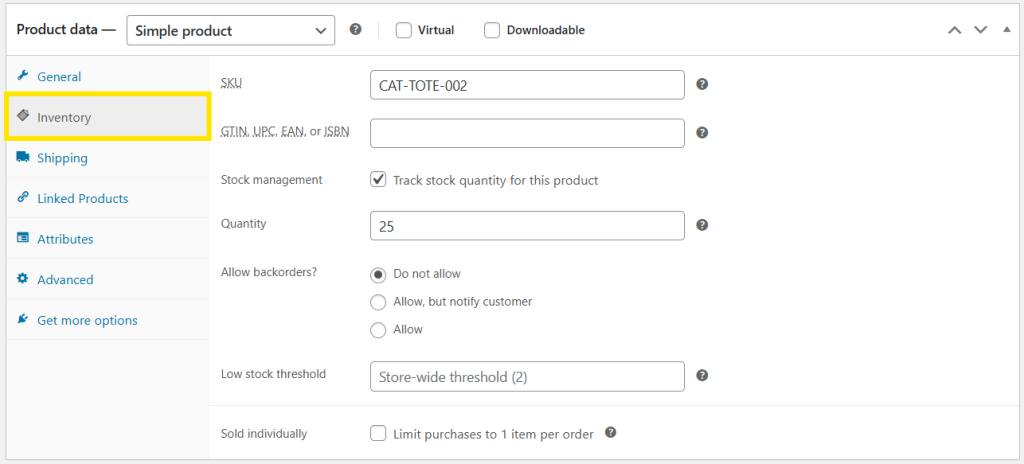
Under Inventory, you can assign a unique SKU (stock-keeping unit) to your product, set Stock Status, and enable Stock Management. This allows WooCommerce to track inventory details, allowing to input exact stock quantity and allow backorders. You can also mark items as “Sold Individually” to limit purchases to just one item per order.
Shipping
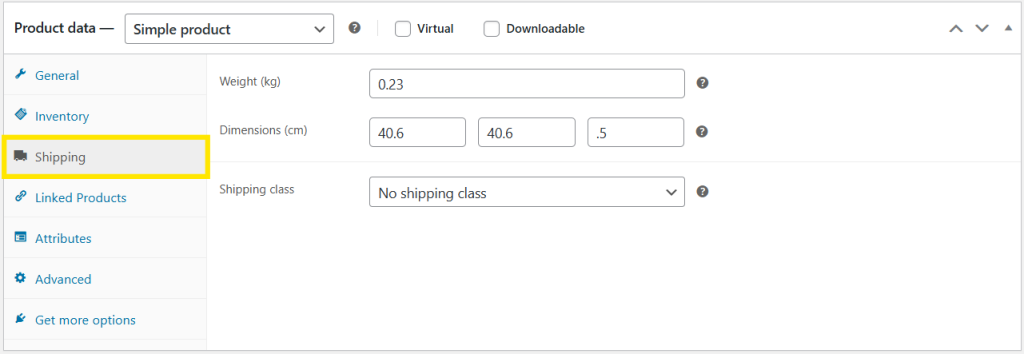
The Shipping tab allows you to set details like Product Weight, Dimension, and Shipping Class (if applicable, to group products with similar shipping requirements). This information helps WooCommerce calculate shipping costs accurately.
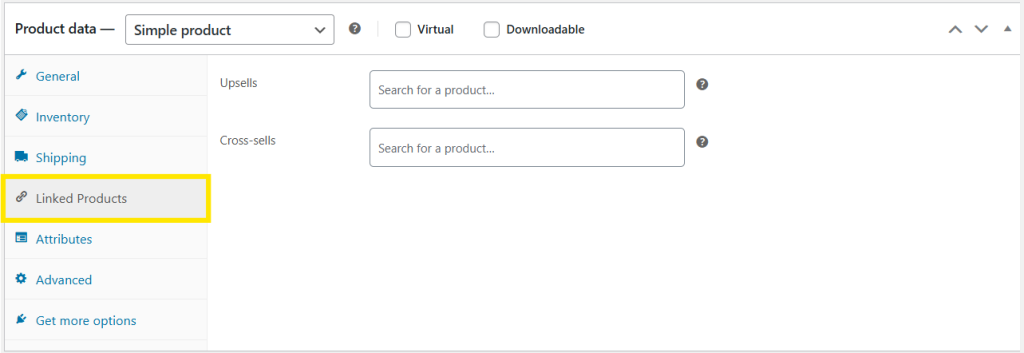
Linked products
This is where you can link related products and categorize them as Cross-sells (complementary products) and Upsells (higher-end/premium versions of the item). It’s handy for encouraging customers to add more to their carts, as linked products are displayed while they browse in your WooCommerce store.
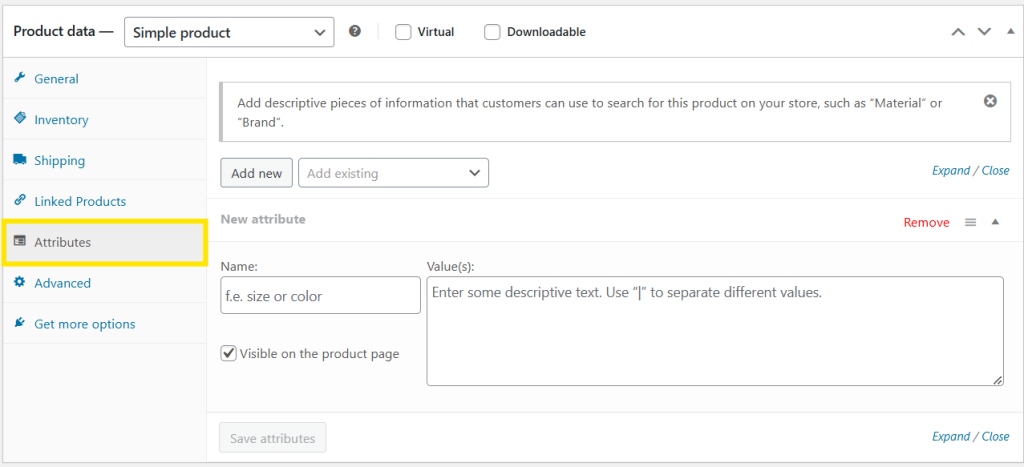
Attributes
Typically used for Variable Products, the Attributes option allows you to add specific details to your products, such as “Color” or “Brand.”
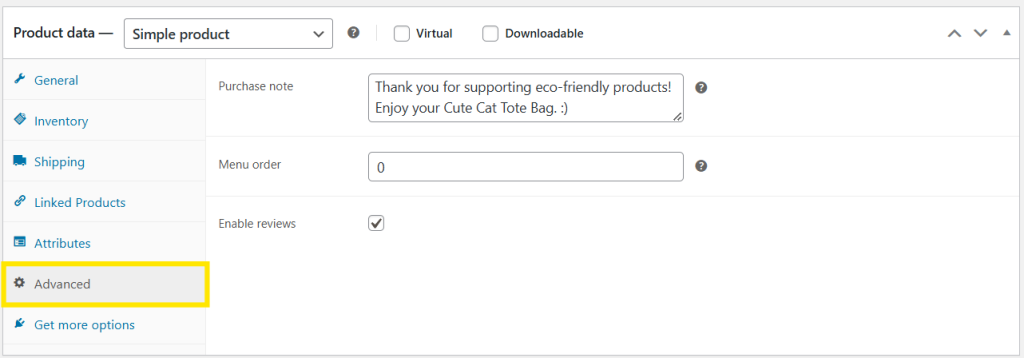
Advanced
In this section, you can configure additional optional settings like enabling Product Reviews and purchase notes, as well as the order where the item appears in your product catalog.
Make sure to go through all these settings to ensure that your product is configured properly.
Step 3: Finalize product details and upload images
Now that your core product details are set (yay!), it’s time to add the final touches.
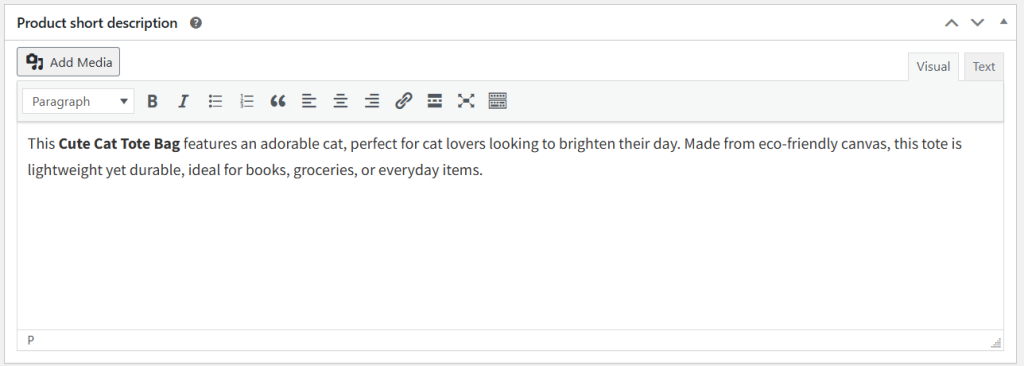
Scroll down from the Product Data tab and give your product a short description–this appears on top of the WooCommerce product page, giving customers a quick overview of the item. Highlight its key features and benefits, but keep it as concise as possible.
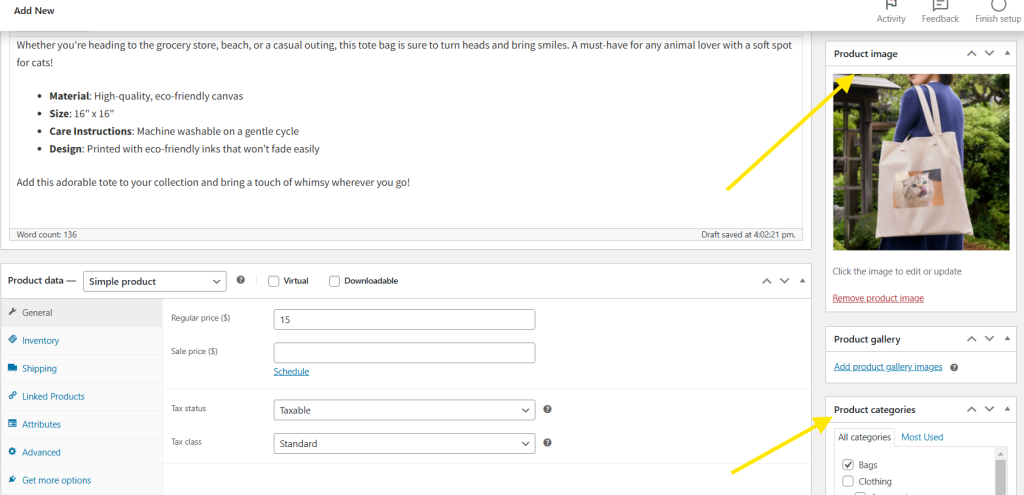
Next, don’t forget to upload product images! This is necessary if you want your listing to be visually appealing. To do so, click “Set Product Image” at the right-hand sidebar. You also have the option to upload multiple images in the Product Gallery to show additional views or close-up details of the item.
Finally, assign Product Categories and Tags to organize your products. Setting product categories makes it easier for your customers to search and filter related products, enhancing their overall shopping experience.
Once you’re satisfied with your settings, simply hit Publish.
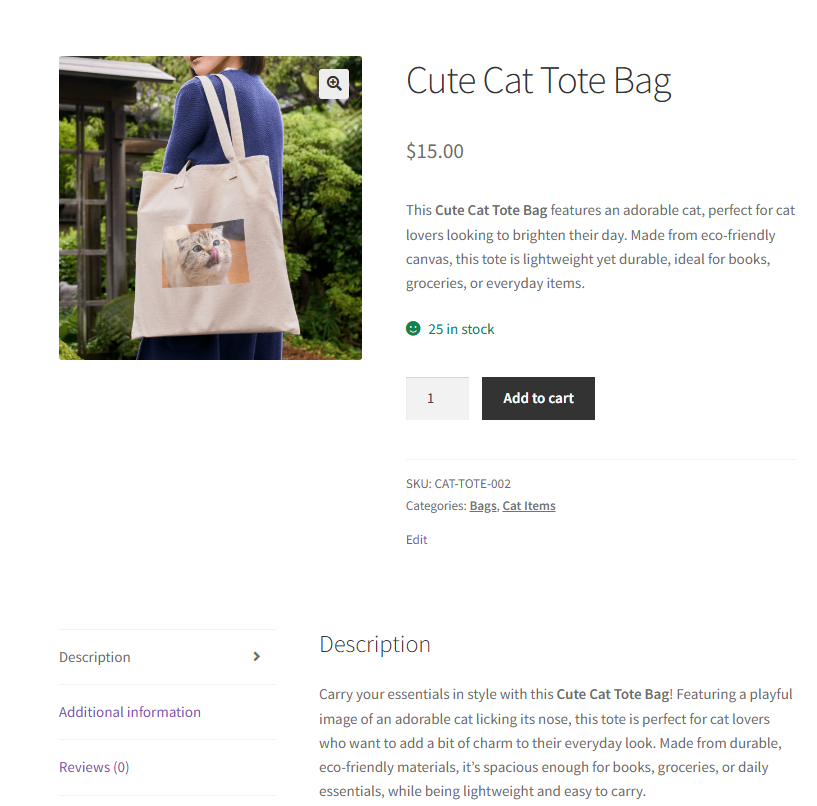
And that’s basically it. Congratulations, your product is now live and ready for customers to see! Take a look at how our product looks for customers:
Promoting Your WooCommerce Products
Of course, the work doesn’t end after successfully listing your products in your WooCommerce store. To attract customers, you need to run compelling promotions that will capture their attention and encourage them to add items to their carts.
Advanced Coupons make it easy for you to create irresistible promotions. This powerful plugin extends the default coupon functionality of WooCommerce, letting you run targeted deals like Buy One Get One offers, shipping discounts, and more. It also allows you to set specific cart conditions to determine how and when discounts should be applied.
Want to learn more about what’s possible with Advanced Coupons? Check out our getting started guide here!
Frequently Asked Questions
What are the different product types in WooCommerce?
There are six default WooCommerce product types, including: Simple Products (items with no variations), Grouped Products (collections of related items), External/Affiliate Products (items sold on external websites), Variable Products (items with multiple variations, such as size and color), Virtual Products (non-physical items like subscriptions and software) and Downloadable Products (digital items that can be downloaded).
How to check WooCommerce product type?
To check the product type of an existing WooCommerce product listing, navigate to your WordPress dashboard > Products > All Products. Click “Edit” on the product you want to check. Under the Product Data section, you’ll see the product type dropdown menu, indicating its current product type. This is also where you can change the product type, if needed.
How do I get the categories of products in WooCommerce?
You can view and manage WooCommerce product categories by heading to your WordPress dashboard > Products > Categories. This will take you to the Product Category settings page, where you can see a list of your existing product categories, make changes to them, or add new ones.
Conclusion
Understanding WooCommerce product types can you confidently create product listings that make shopping more convenient for customers. In this complete guide, we walked you through the default WooCommerce product types:
- Simple product
- Grouped product
- External/affiliate products
- Variable products
- Virtual products
- Downloadable products
Along the way, we also introduced you to Advanced Coupons–a powerful plugin that makes setting up compelling product promotions easier for WooCommerce store owners. With this tool, you can easily set up targeted product deals like BOGO, shipping discounts, and URL coupons.
We hope this guide helped you understand their key difference and aid you in choosing the right ones to set up in your store. If you have any questions about this topic, feel free to comment them down below!

