Maintaining an organized product catalog is a crucial part of ensuring a smooth shopping experience. However, this can be challenging if you’re selling multiple versions of the same item. How do you keep things tidy without creating separate listings for every variation? This is where WooCommerce variable products come in!
WooCommerce variable products allow you to set up multiple versions of the same item within a single product page. It’s a smart and practical way to give shoppers more choices while keeping your listings organized. Best part? They’re pretty straightforward to manage and set up!
We’ll lay down everything you need to know in this guide. So, let’s get right into it!
What Are WooCommerce Variable Products?
Have you ever shopped online and selected a particular color or size before adding a product to your cart? WooCommerce variable products work exactly the same way–it lets you offer multiple variations of a single item in one listing.
Depending on the types of products you’re offering, variations can include options like size, color, material, or brand. No need to create a separate listing for each–variable products allow you to manage everything from one place!
WooCommerce also allows you to customize each variation’s price, SKU, stock level, and other key product settings. This makes it easy to offer options while keeping your product catalog neat. You might create variable products if you’re selling:
- Clothing items with different sizes (S, M, L)
- Bags that come in various materials like leather or canvas
- Candles that come in different sizes
- Phone cases in different colors (Pink, Blue, White)
How To Set Up WooCommerce Variable Products
Before we create our first variable listing, we need to understand two important concepts in WooCommerce: product attributes and variations.
- Product Attributes: These are “characteristics” that describe your product, such as size, color, material, or brand. They define the options shoppers can choose from.
- Variations: These are the combinations of attributes you’ve set. For instance, if you offer a shirt in three sizes (S, M, L) and two colors (Pink, White), WooCommerce can generate six variations like Small / Pink or Medium / White.
They might seem tricky at first, but they’re actually pretty straightforward to set up. Let’s walk through the step-by-step process together!
Step 1: Create your product attributes
The first step is to create the attributes you’ll use for your variable product. Think of them as the “building blocks” for your variable product–they allow you to define the different choices shoppers can make, such as size, color, or material.
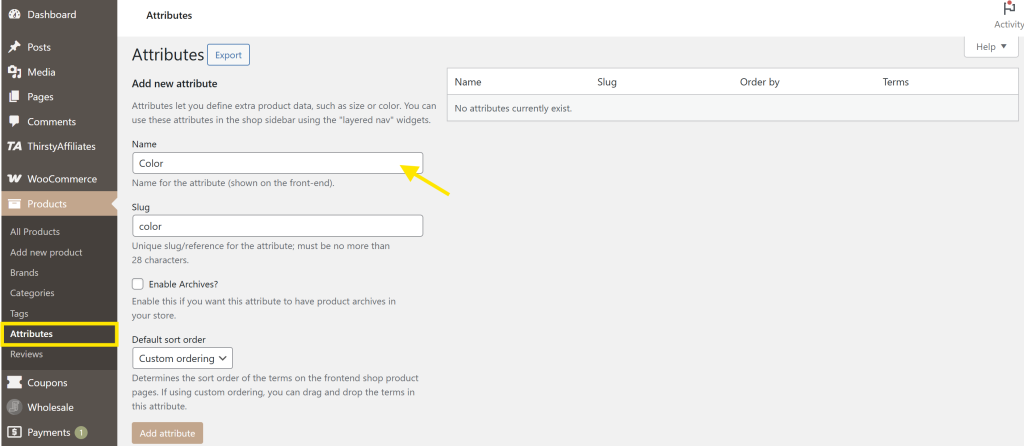
From your WordPress dashboard, head to Products > Attributes. Under the “Add new attribute” section, you can enter a name and slug for your attribute (for example, “Color”). Then, click the “Add Attribute” button.
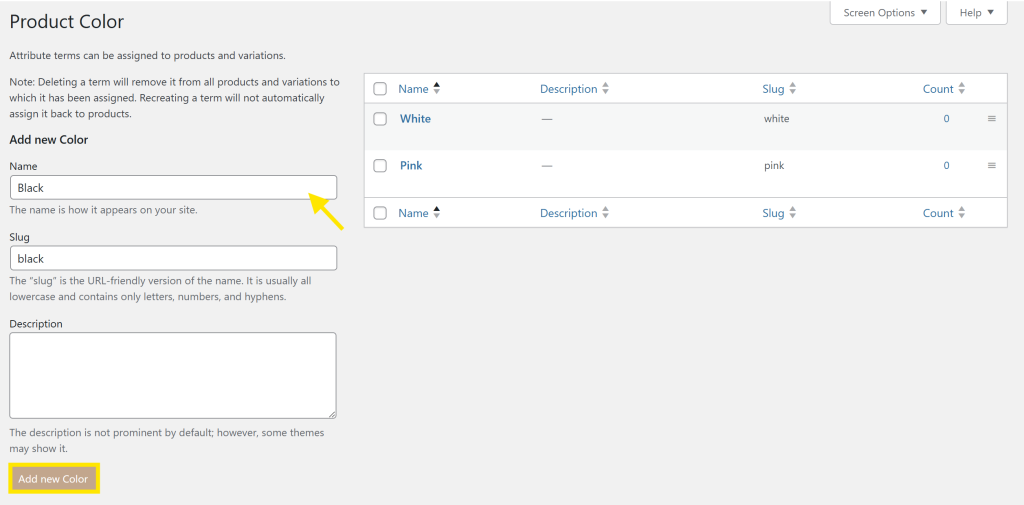
Your newly created attribute will now appear in the attribute table on the right. Click “Configure terms” to add your options.
In the example below, we’re adding colors like Pink, White, and Black.
You can add as many terms as you need and repeat this process for all the attributes you want to create.
📝 POWER TIP: You can also create custom attributes directly within the product page, but setting them up globally (like we did here) allows you to use them across all your products. Want to learn more? Check out our complete guide about setting up product attributes here!
Step 2: Create your WooCommerce variable product
Now that we’ve set up our product attributes, it’s time to create your actual product listing.
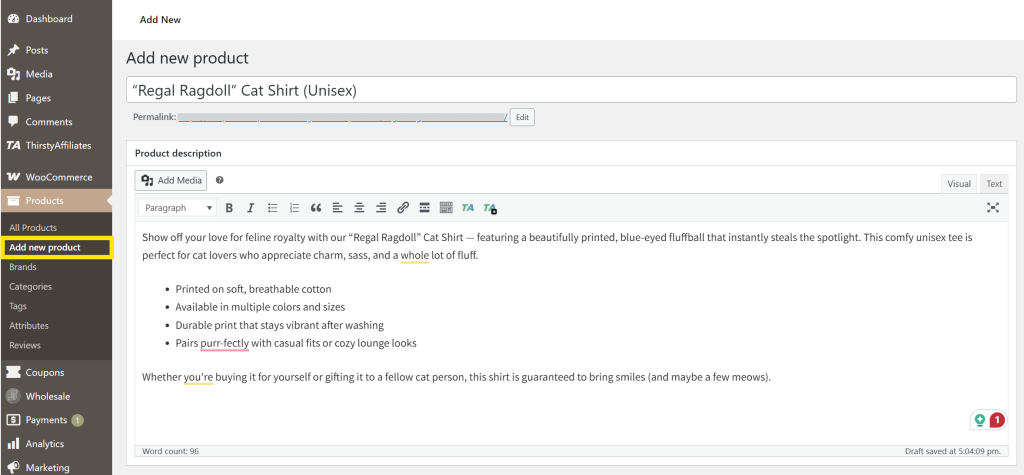
To do so, head to Products > Add New Product. Enter your product name, write a short and long description, and upload images as you normally would.
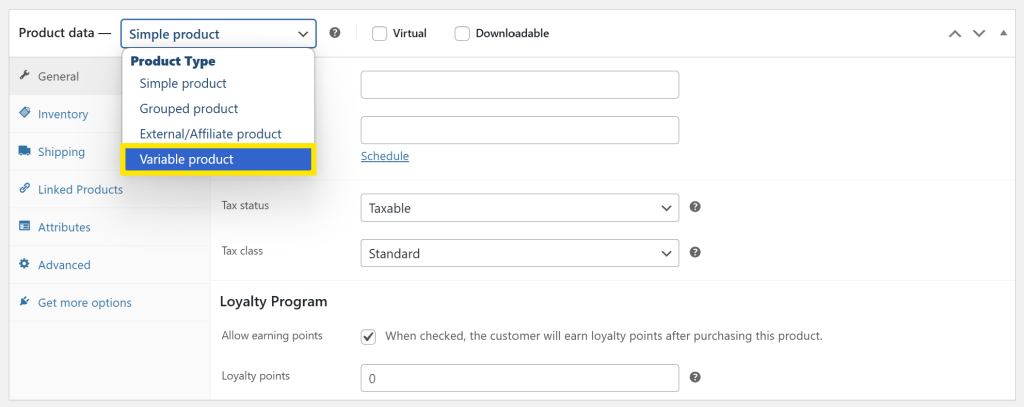
Once the basic details are in place, scroll down to the Product data panel and select “Variable product” as the product type.
You’ll notice that this action unlocks the Variations tab, which we’ll configure in the next steps.
🎯POWER TIP: You can use AI-powered tools like StoreAgent to automatically generate SEO-optimized product descriptions for you! It’s a great way to save time and ensure your listings are optimized for search.
Step 3: Assign attributes to your product
Remember the attributes we set earlier? We’ll use them here!
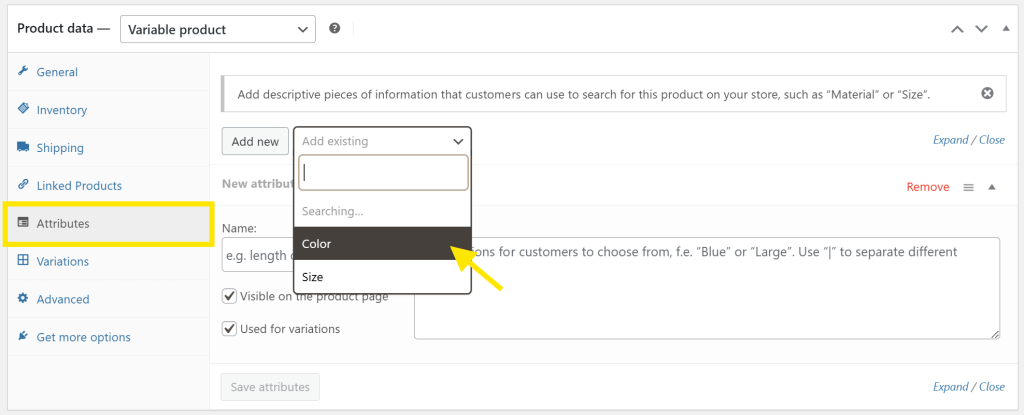
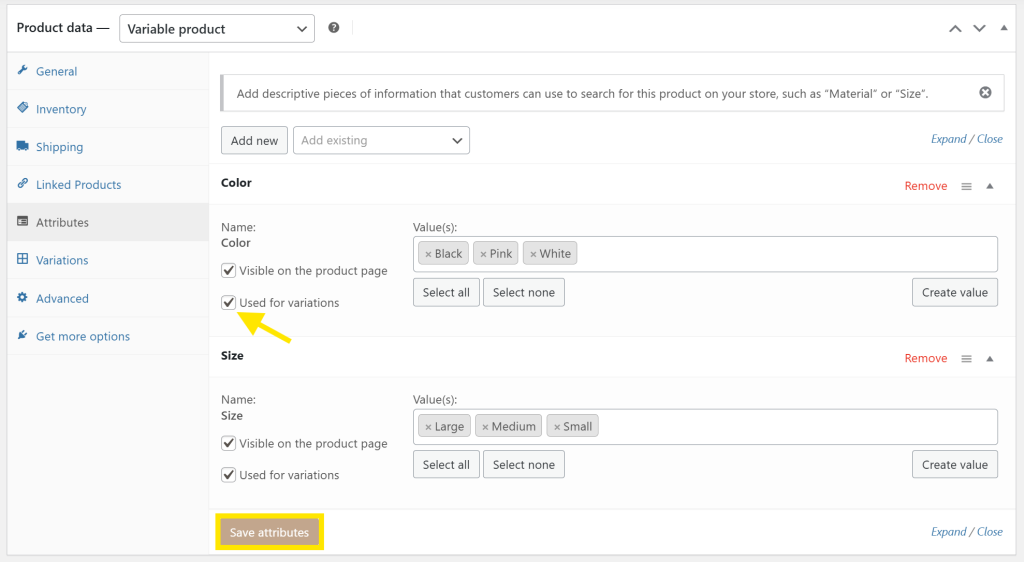
Head to the Attributes tab. From the dropdown, select an existing attribute like Color, then click Add. In the Value(s) field, select the colors available for your product (e.g., Pink, White, Black).
Repeat the process for other applicable attributes. In this example, we’ll also add Size (Small, Medium, Large).
🔔 IMPORTANT: Tick the box that says “Used for variations”–this allows WooCommerce to use these attributes to create product variations in the next step.
Once you’ve added all the attributes applicable to your product, hit “Save attributes.”
This step tells WooCommerce which combinations it can generate so your customers can choose from options like Pink / Medium or Black / Large. So, let’s configure that next!
Step 4: Generate your product variations
Now that we’ve selected the attributes for our product listing, it’s time to generate our product variations! Basically, they’re the “combinations” shoppers will see on the product page.
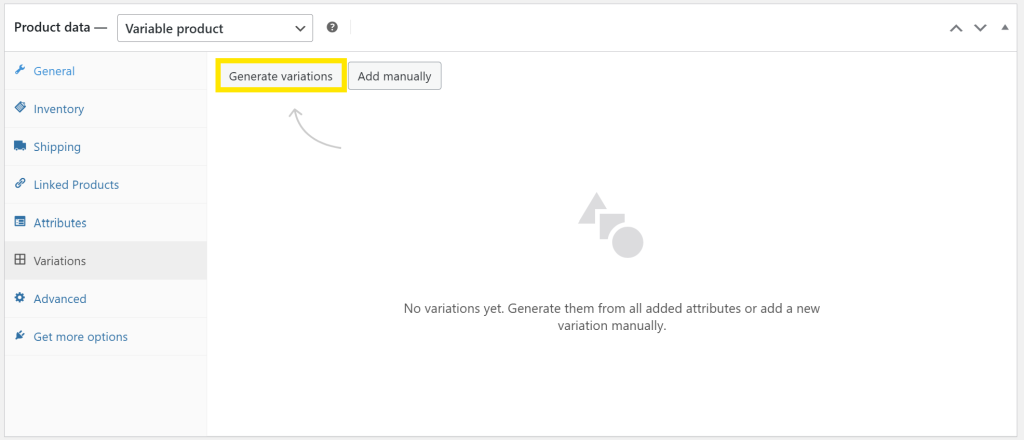
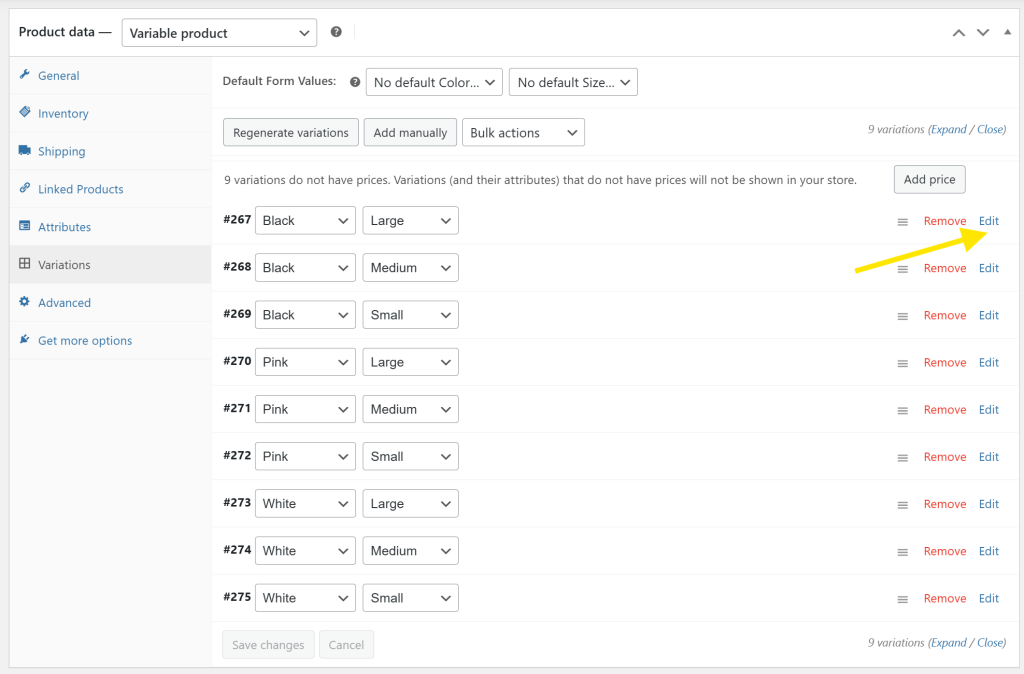
To do this, head to the Variations tab and click “Generate variations”–this option automatically generates all possible combinations of your attributes.
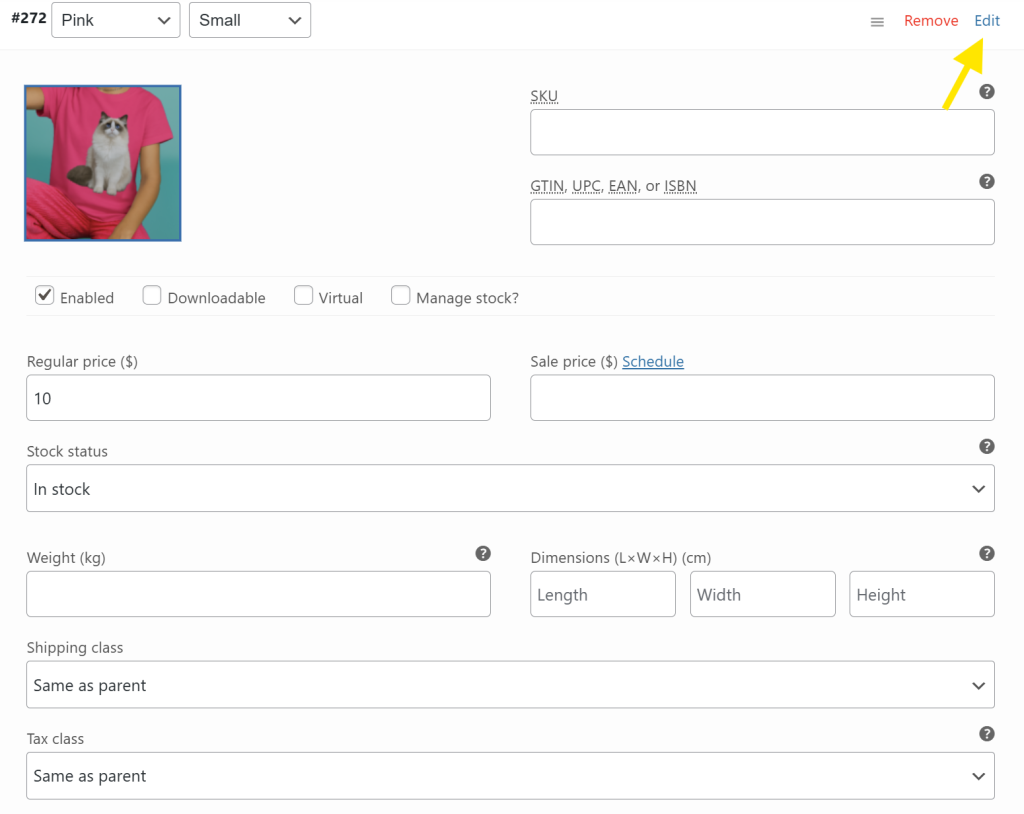
Once generated, you can edit each variation individually by clicking the “Edit” button.
Here, you can:
- Upload a specific product image
- Set a unique price
- Enter an SKU
- Adjust stock settings
- Choose whether it’s downloadable or virtual
📝 NOTE: If your selected product does not offer every possible combination, you can choose to add available variations manually. Simply click “Add manually” and select the attributes available. This option is particularly useful if, for instance, certain product colors are available only in set sizes.
Step 5: Review and publish your product!
We’re almost there! Before hitting that “Publish” button, let’s give everything a quick review:
- Make sure that all variations have prices set (WooCommerce won’t display a variation without a price)
- Double-check images and descriptions
- Verify stock levels, SKUs, and any unique settings for each variation
- Preview your product page!
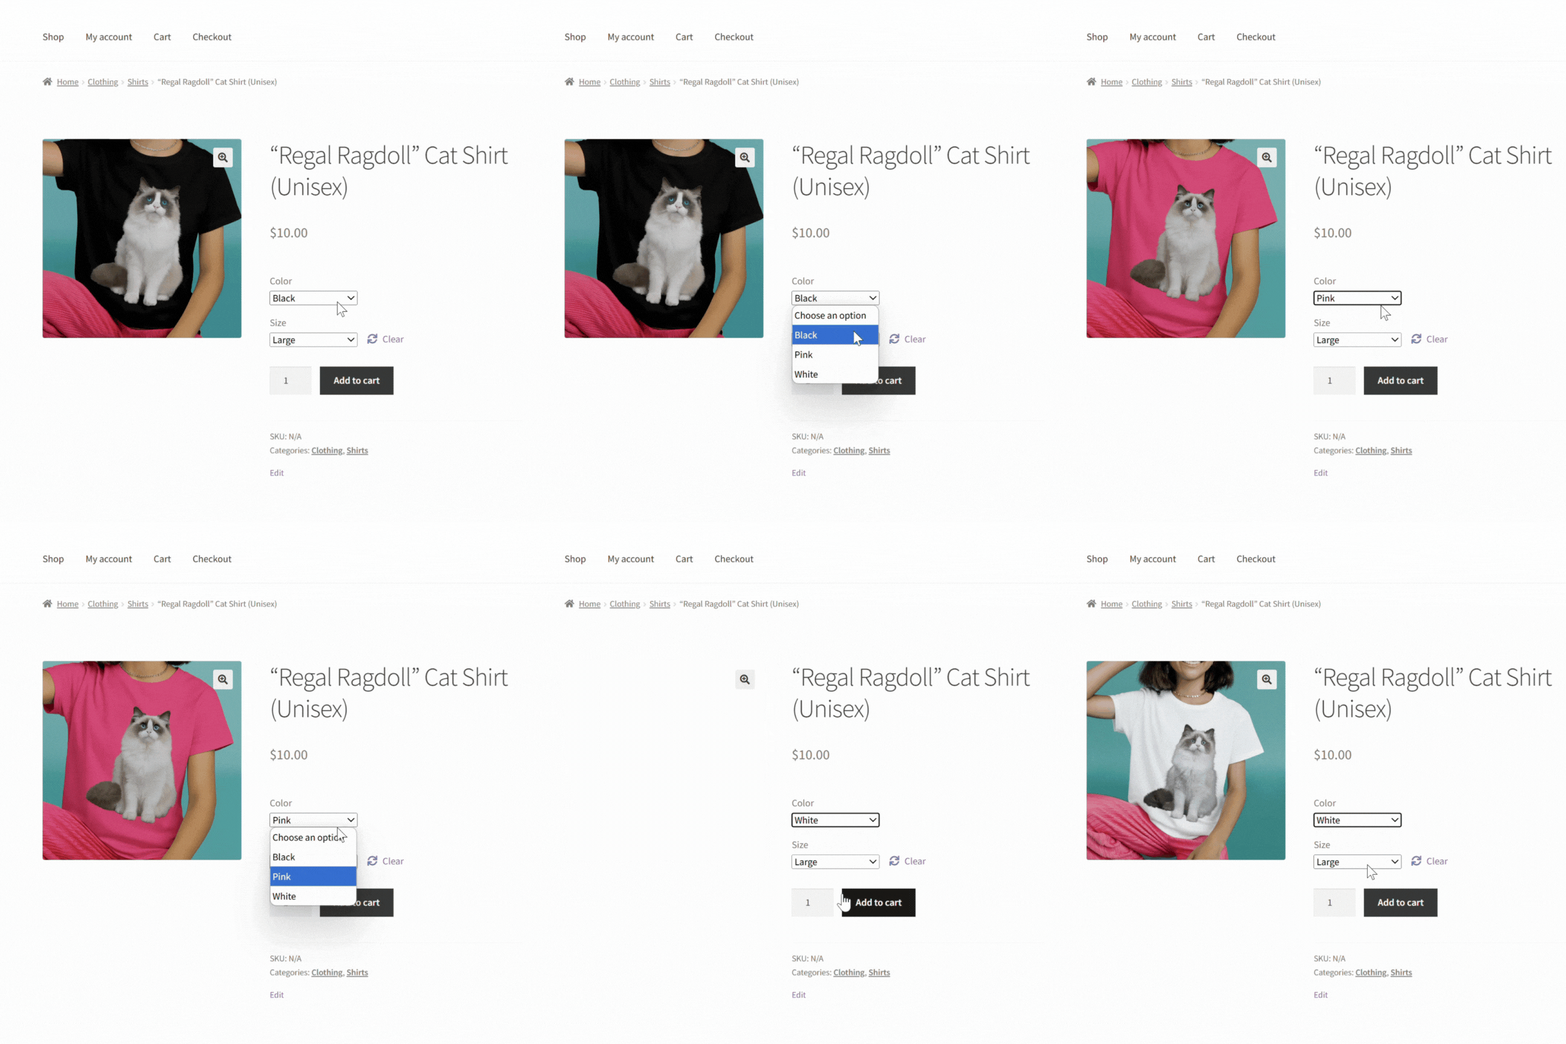
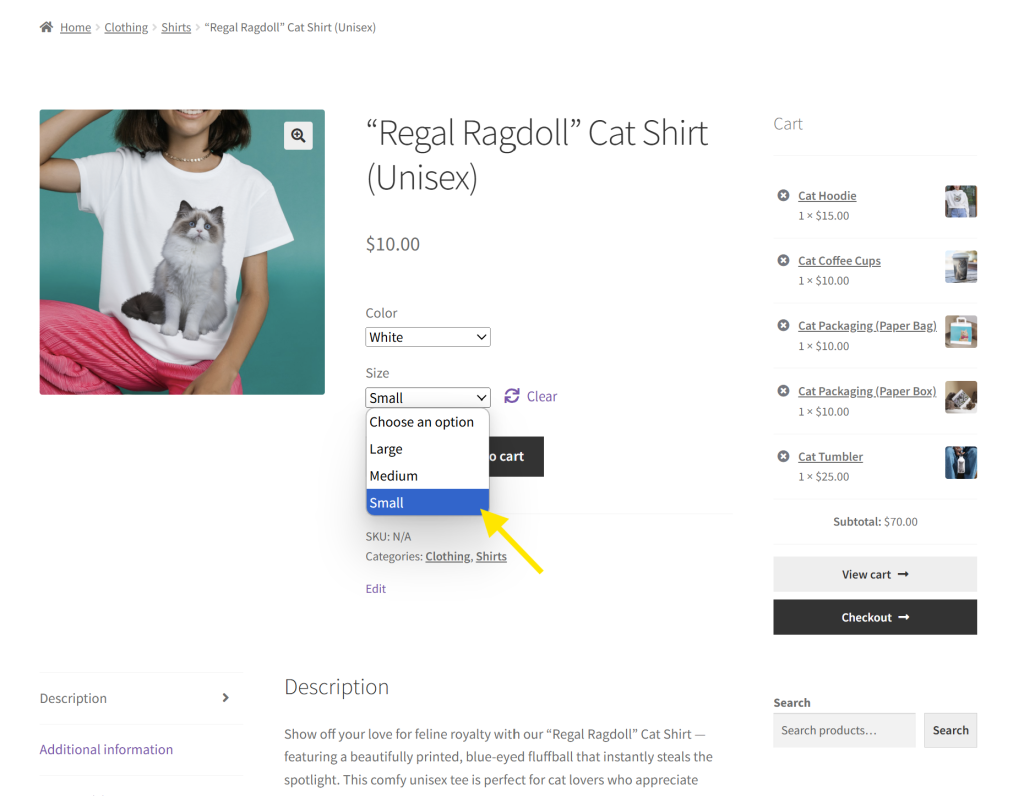
If you’re satisfied with how it looks, go ahead and click that “Publish” button! Take a look at how it looks for customers:
That’s basically it! You’ve learned how to create WooCommerce variable products. 🎉
🎯POWER TIP: Want to push slow-moving stock or run targeted sales? With Advanced Coupons, you can create promotions based on product attributes. For example, you can offer a discount only on a specific color variant. Learn more here. 👉

Frequently Asked Questions
What is a WooCommerce variable product?
WooCommerce variable products allow you to offer different versions of the same item within a single product listing. For example, if you’re selling a t-shirt that comes in different sizes and colors, you can display all the options on one product page. Customers can simply choose their preferred size and color before adding the item to their cart.
How do I add variations to my product in WooCommerce?
To add variations to a product, set up product attributes first. You can do so globally by heading to your WordPress dashboard > Products > Attributes, or directly from the product page.
Make sure you’ve selected “Variable product” as the product type. Once you have your product attributes, assign them to your product under the Attributes tab, then use the Variations tab to generate all possible combinations. You can edit each product variation individually and set custom images, prices, stock levels, and more.
What is the difference between simple product and variable product in WooCommerce?
Simple products are single items with no additional options–they don’t come in different sizes, colors, or styles. WooCommerce variable products, on the other hand, lets you offer multiple versions of one item. Shoppers can choose their preferred variation, such as size or color, directly on the product page before adding it to their cart.
Can I create discounts based on WooCommerce product variations?
Yes! With Advanced Coupons, you can create targeted promotions based on product attributes. For instance, you can offer discounts only for specific colors or brand. This is perfect for seasonal sales and clearing out inventory.
Conclusion
Setting up WooCommerce variable products can be particularly helpful if you’re offering different versions of the same items. With this WooCommerce feature, you can give your shoppers more choices while keeping your product listings organized and easy to browse! In this helpful guide, we discovered how to set them up in just five key steps:
- Set your product attributes
- Create your WooCommerce variable product
- Assign attributes to your product
- Generate product variations
- Review and publish your product
And if you’re looking to run smarter, more targeted promotions, Advanced Coupons lets you create discounts based on product attributes! It’s a great way to run targeted promotions if you want to move specific items and make way for new inventory.
We hope this guide helped you out! Do you have any questions about WooCommerce variable products? Let us know in the comments. We’ll do our best to help!


