
User Experience (UX) is an important element in building a successful WooCommerce store. In fact, one of the leading causes of shopping cart abandonment is when shoppers face frustrating issues during checkout.
Fortunately, offering coupons and discounts to your customers doesn’t have to turn into a conversion killer. The Advanced Coupons for WooCommerce plugin has a great feature that can help reduce abandonment by providing a one-click discount coupon button at the checkout.
In this article, we’ll show you how to configure ‘One-Click Apply Notifications’ in WooCommerce. Then, we’ll discuss how this can improve your overall customer experience. Let’s get to it!
How One-Click Apply Coupons Can Improve Checkout Experience In WooCommerce
Something that is well known is that just about anything that frustrates a shopper during check out is likely to lead to an abandoned cart scenario.
The corollary being that anything that delights your customer should reduce abandonment.
When it comes to your coupons, we want to make the process as seamless as possible and provide as much user feedback as possible.
The typical process look like this:
- The customer gets an email with a coupon offer
- They shop on your store and go to the checkout
- They have to remember the coupon and then find the checkout field and type or copy+paste the code manually
- The coupon is granted and the customer (hopefully, if they haven’t abandoned by now) proceeds with the checkout
But using one-click apply coupons in WooCommerce will help improve that process:
- Customer gets an email with a coupon offer
- They shop on your store and go to the checkout
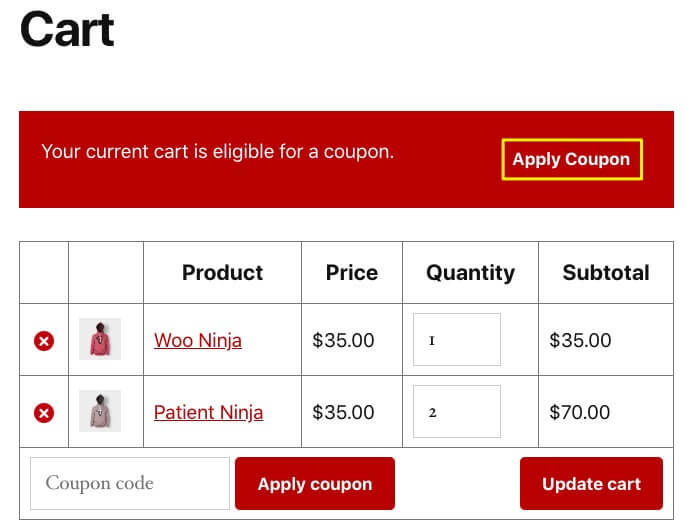
- When they get to the checkout they see a notice saying they’re eligible for the discount and there is a button to click which applies the coupon for them without typing
Making coupons difficult to apply is an unnecessary frustration that can lead to cart abandonment. You can resolve that particular problem easily with Advanced Coupons one-click apply notification feature.
How to Enable One-Click Apply Notifications With Advanced Coupons (In 4 Steps)
Offering coupons can sometimes be a cumbersome process during a particularly critical point in the checkout process.
Let’s look at how Advanced Coupons can help in just four steps using a feature that shows the customer a WooCommerce notice when they are eligible for a discount.
1. Install and activate the Advanced Coupons Plugin
To get started, you’ll need to choose a pricing plan and download the Advanced Coupons for WooCommerce plugin.
Once you’ve downloaded the files, you’ll need to visit your WordPress dashboard to install and activate the plugin. This will seamlessly integrate new features into your current WooCommerce installation.
2. Set-up a new coupon
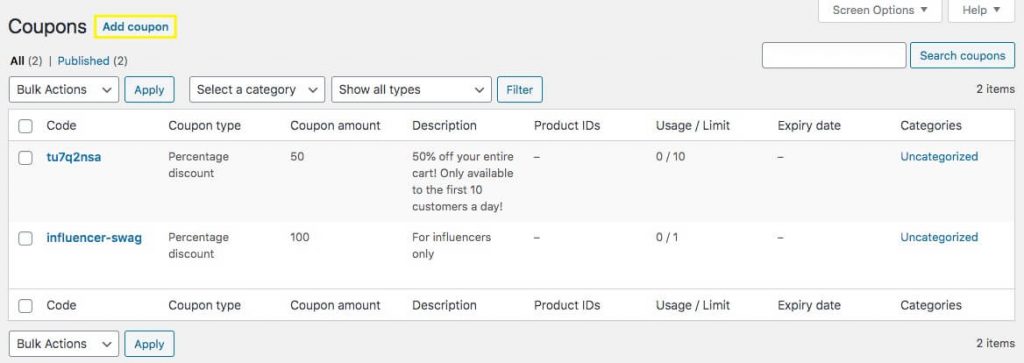
Before setting up the conditions for your one-click notification, you’ll need to make sure you have an active coupon to use. To create a new one, go to WooCommerce > Coupons > Add coupon:
After naming your coupon and completing the General settings, which includes the worth of the coupon, you’ll want to click on Usage restriction to define when customers will be notified of the coupon:
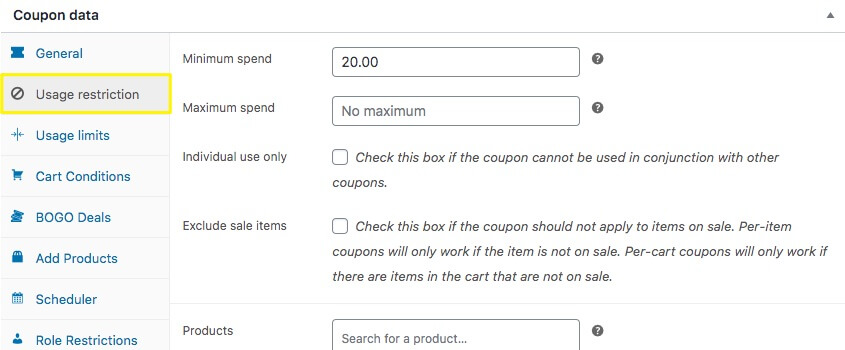
For our example, we’ll set a minimum spending requirement of $20. That means our coupon will be usable if the shopper has at least $20 of products in their cart at checkout.
You can also use the Cart Conditions settings panel to set up the parameters that need to be met for the coupon to appear:
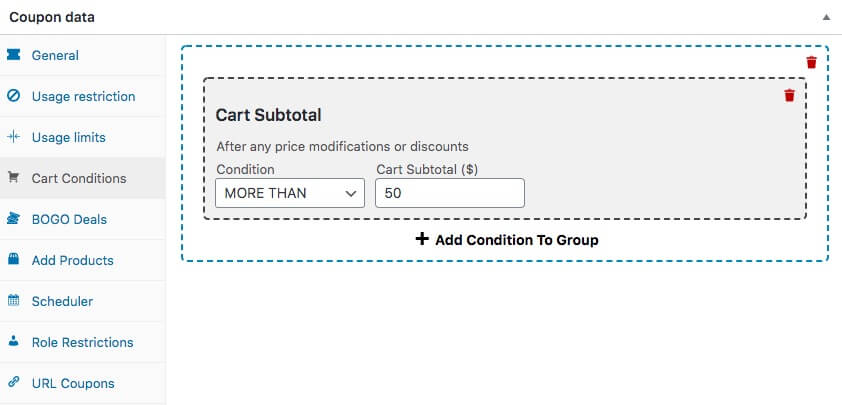
Essentially, you’ll want to use Cart Conditions rather than Usage restriction in cases where your conditions are more complicated. With this method, you can add more than one condition to a grouping, for example.
3. Configure One-Click Apply Notification Settings
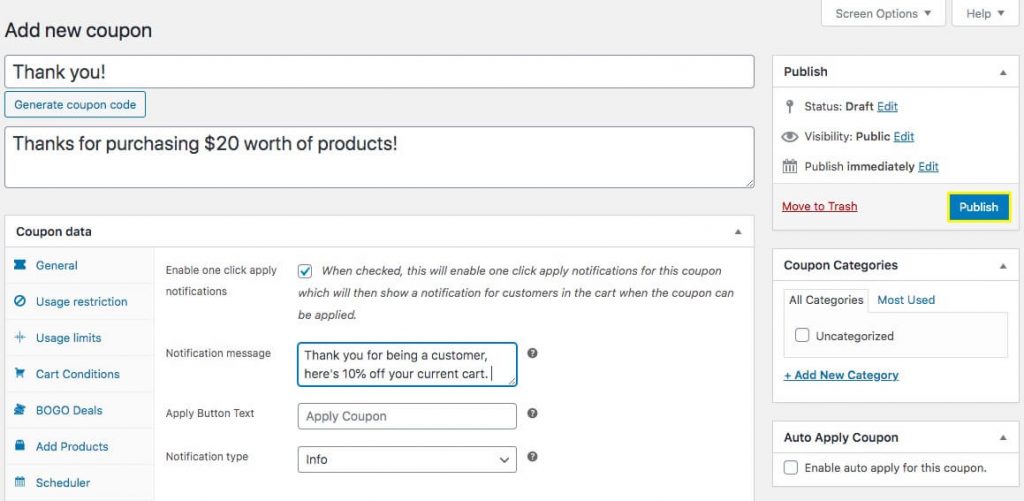
Now you’re ready to click on One-Click Apply Notification and choose your settings:
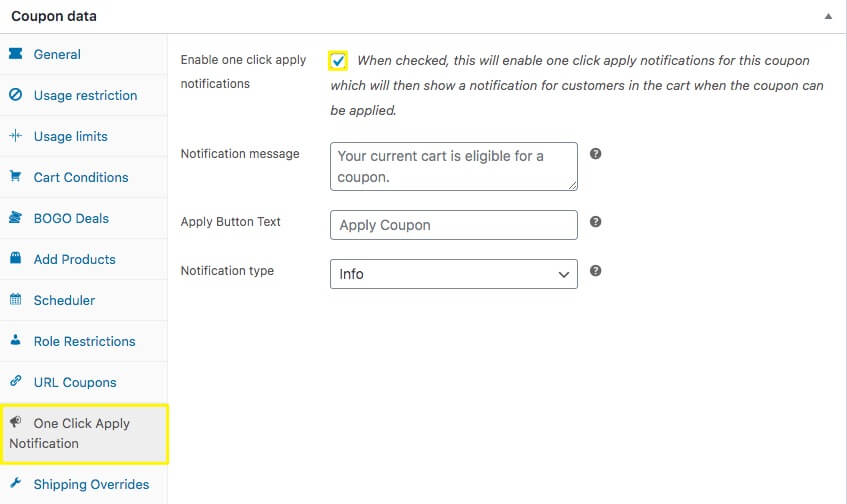
Here, you’ll need to click the box labelled ‘Enable one click apply notifications‘. This means shoppers will receive an on-screen message if their cart meets the restrictions you set previously.
Next, you can customize the notification message your customers will receive. This gives you an opportunity to create a unique communication point. For example, you could thank them for making a purchase while serving up a surprise discount.
It’s important to note that another Advanced Coupons feature, ‘Auto-Apply’, also uses Cart Conditions, the two options have different functionality. When you use one-click apply, it gives the user a chance to ‘opt-in’ to the coupon. With Auto-Apply, users will see the discount automatically when they check out.
4. Publish and Test Your Coupon Settings
Once you’ve adjusted all the settings for your new coupon and one-click notification, be sure to click Publish to make your coupon available:
Once your coupon is live, you can test it out. Load up your cart and head for checkout! If you’ve met the requirements ($20 worth of products for our example) you should see the coupon text and button in your shopping cart:
That’s how you create a coupon that is easy for your customers to use and doesn’t disrupt their user experience!
Key Takeaways
Here’s the bottom line:
The process of adding coupons or discounts shouldn’t be hard for your customers. Coupons are a good thing, right? So make the customers feel like they’re being rewarded and they’ll come away feeling like it was easy dealing with you.
Using Advanced Coupons makes it possible for you to streamline how users apply coupons by introducing a one-click button to apply a coupon in WooCommerce. This helps them avoid a potential pain point during an important part of their customer journey.
To avoid making your customers hunt and peck in other browser tabs for your codes, all you have to do is this:
- Purchase and install the Advanced Coupons add-on for WooCommerce.
- Set up a new coupon in WordPress.
- Configure your One-Click Apply Notification settings.
- Publish and test your coupon settings on the front end so you know its working the way you want.
Do you have any questions about creating a one-click apply notification in WooCommerce using Advanced Coupons? Feel free to let us know in the comments section below!


