

Big news for your loyalty program! You can now bulk adjust loyalty points across a whole group of customers at once, using the new Bulk Adjust tab in Advanced Loyalty Program.
Choose who you want to reach by role, points balance, sign-up date, or when they last ordered. Check the exact list of customers before anything happens. Then add points, take points away, reset balances to zero, or clear point histories completely.
We’ll walk you through each step below, plus a second new option that rewards your customers for repeat product reviews. Let’s get right into it!
Feature Overview: Bulk Adjust Loyalty Points
Need to change point balances across a group of customers at once? That’s exactly what the new Bulk Adjust tab is built for. You’ll find it inside Advanced Loyalty Program, sitting alongside your Dashboard, Customers, and Settings tabs.
The process is simple: filter the customers you want, preview the results, choose how their points should change, then confirm the adjustment and track its progress. You can still update one customer’s balance from the Customers tab whenever you need to. The new Bulk Adjust tab simply makes it easier to handle a group of customers at once.
The Bulk Adjust tab gives you three options for different loyalty points management tasks. You can increase or decrease balances, reset them to zero, or clear a customer’s points history entirely.
How To Bulk Adjust Loyalty Points, Step By Step
Before following along, make sure Advanced Loyalty Program is installed and updated on your store. If you don’t have the plugin yet, you can get it here.
To get started, head to your WordPress dashboard > Coupons > Loyalty Program, then click the Bulk Adjust tab.
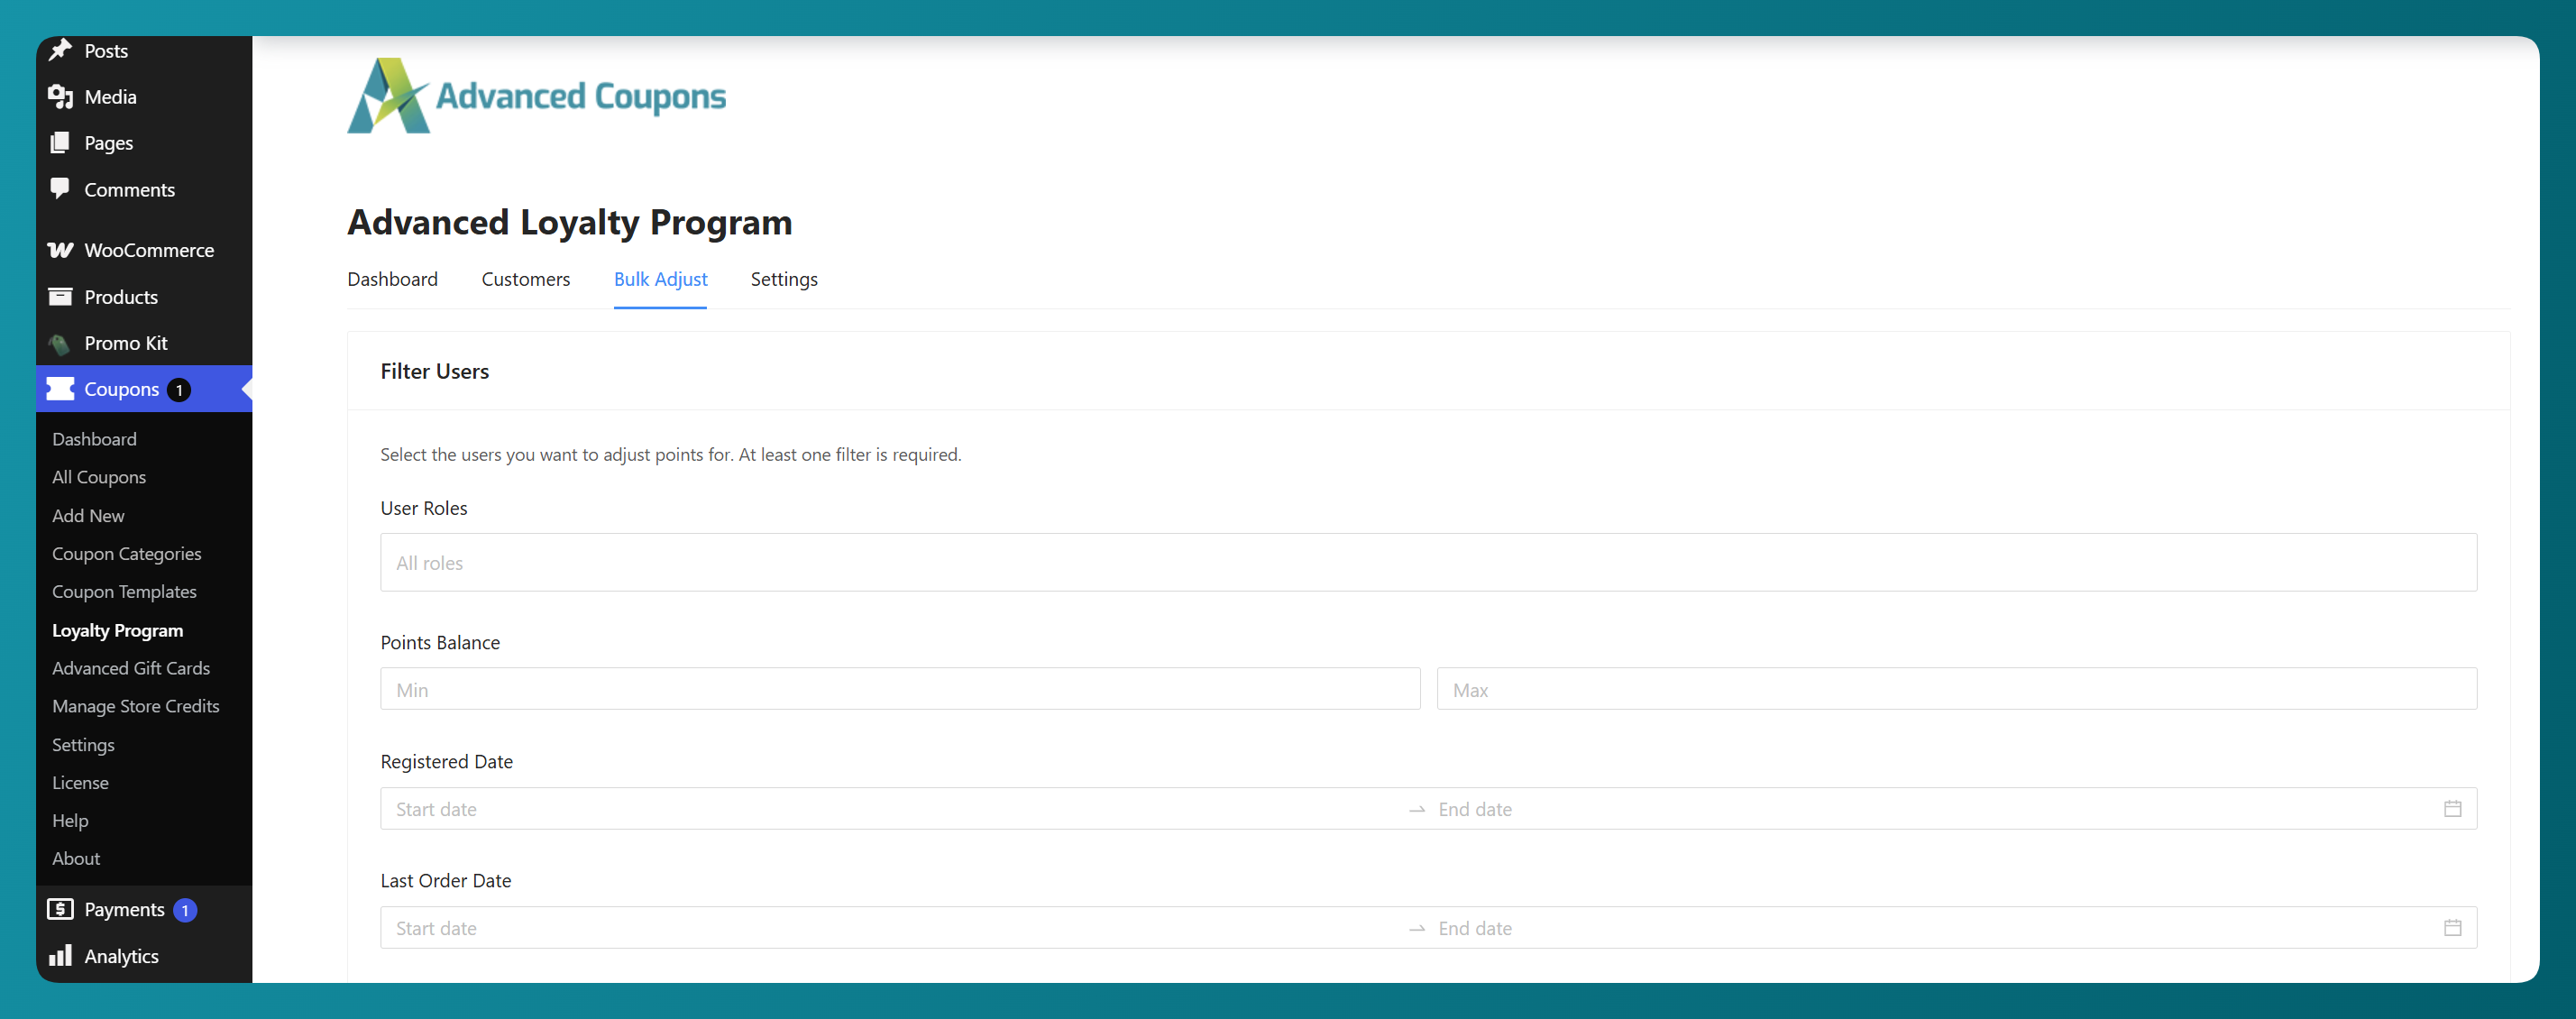
Step 1: Filter the customers you want to target
Use the Filter Users panel to choose which customers you want to work with. You’ll need to set at least one filter before you can preview the results.
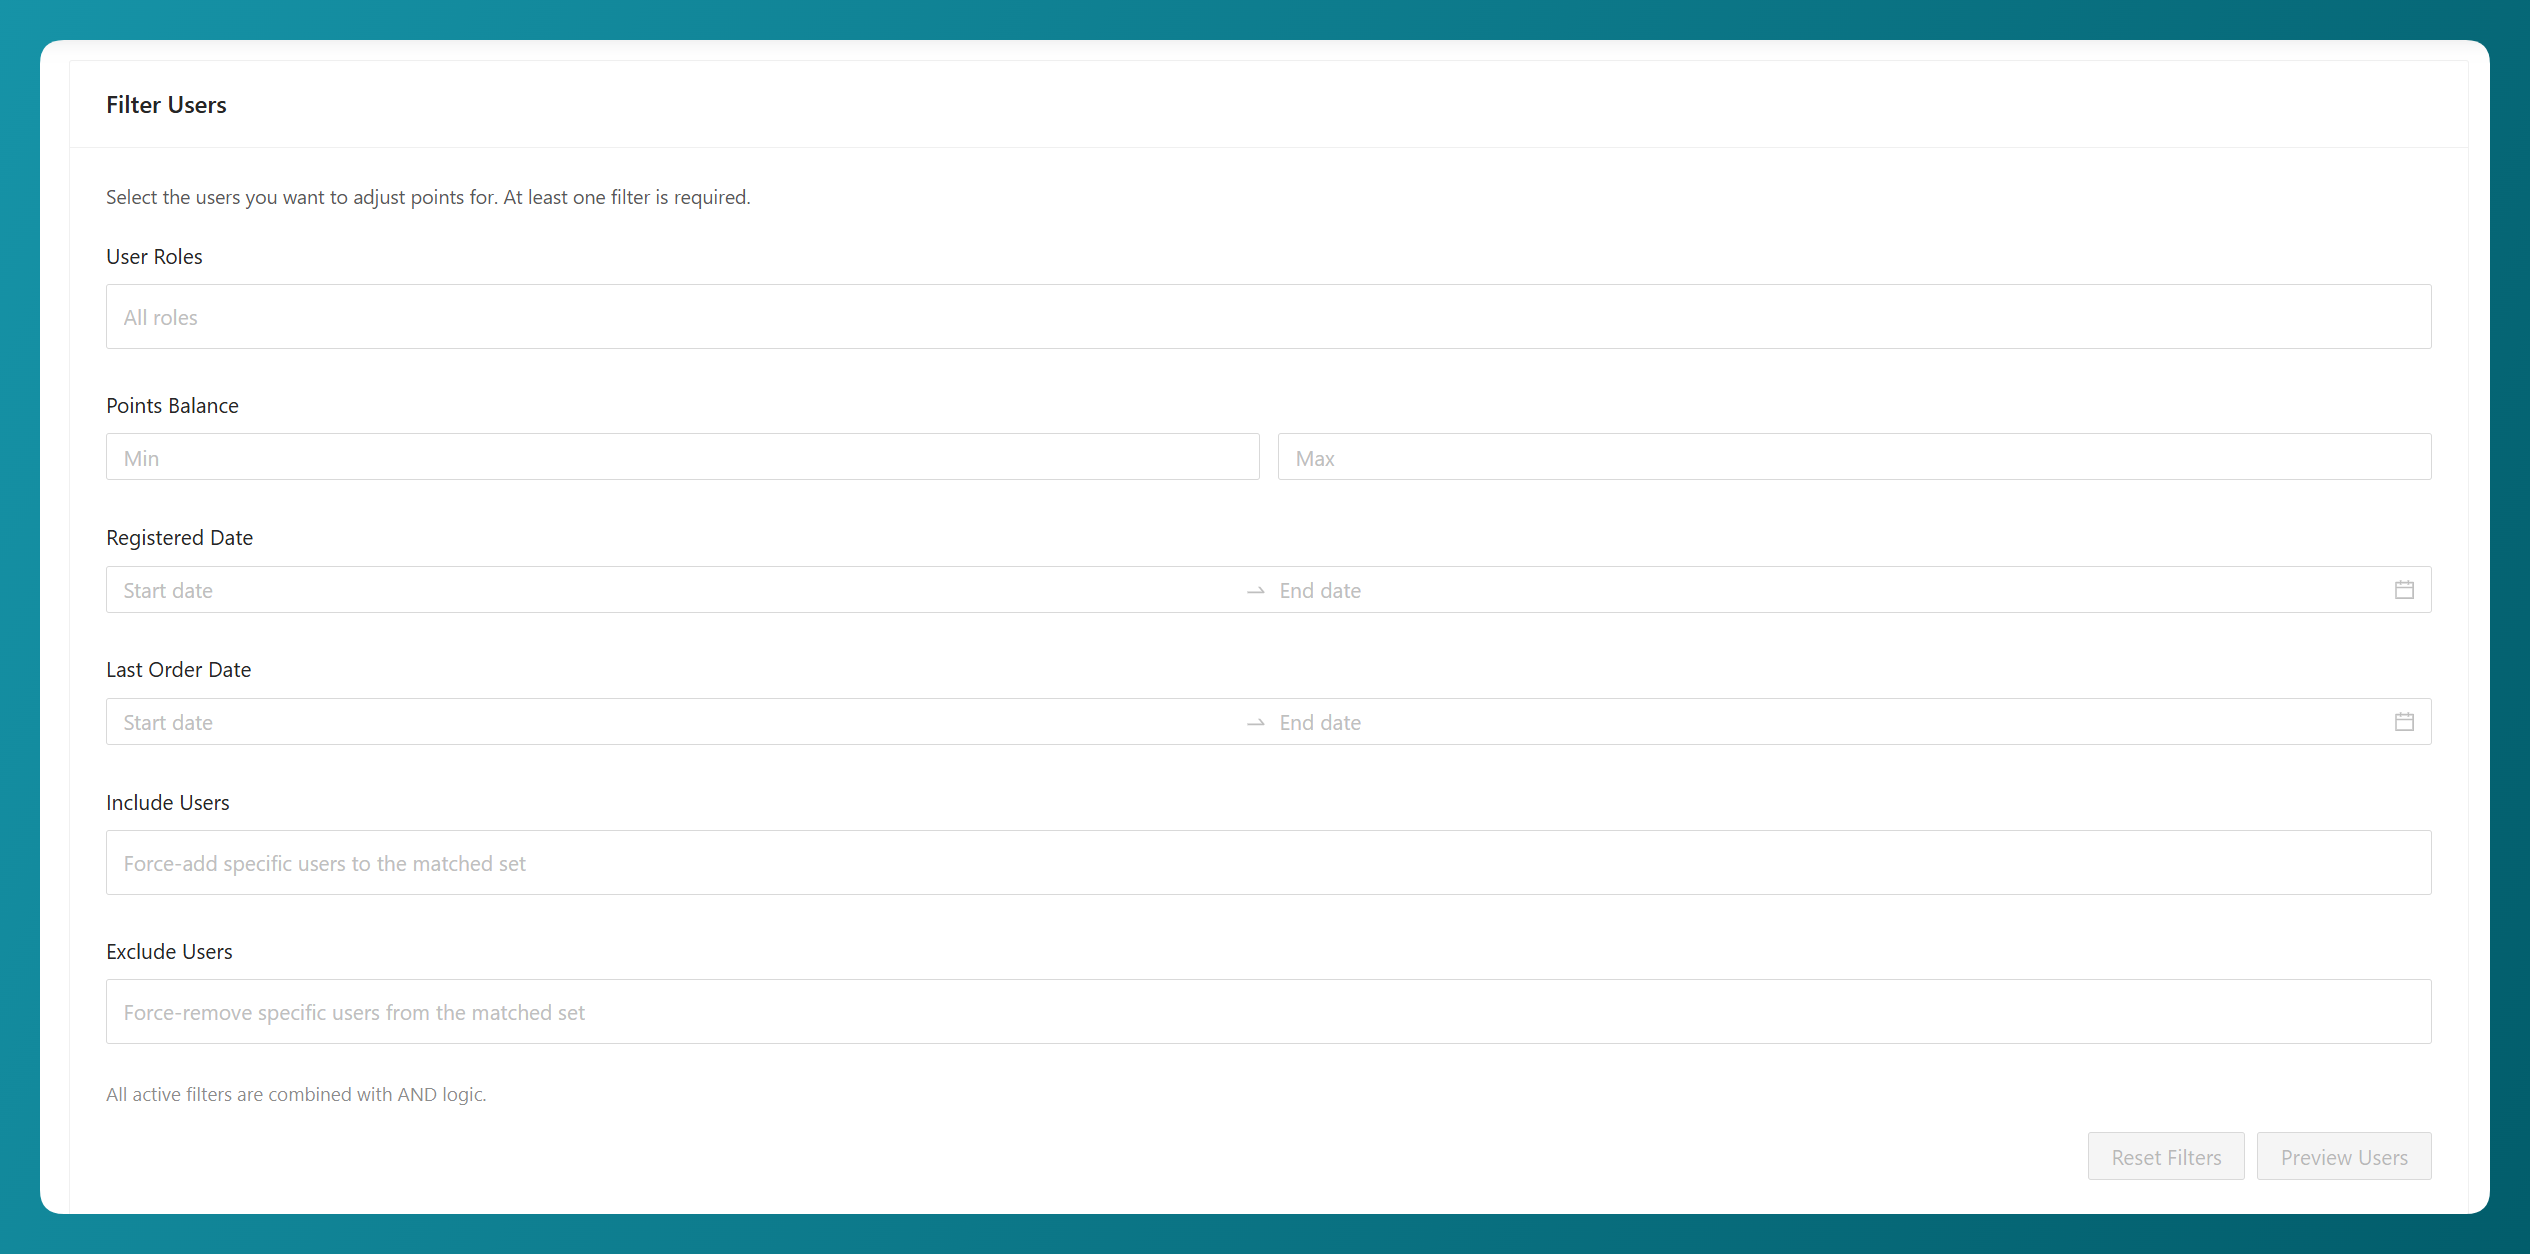
Here’s what each filter does:
- User Roles: Choose which roles to include. You can select Customer, Subscriber, or both.
- Points Balance: Set a Min value, a Max value, or both, to target customers within a particular points range.
- Registered Date: Target customers who created their account between two dates.
- Last Order Date: Target customers who placed a paid order between two dates.
- Include Users: Force-add specific customers to the matched set, even if they don’t meet the filters above.
- Exclude Users: Force-remove specific customers from the matched set. If someone appears in both Include and Exclude, the exclusion wins.
Your regular filters work together, so customers need to match all the active criteria you’ve set. Include Users and Exclude Users work as overrides: included customers are force-added to the results, while exclusions always win.
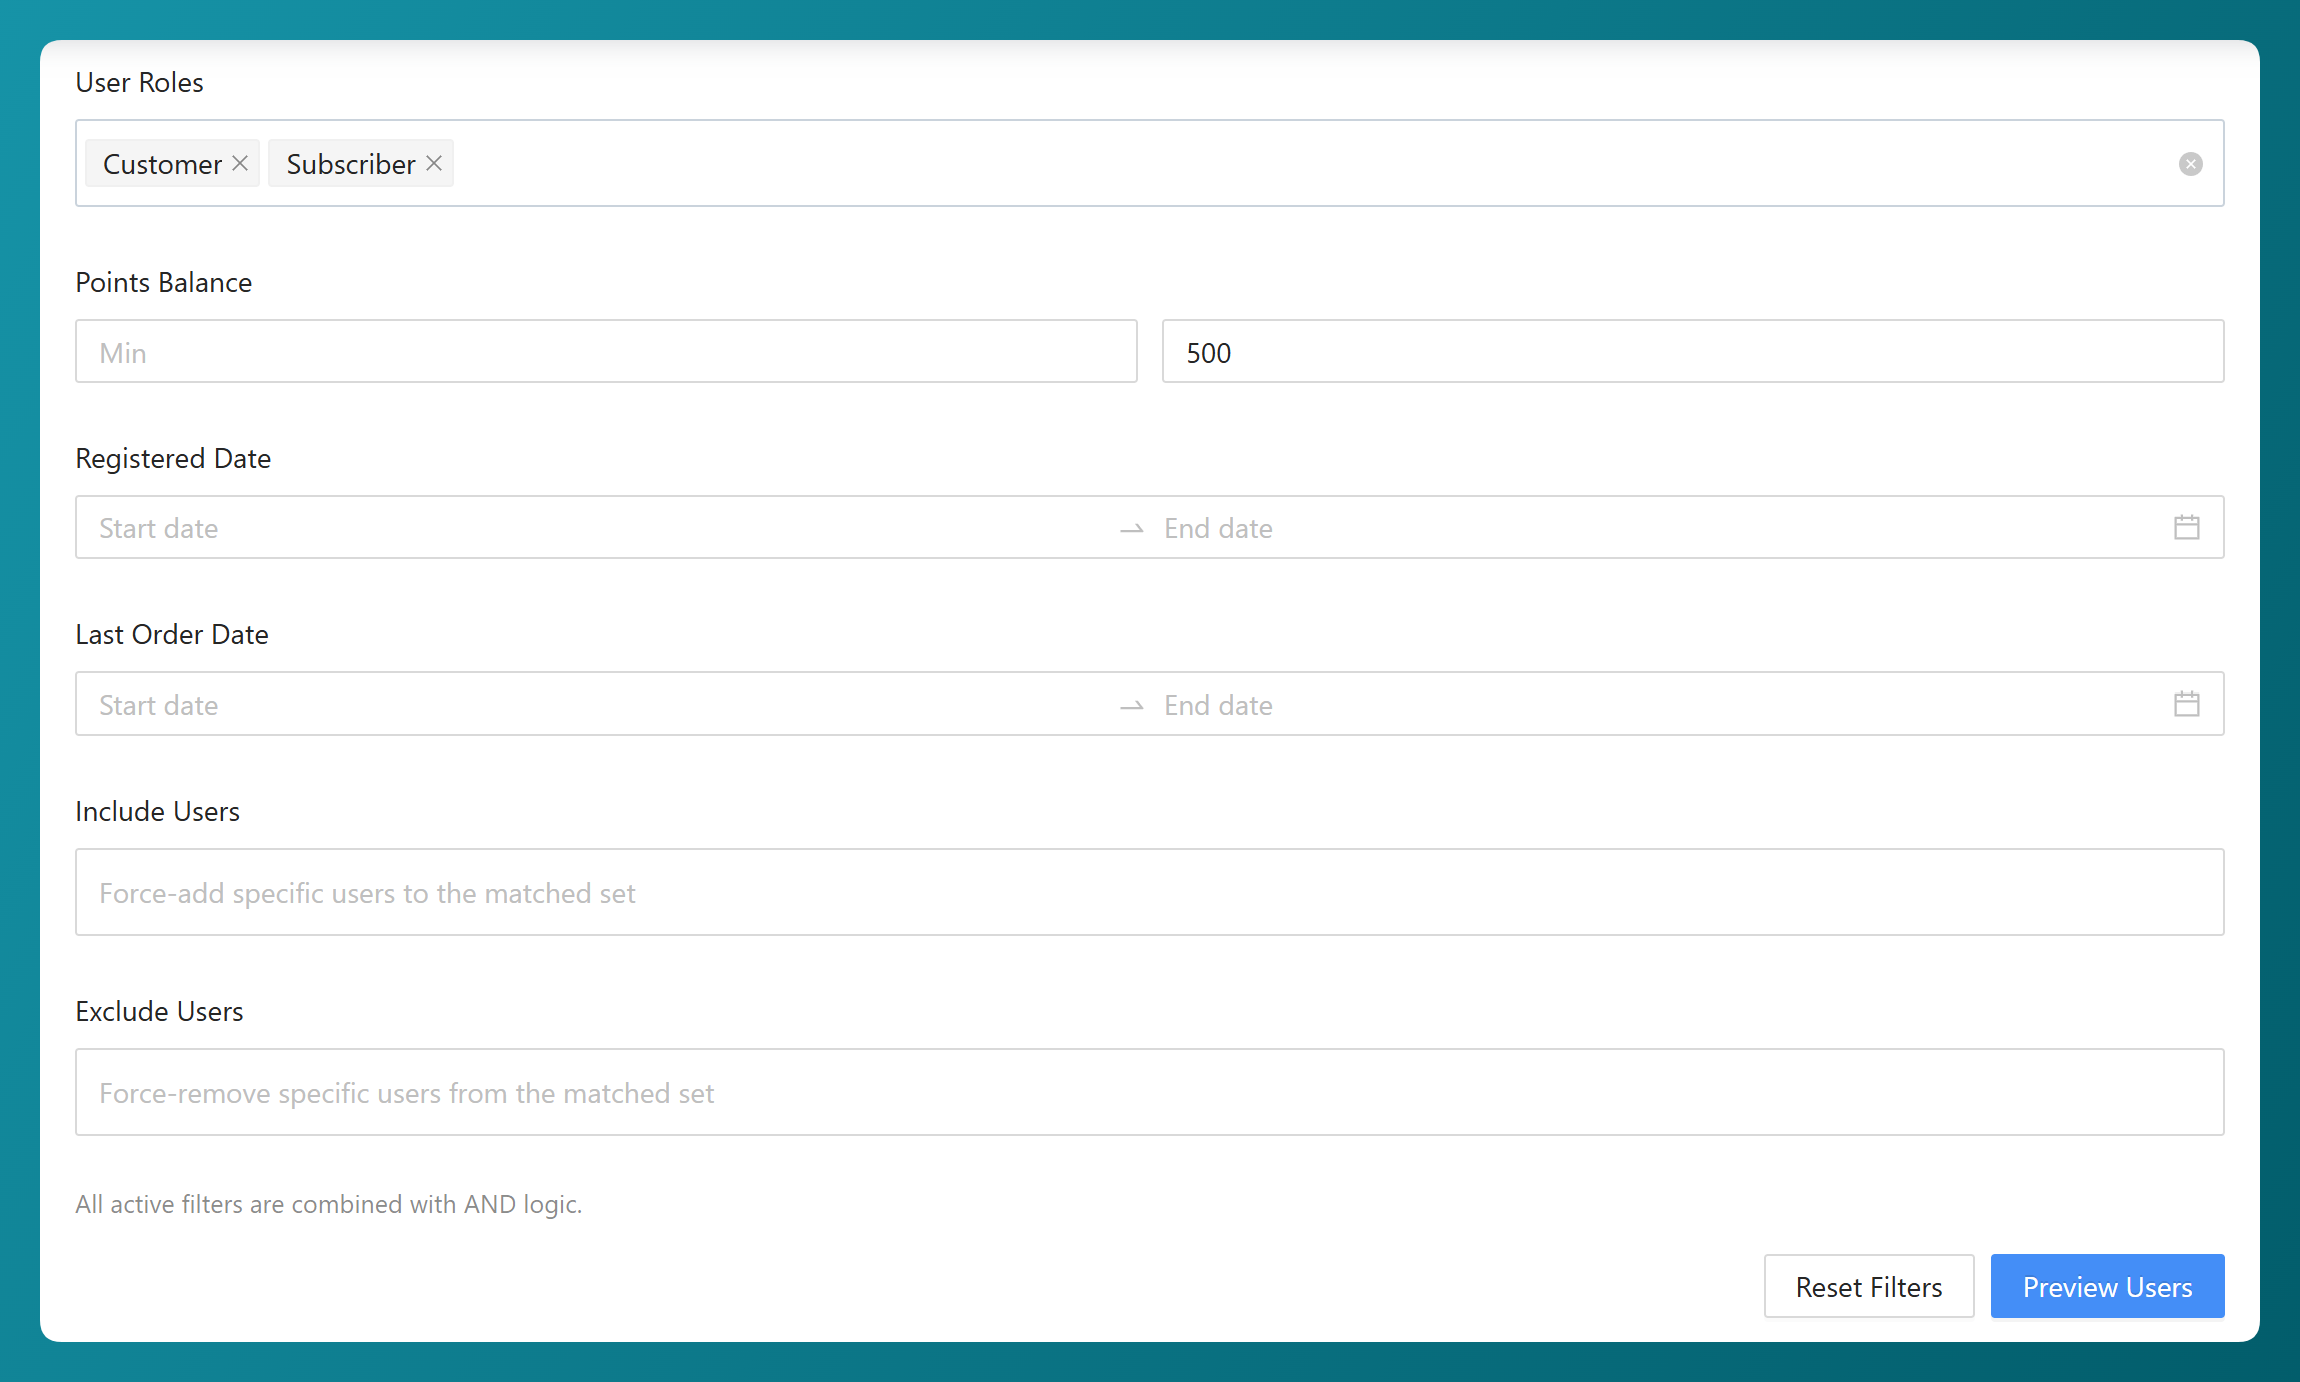
In the example above, we’ve selected the Customer and Subscriber roles and set the Points Balance Max to 500. This means we’re targeting everyone in those two roles who currently holds 500 points or fewer.
Step 2: Preview who matched
Once your filters are set, click Preview Users. It’s worth doing every time, since you get to see exactly who you’ve matched before anything is applied.
You’ll get a count of how many customers matched, along with a table showing each one’s Name, Email, Current Points, and Role. Once you’ve configured an adjustment in the next step, two more columns appear, Adjustment and New Points, so you can see what each customer’s balance will become.
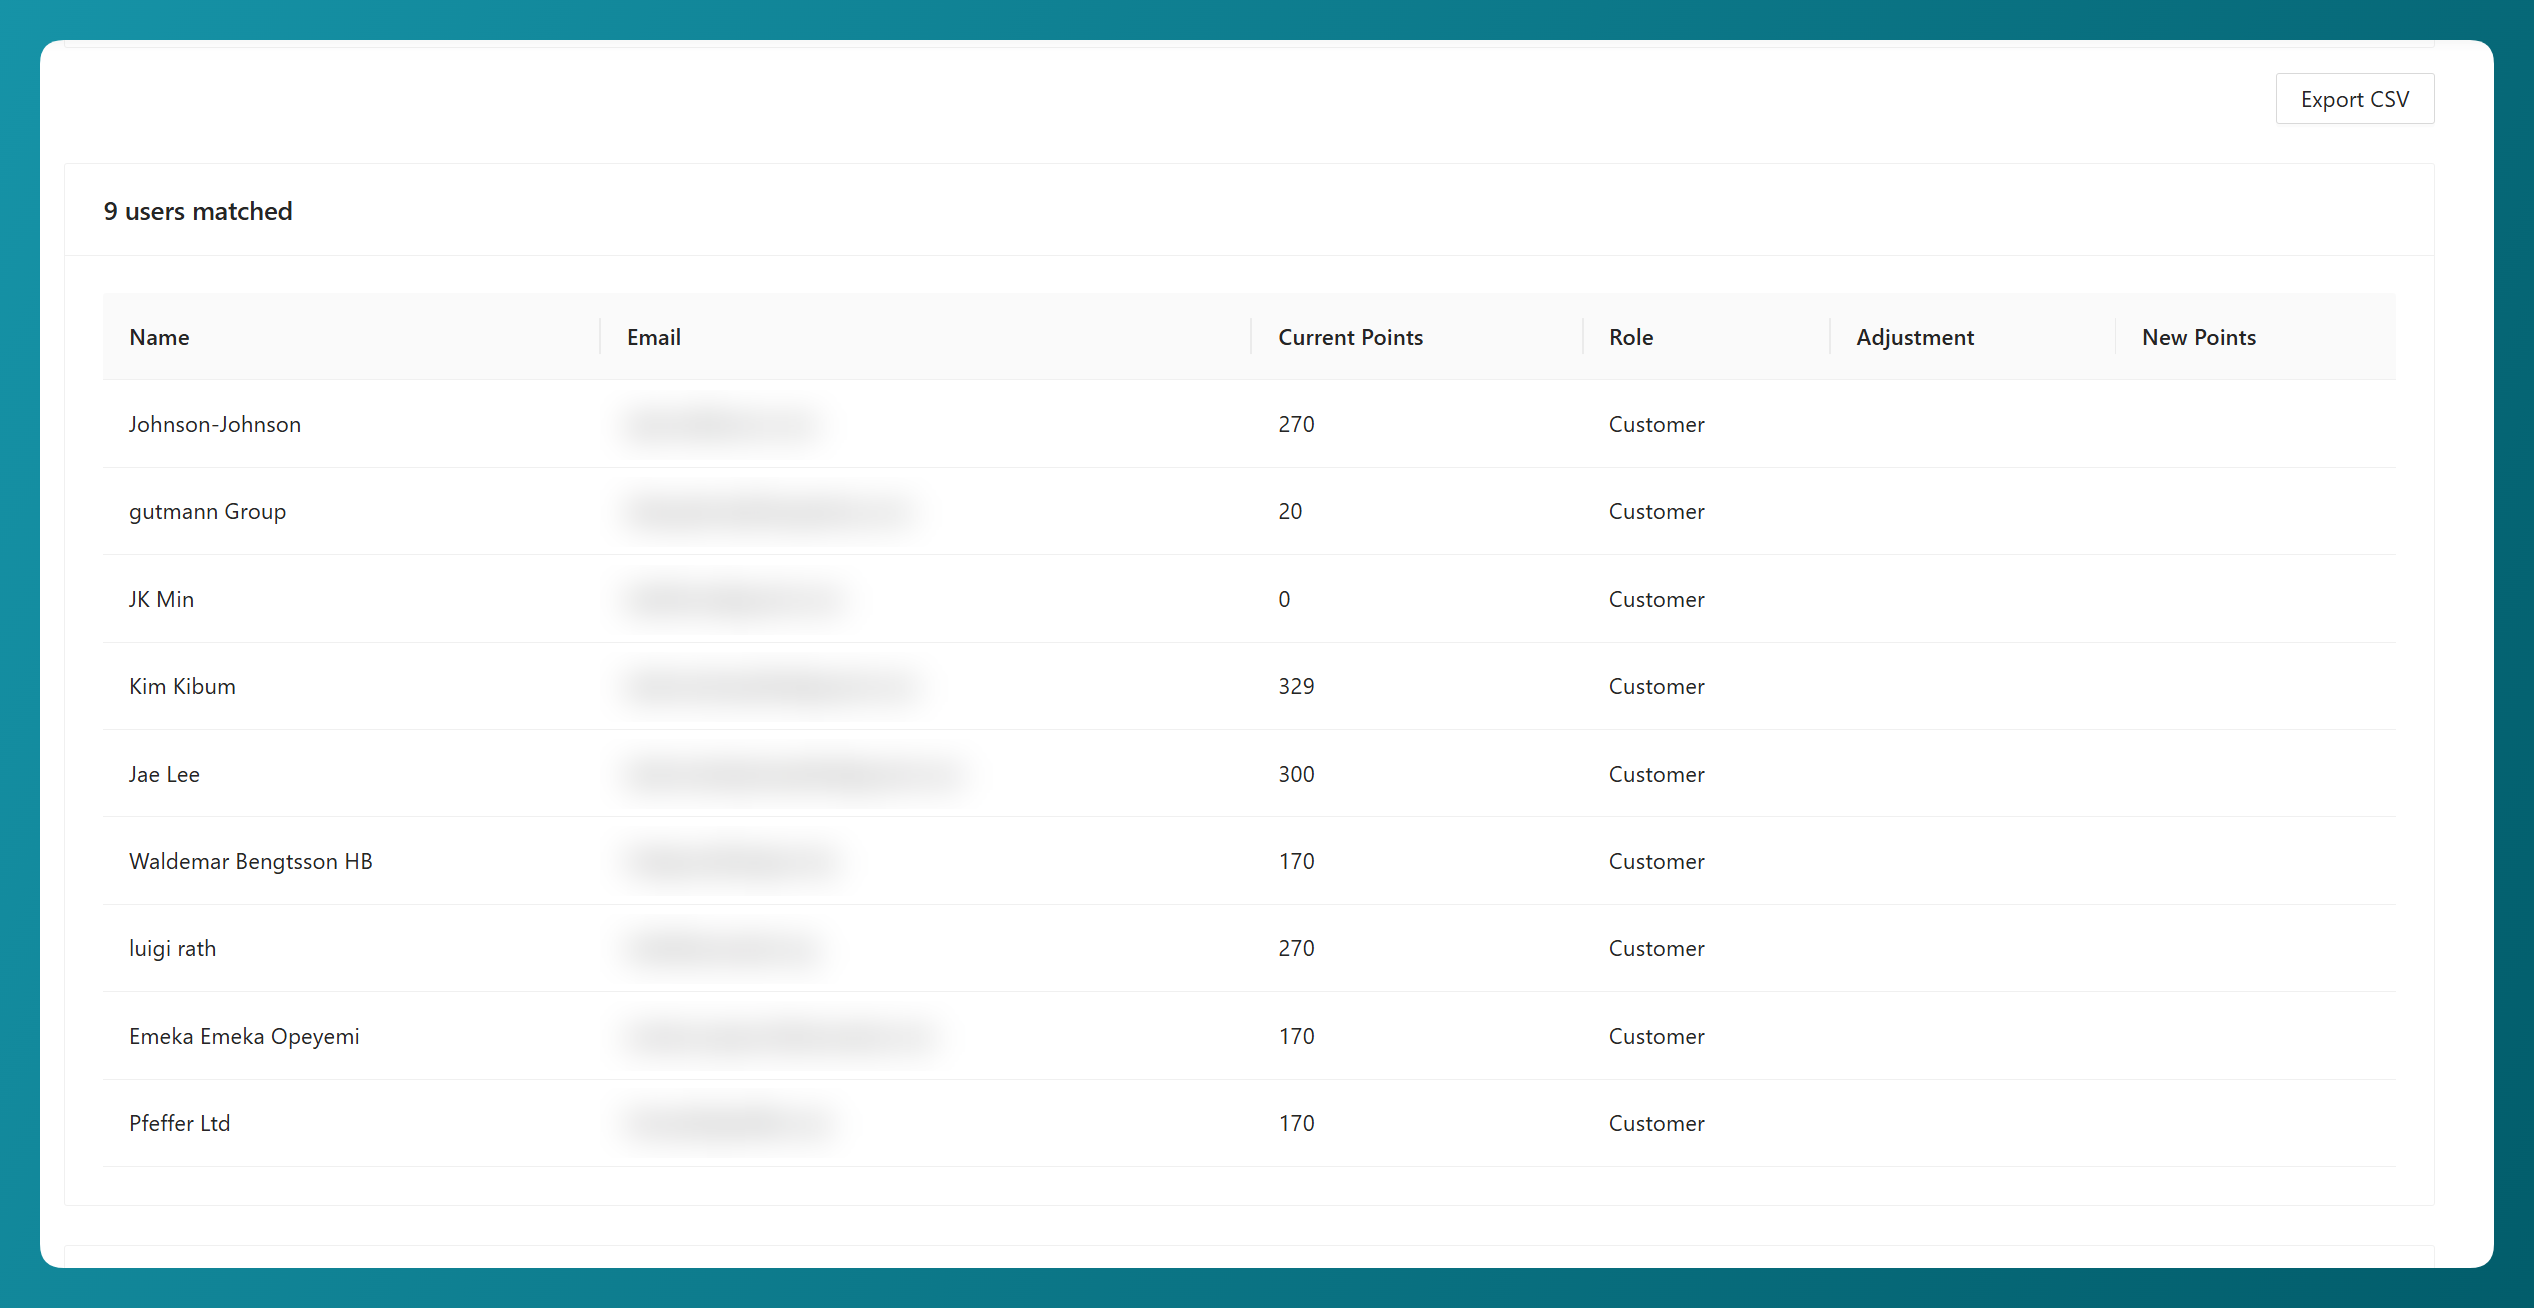
Two other buttons are handy here. Export CSV downloads the matched list with each customer’s User ID, Name, Email, and Current Points, which is useful if you want a record of who matched or need to share the list with someone else. If the match doesn’t look right, Reset Filters clears everything so you can start again.
Step 3: Configure the adjustment
Below the preview, you’ll find the Adjustment Configuration panel. This is where you decide what actually happens to those customers’ points.
Start with Operation, which gives you three choices:
- Adjust: Add points to or take points away from each matched customer.
- Reset to Zero: Bring every matched balance down to zero, while keeping each customer’s points history in place.
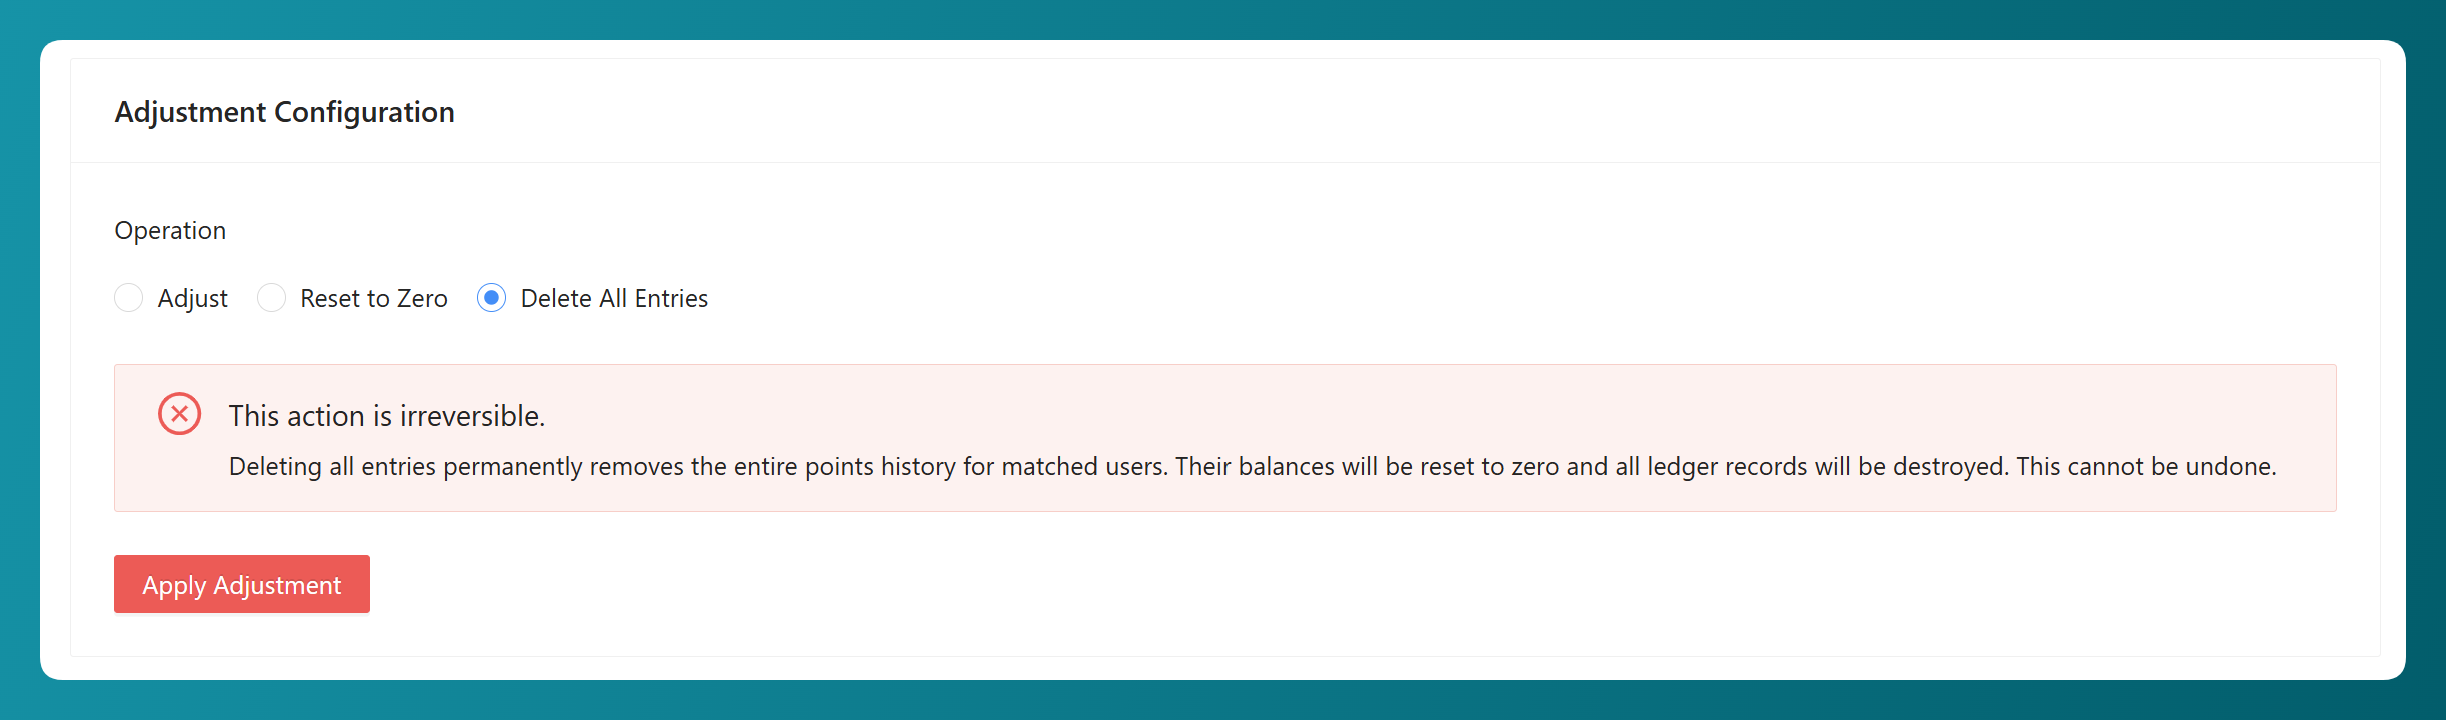
- Delete All Entries: Clear the points history for matched customers completely. This one is permanent, so the plugin flags it clearly before you go ahead.
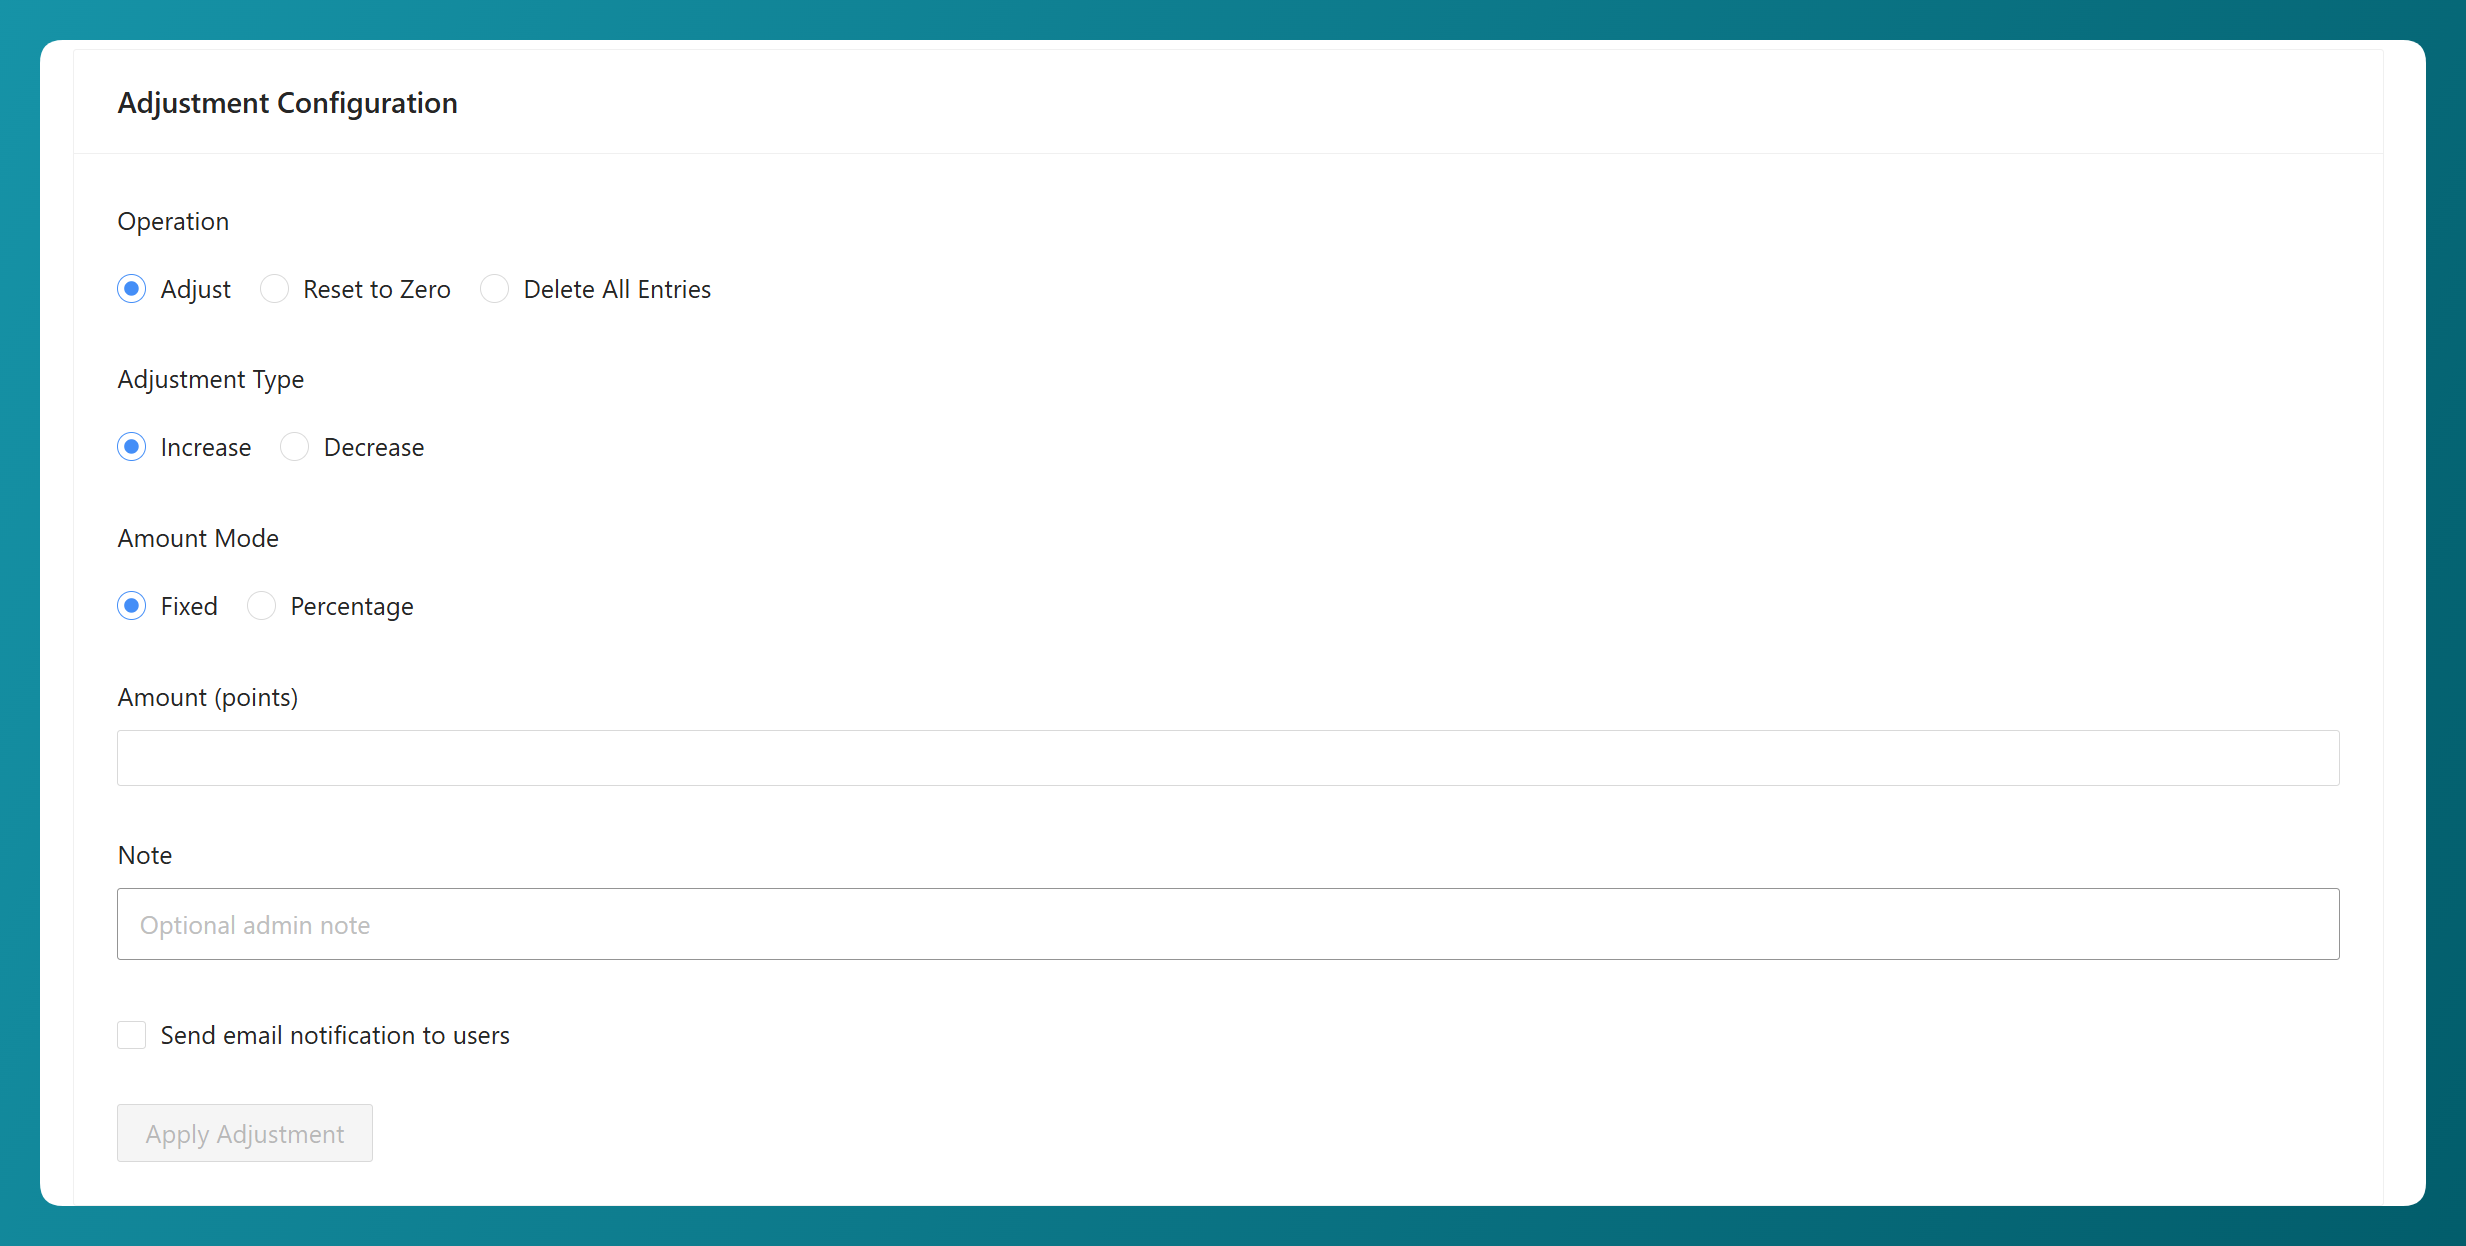
Reset to Zero and Delete All Entries both leave your customers on zero points, so it’s worth knowing how they differ:
- Reset to Zero records the change as a deduction, so the customer’s points history still shows what they earned and when it was cleared. Pick this when you might need to explain the balance later.
- Delete All Entries removes those history records as well. Pick this when you want the points history genuinely gone, like clearing test data before a store goes live.
If you choose Adjust, a few more options open up. Adjustment Type sets whether you’re going up or down, with Increase and Decrease. Amount Mode then decides how that amount is worked out:
- Fixed: Apply the same point amount to each matched customer. For example, a fixed increase of 100 adds 100 points to each balance.
- Percentage: Each customer moves by a percentage of their own balance, so bigger balances move further. Percentages round to whole points, and anyone whose result rounds to zero is simply skipped.
Decreases are capped at whatever the customer actually holds, so a balance will never drop below zero no matter what amount you set.
Underneath, the Note field lets you record an optional admin note against the adjustment. It’s easy to skip, but a short note like “Winter campaign top-up” is genuinely useful months later when you’re looking back at a customer’s points history and wondering where a change came from.
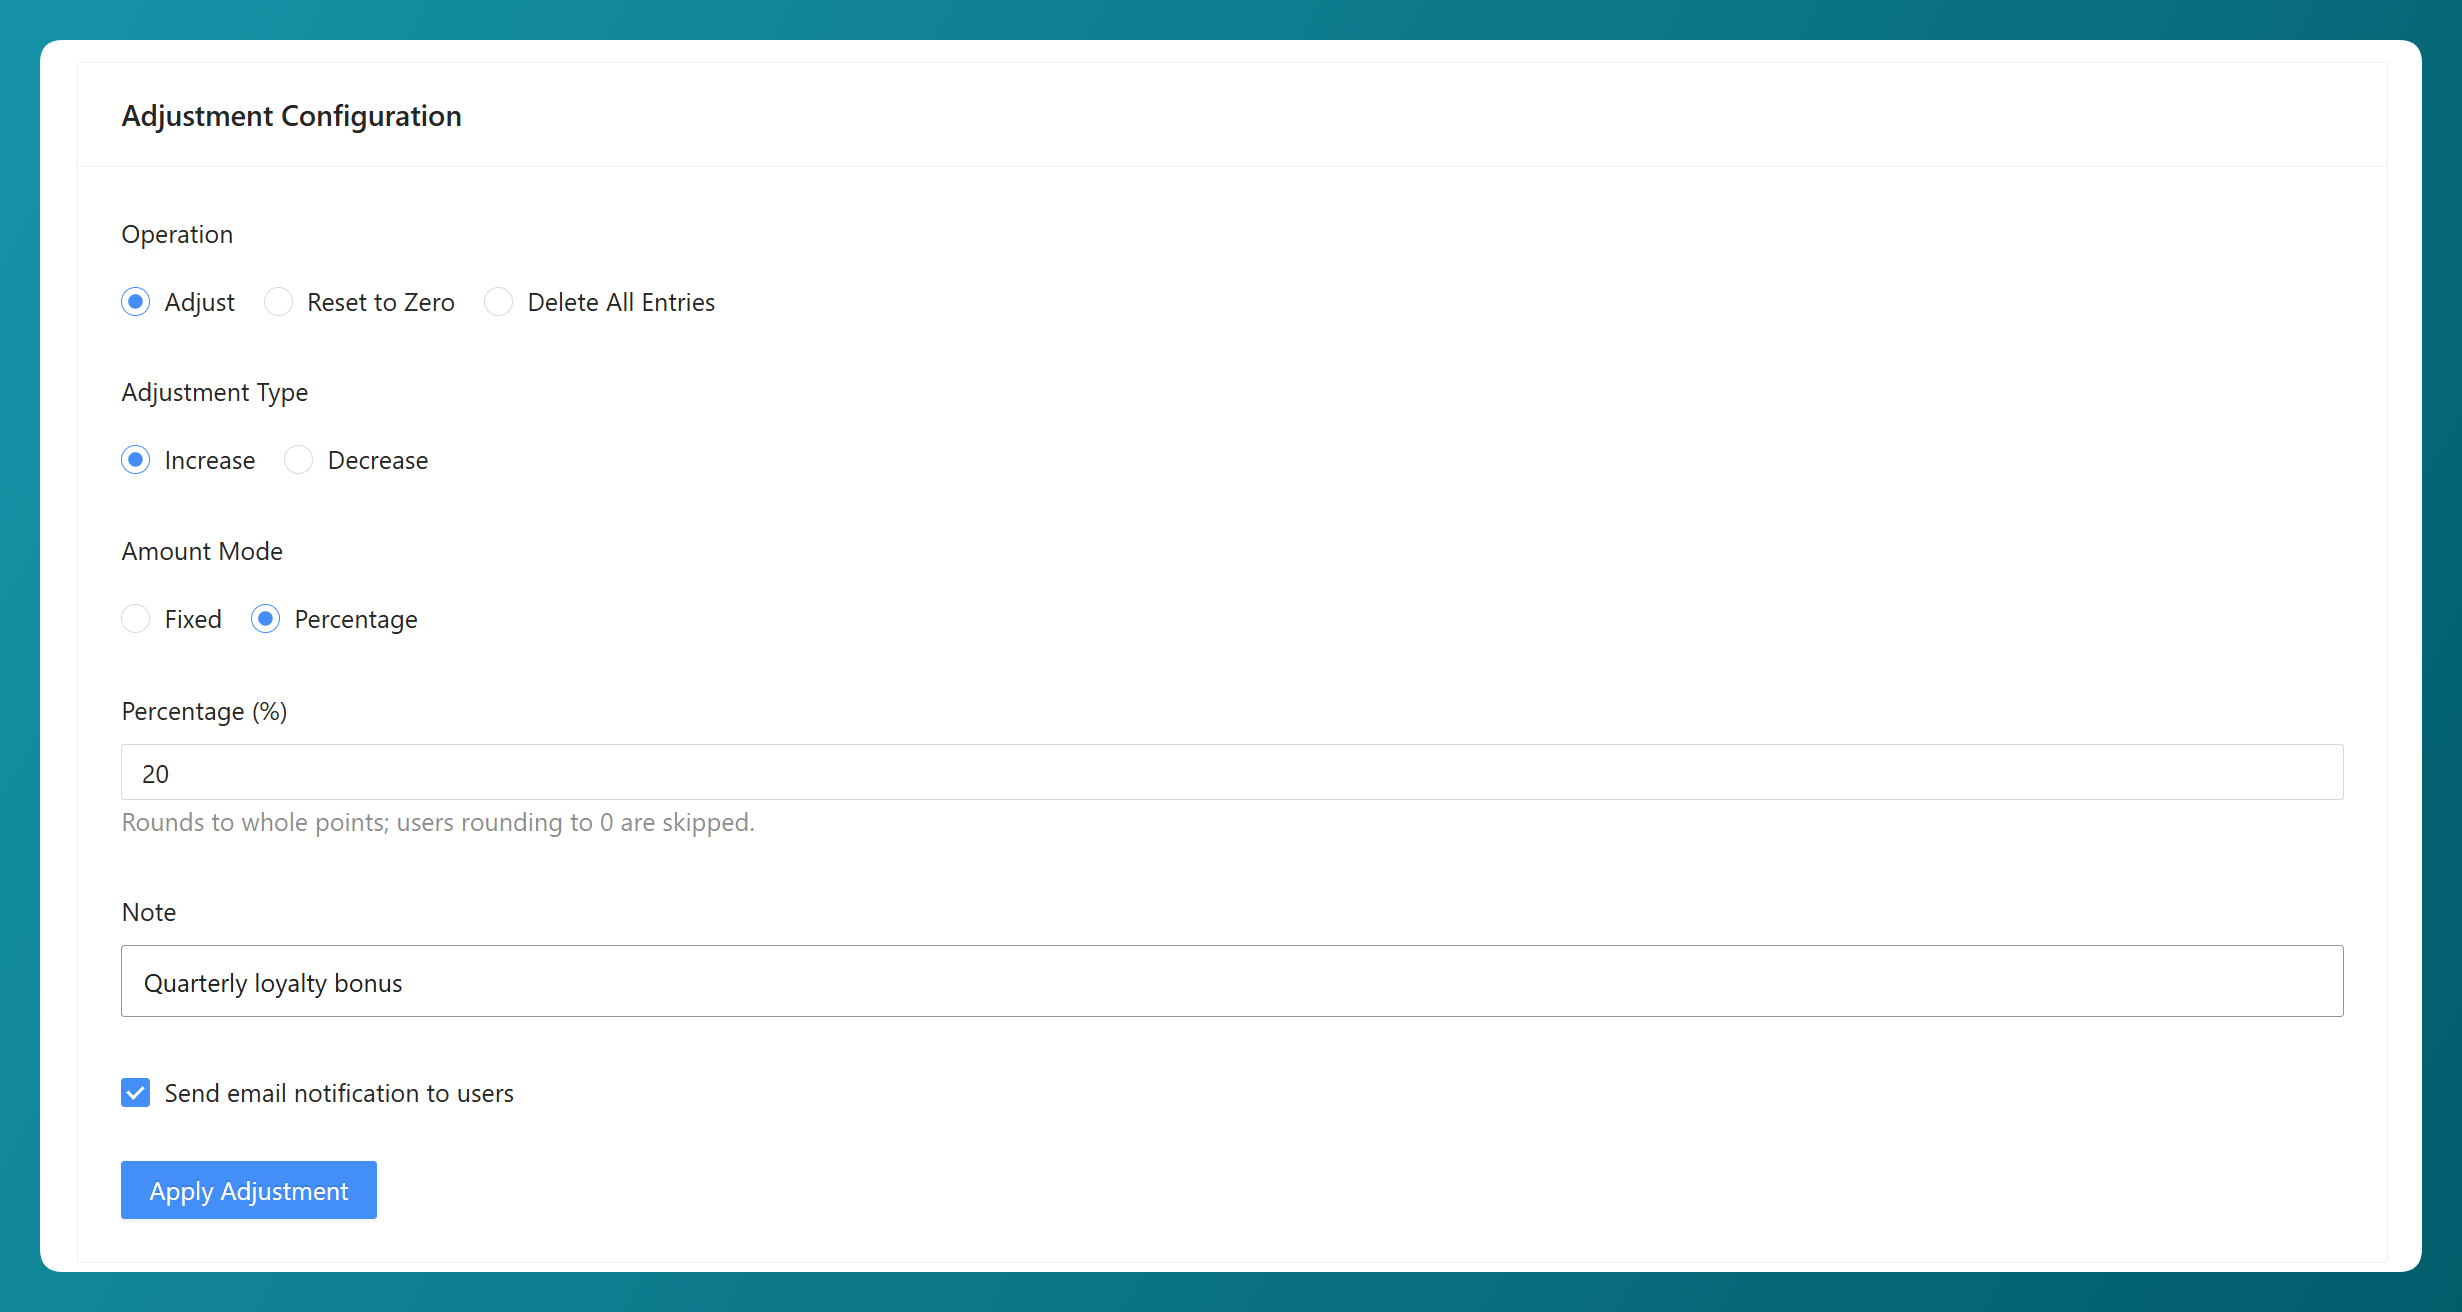
In the example above, we’re setting up a 20% increase to each matched customer’s current points balance, with “Quarterly loyalty bonus” added as the admin note. We’ve also turned on email notifications so affected customers will be notified about the points update.
For Adjust and Reset to Zero, you can also choose to send an email notification so affected customers know their balance changed. Delete All Entries doesn’t send this notification.
Step 4: Confirm and track progress
When you’re happy with the setup, click Apply Adjustment. You’ll get a confirmation step so you can review the customers affected and the change you’re about to make. Delete All Entries uses a stronger confirmation warning because it permanently removes point history.
If a Total Points estimate is shown, the final amount is still calculated using each customer’s balance when the operation actually runs. So if a balance changes after your preview, the current value is the one that gets used.
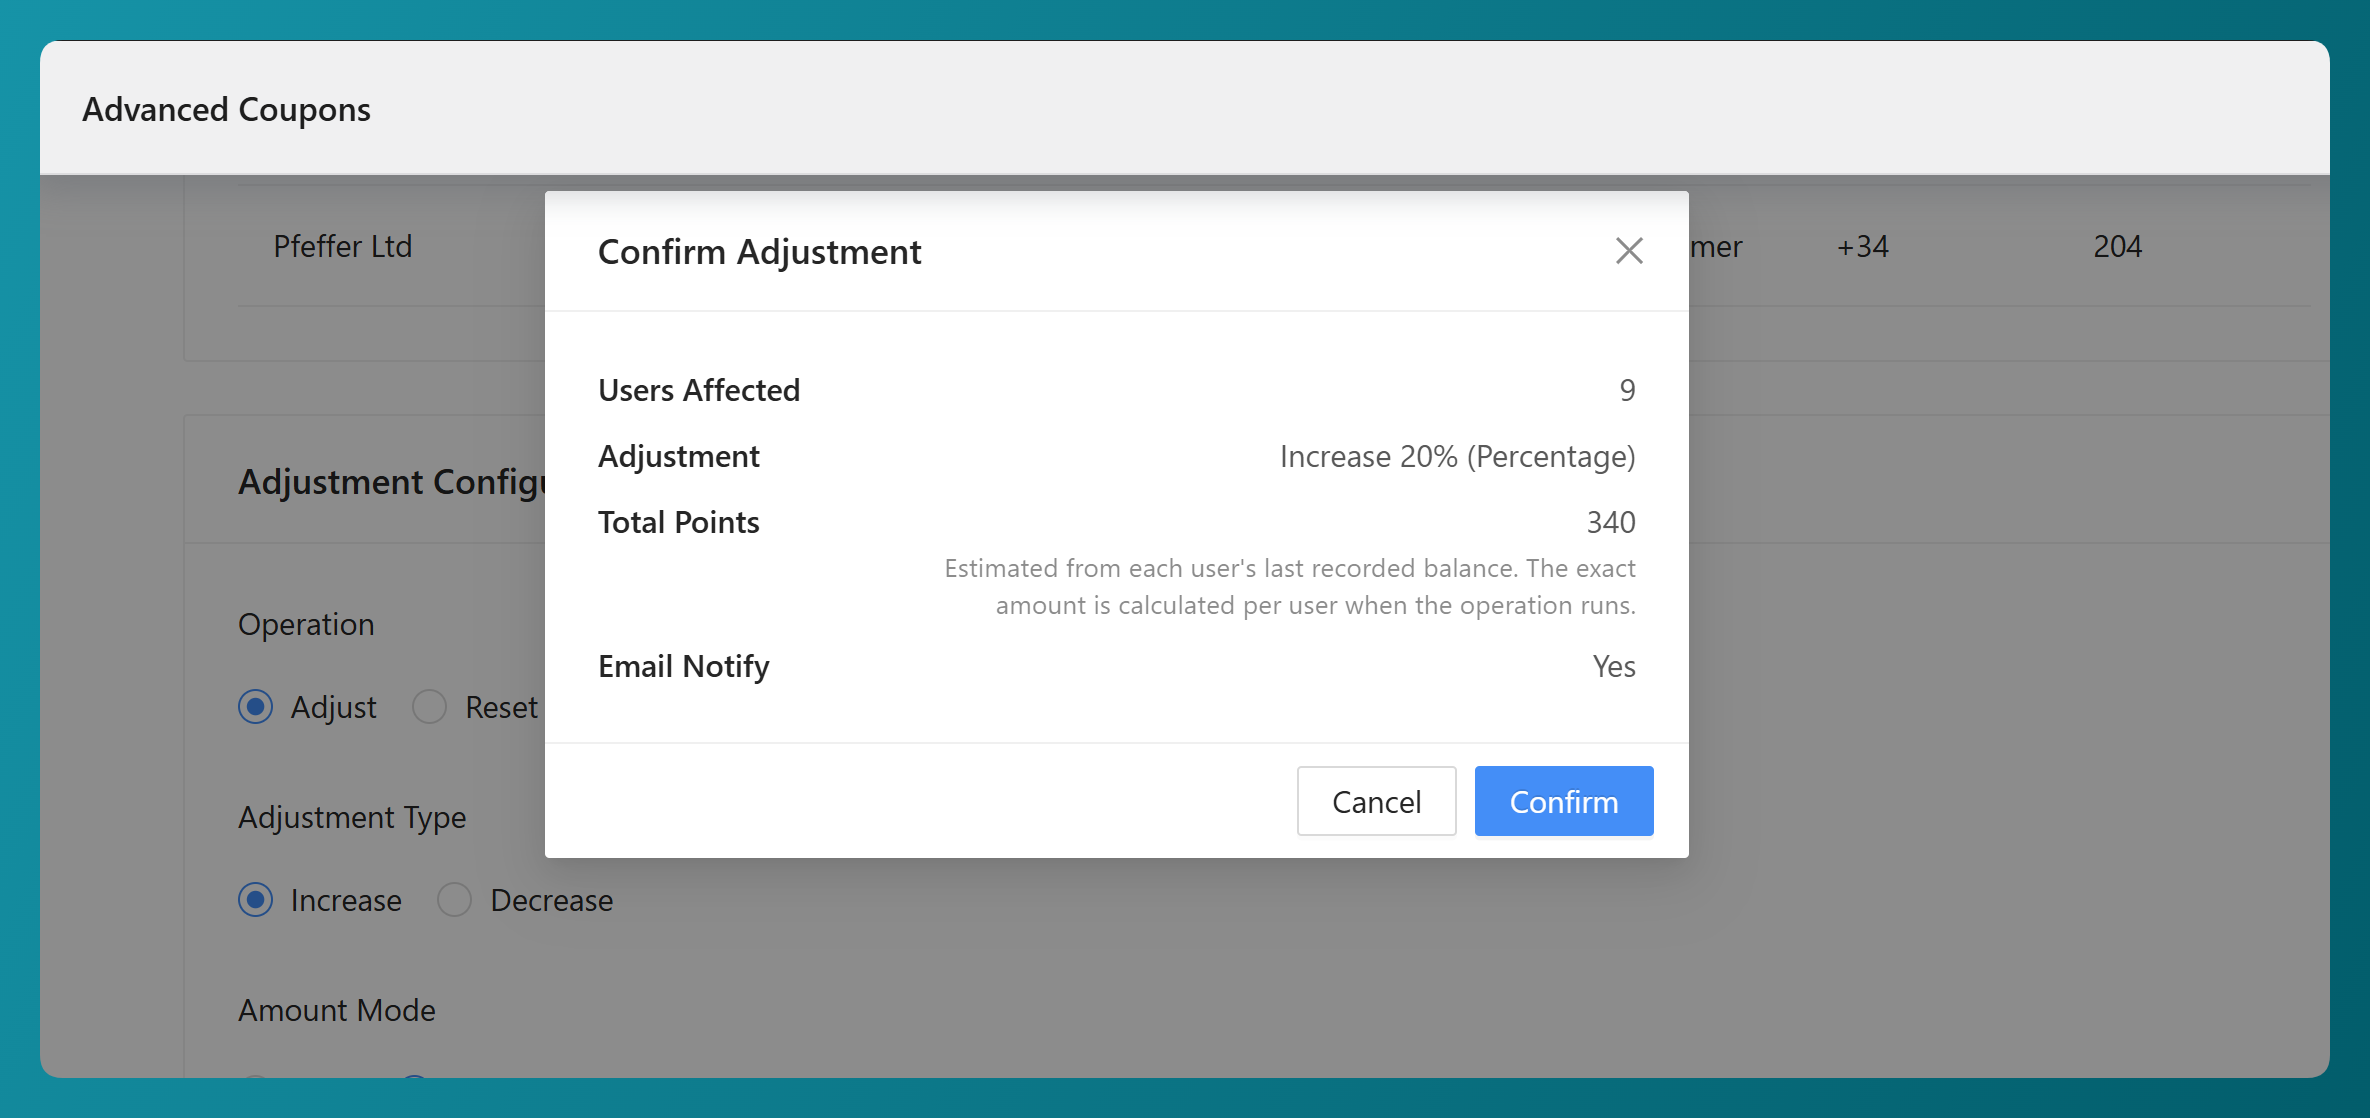
Hit Confirm and the operation starts running in the background, with a progress bar showing you how far along it is. Larger customer sets are processed in batches, so you can leave it to work through the list. One bulk operation runs at a time, which keeps two overlapping adjustments from landing on the same customers.
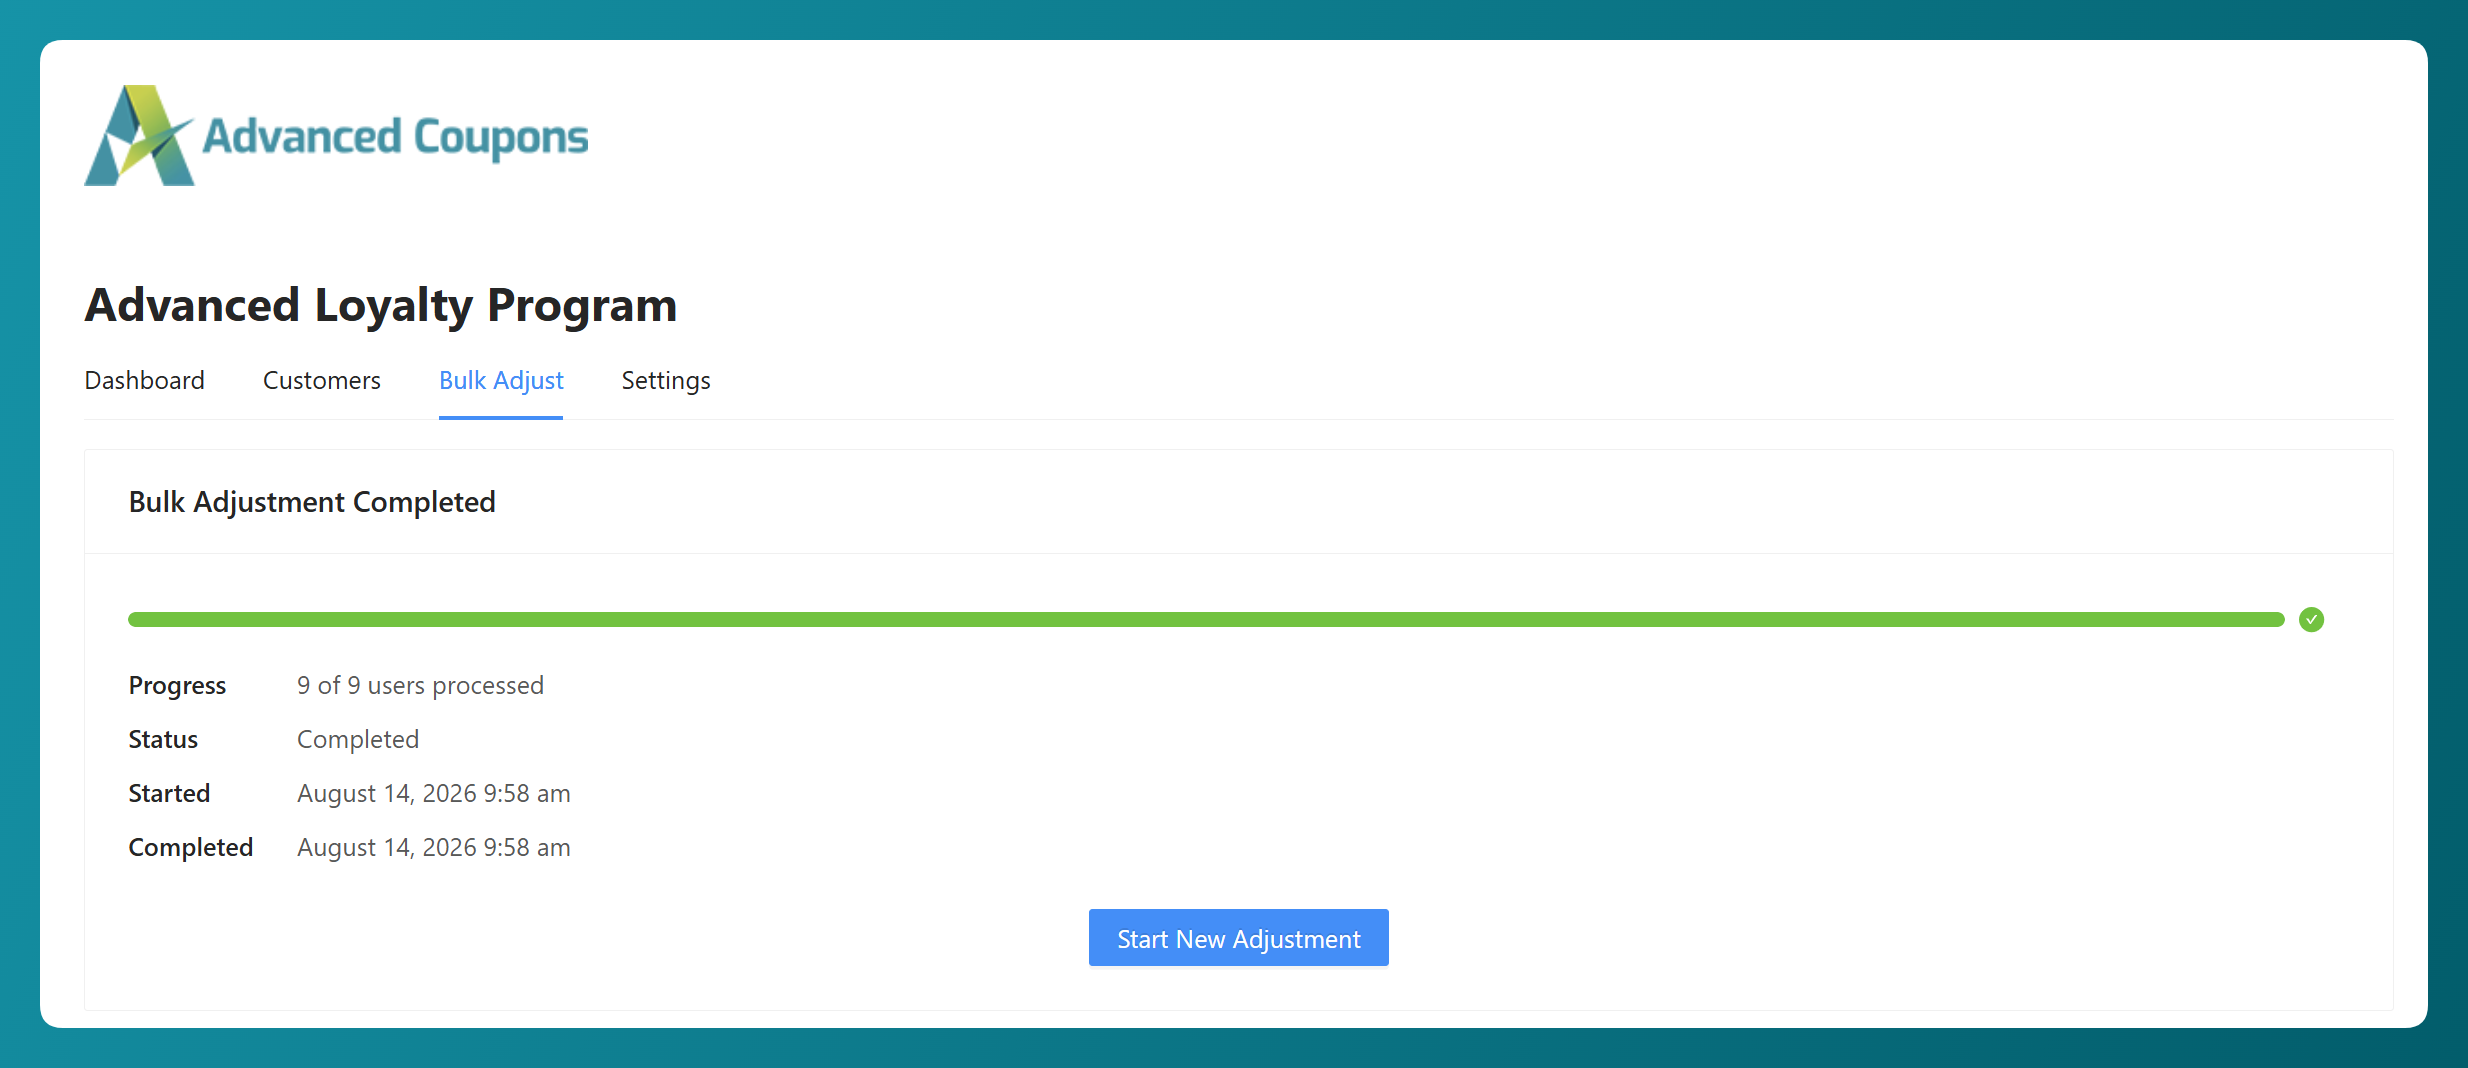
Once it reaches the end, you’ll see the operation marked as completed. And that’s basically it!
🎯 POWER TIP: Before you run anything permanent, hit Export CSV at the preview stage. You’ll have a record of every customer’s balance as it stood before the change, which is handy for your own reference and for answering customer questions afterward.
Five Ways To Use Bulk Adjust Loyalty Points
Now that you know how it works, here are just some of the ways you can put it to use in your store:
1. Reward the customers who bought during a specific period
Set the Last Order Date filter to a period that matters to your store, like your holiday season or the month you launched a new product line, then increase points for everyone who ordered during that time. It’s a simple way to thank those customers and give them extra points to use on a future purchase.
2. Give your highest-balance customers something extra
Set a Points Balance Min value so you’re only reaching shoppers with higher balances, then give them a percentage-based increase. Because the amount works from each person’s own balance, customers with more points receive a larger increase. It’s a simple way to give something extra to customers who have built up larger balances in your rewards program.
3. Correct points that were awarded in error
If a promotion handed out more points than you intended, you can correct them in one pass. Use Include Users to select the specific customers affected, or narrow them down with a Points Balance range, then apply a decrease. Since decreases stop at zero, you don’t have to worry about pushing anyone into a negative balance.
4. Clean up balances after a store migration
If you’re moving to a new store or finishing a round of testing, you may have point balances that you no longer want to keep. Reset to Zero clears those balances while keeping the history, while Delete All Entries removes the points history as well.
5. Run a seasonal boost for a single segment
Use the Registered Date filter to reach customers who joined within a certain period, like everyone who signed up during a campaign, and give that group a seasonal points bonus. This gives you a simple way to run a more focused promotion instead of applying the same offer to your entire customer base.
Also New: Award Points For Every Product Review
There’s also a new option for how you reward customers who leave product reviews.
Your customers can already earn points for leaving product reviews. Previously, they could earn those points once for each product they reviewed, but another review of the same product wouldn’t earn additional points.
The new Award points for every product review setting lets you change that behavior. Head to Coupons > Loyalty Program > Settings > Points Earning and scroll to the Point Amounts section. Turn the setting on and customers can earn points each time they leave another review on the same product.
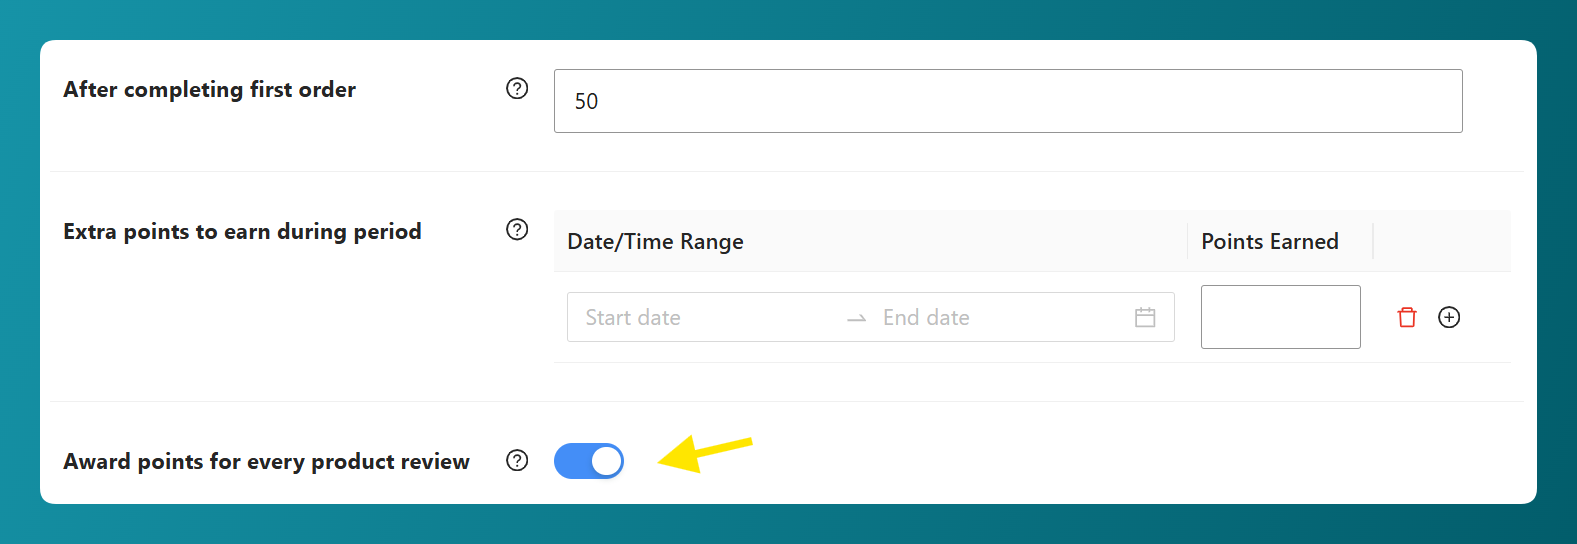
The setting is off by default, so nothing changes unless you enable it. It only affects product reviews, while your blog comment settings continue to work separately. Make sure Leaving a product review is also enabled in your Actions that earn points list and has a point value set, since that determines how many points each review earns.
Frequently Asked Questions
Can I undo a bulk points adjustment?
There isn’t a one-click undo for bulk operations, so it’s worth checking the preview carefully before you confirm. If you need to correct an adjustment afterward, you can run a new adjustment for the affected customers. Delete All Entries is the one to be especially careful with because it permanently removes their points history.
Which user roles can I bulk adjust?
The User Roles filter lets you select Customer, Subscriber, or both. You can also use Include Users to force-add specific customers even if they don’t match the active filters.
Will customers be notified when their points change?
For Adjust and Reset to Zero, you can choose whether to send affected customers an email about the balance change. Delete All Entries doesn’t send this notification.
Is the total points figure on the confirmation screen exact?
It’s an estimate based on the balances used during the preview. When the operation runs, each customer’s balance is calculated again at that moment, so the amount applied reflects their current balance.
Can I run two bulk operations at the same time?
One bulk operation runs at a time, so you can’t start another until the current one finishes. This prevents two bulk adjustments from running over the same customer balances at once.
Does reset to zero delete a customer’s point history?
No. Reset to Zero records the change as a deduction, so the customer’s points history stays intact and you can still see what they earned previously. If you want the history removed as well, that’s what Delete All Entries does.
Wrapping Up
The new Bulk Adjust tab makes it easier to bulk adjust loyalty points for the customers you need. You can filter the group, preview who will be affected, choose the right adjustment, and confirm the change before it runs.
In this guide, we learned:
- What the Bulk Adjust feature does
- How to bulk adjust loyalty points, step by step
- Five ways to use bulk adjust loyalty points
- How to award points for every product review
These updates give you more control over both existing point balances and how customers earn points from product reviews. If you’re using Advanced Loyalty Program, you can start trying them from your WordPress dashboard.
Do you have any questions about this update? Let us know in the comments. Happy to help!