
You can spend weeks choosing the right products, taking polished photos, and writing helpful descriptions. But when shoppers reach your shop page, your newest arrival, best deal, and bestseller can still blend into the same product grid. Everything carries the same visual weight, so shoppers have to work out what deserves their attention.
That’s where ecommerce visual merchandising comes in. It uses product placement, badges, labels, and other visual cues to help important items stand out and make your catalog easier to scan. Much like a window display guides attention in a physical store, your online store can show shoppers where to look and why a product is worth exploring.
In this guide, we’ll explain how ecommerce visual merchandising works, share seven practical techniques for online stores, and show you how to apply them in WooCommerce using conditional product labels.
What Is Visual Merchandising (And Why It Works Online)
Visual merchandising is the practice of presenting products so shoppers notice the right ones and feel motivated to buy. It started in brick-and-mortar retail with window displays, shelf layouts, and signage. Ecommerce merchandising takes the same ideas and applies them to product grids, category pages, and product pages.
The reason it matters online comes down to how quickly shoppers need to understand a page. Images, prices, badges, and other visual cues help people scan a product before they read every detail. That makes visual hierarchy important: shoppers should be able to tell what deserves attention without working through every line.
A few principles explain how ecommerce visual merchandising helps guide shoppers’ attention:
- Attention and visual hierarchy: A bright “20% Off” badge in a crowded product grid can draw attention to a specific item. This gives shoppers a clearer idea of where to look first.
- Scarcity and urgency: An “Only 3 left” or “Last chance” label can create urgency by showing that availability is limited. Use these messages only when they reflect real stock or deadlines.
- Social proof and recommendations: A “Bestseller” label signals that other shoppers have chosen the product, while a “Staff pick” label adds an editorial recommendation.
These cues are not just decoration. They can reduce the effort it takes to understand what a store is highlighting. Baymard Institute found that 52% of desktop and 62% of mobile ecommerce sites have a “mediocre or worse” product page experience. Clear visual signposting will not solve every product page issue, but it can make important offers and product details easier to spot.
7 Visual Merchandising Techniques For Online Stores
The strongest ecommerce visual merchandising comes from a handful of repeatable techniques. You don’t need all of them at once. Pick the ones that match how shoppers move through your store, then layer more as you learn what works.
Here are seven techniques worth building into your WooCommerce store:
- Sale badges that go beyond the default: WooCommerce includes a basic “Sale” badge. A custom badge can show the actual savings, such as “Save $15” or “30% Off,” so the value is easier to understand at a glance.
- New arrival labels: Mark fresh stock with a “New” label so returning customers spot what they haven’t seen yet. This keeps your catalog feeling current.
- Stock and availability cues: An “Only a few left” label can communicate limited stock, while a “Back in stock” label helps returning shoppers notice that an item is available again. The goal is to inform, not to pressure or mislead.
- Bestseller and social proof labels: Highlight your top movers with “Bestseller” or “Customer favorite” tags. These labels give shoppers a quick signal that other customers have already chosen the product.
- Featured and staff pick highlighting: Place key products prominently in your category grids, then use “Featured” or “Staff pick” labels to make them easier to notice.
- Seasonal theming: Swap badge colors and copy for holidays or sale events (“Summer Sale,” “Black Friday”) so the whole store feels like one coordinated campaign.
- Above-the-fold deal signaling: Put your strongest offer where it’s visible before the shopper scrolls. The first screen sets the tone for the visit.
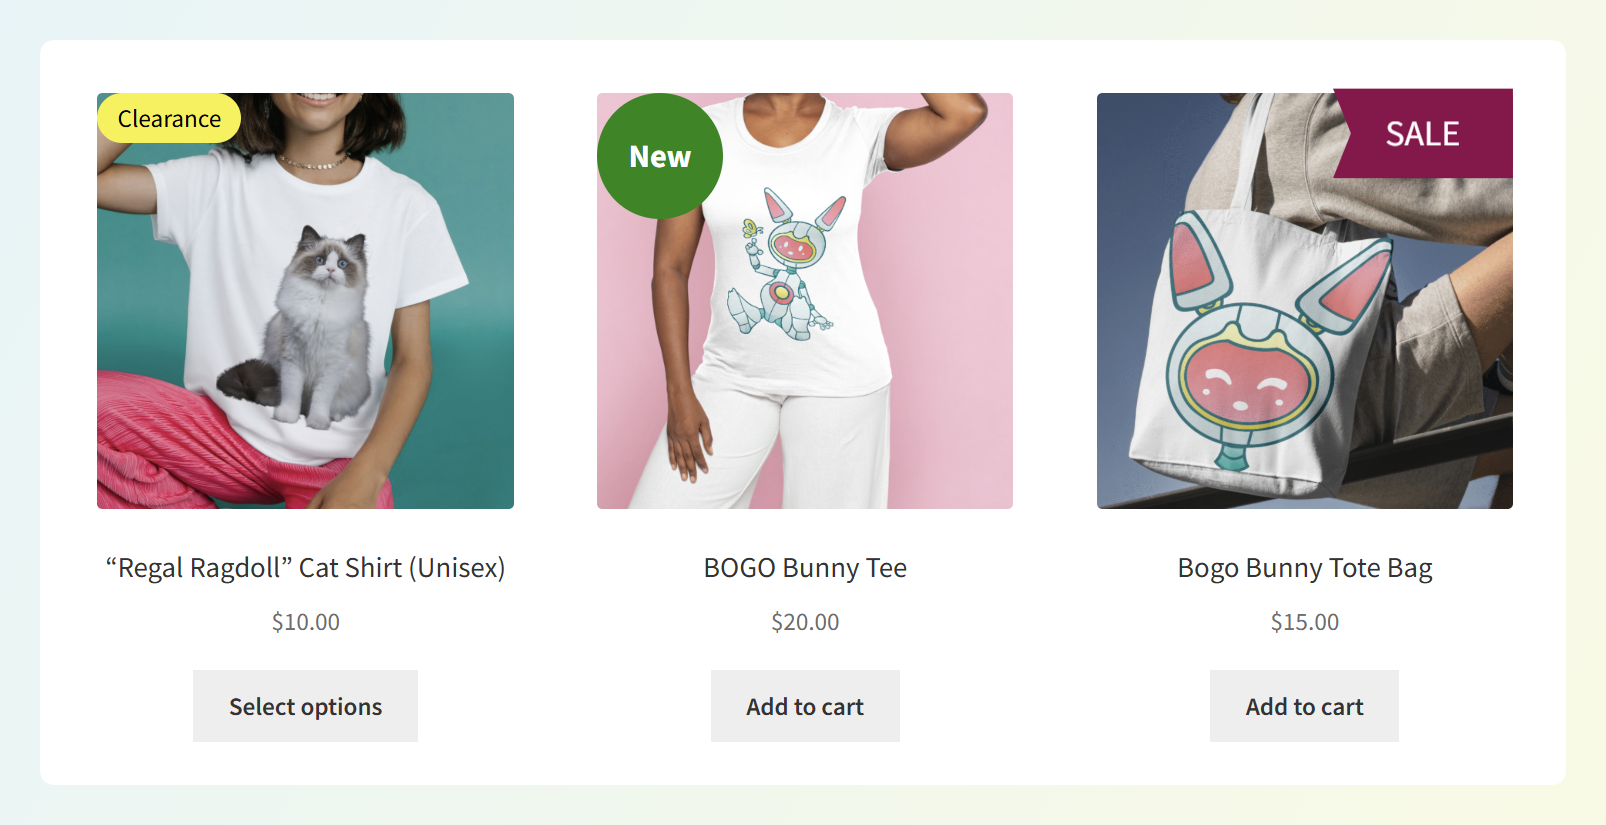
🎯 Practical tip: Avoid placing badges on every product. When too many items compete for attention, the labels stop working as clear visual cues and the page can feel cluttered. Reserve them for products you genuinely want shoppers to notice first.
If product photography is letting your merchandising down, it’s worth fixing the foundation first. We cover the common traps in our guide to WooCommerce product image mistakes, because even the best label can’t rescue a blurry photo.
Advanced Promo Kit makes these techniques easier to apply across a catalog without editing products one by one. We’ll look at how it works in the next section.
How To Use Product Labels For Ecommerce Visual Merchandising
Product labels are one of the most direct ways to put ecommerce visual merchandising into practice in WooCommerce. Here’s how Advanced Promo Kit helps you create and manage them.
Why Advanced Promo Kit fits ecommerce visual merchandising
Advanced Promo Kit from Advanced Coupons is a WooCommerce plugin for adding custom product badges and labels across your shop, category, search, and product pages. Instead of relying on WooCommerce’s default “Sale” badge, you can create multiple custom labels and control where each one appears.
It fits ecommerce visual merchandising because it maps directly to the techniques above. The scarcity cues, bestseller tags, new arrival labels, and seasonal theming we just covered are all things the plugin is built to display, and it can apply them through rules instead of requiring you to update each product manually. That makes the setup easier to manage as your catalog grows. If bestsellers and new arrivals are where you want to start, our tutorial on how to highlight bestsellers and new arrivals in WooCommerce walks through the rule-based setup.
A few capabilities make it suited to this work:
- Conditional labels: Show badges automatically based on conditions like on-sale status, featured products, category, tag, stock status, or price range. A “Sale” badge can appear on every discounted item without you touching each one.
- Six animations: Choose from pulse, flash, shake, bounce, rotate, and swing to draw the eye to a label when subtle isn’t enough.
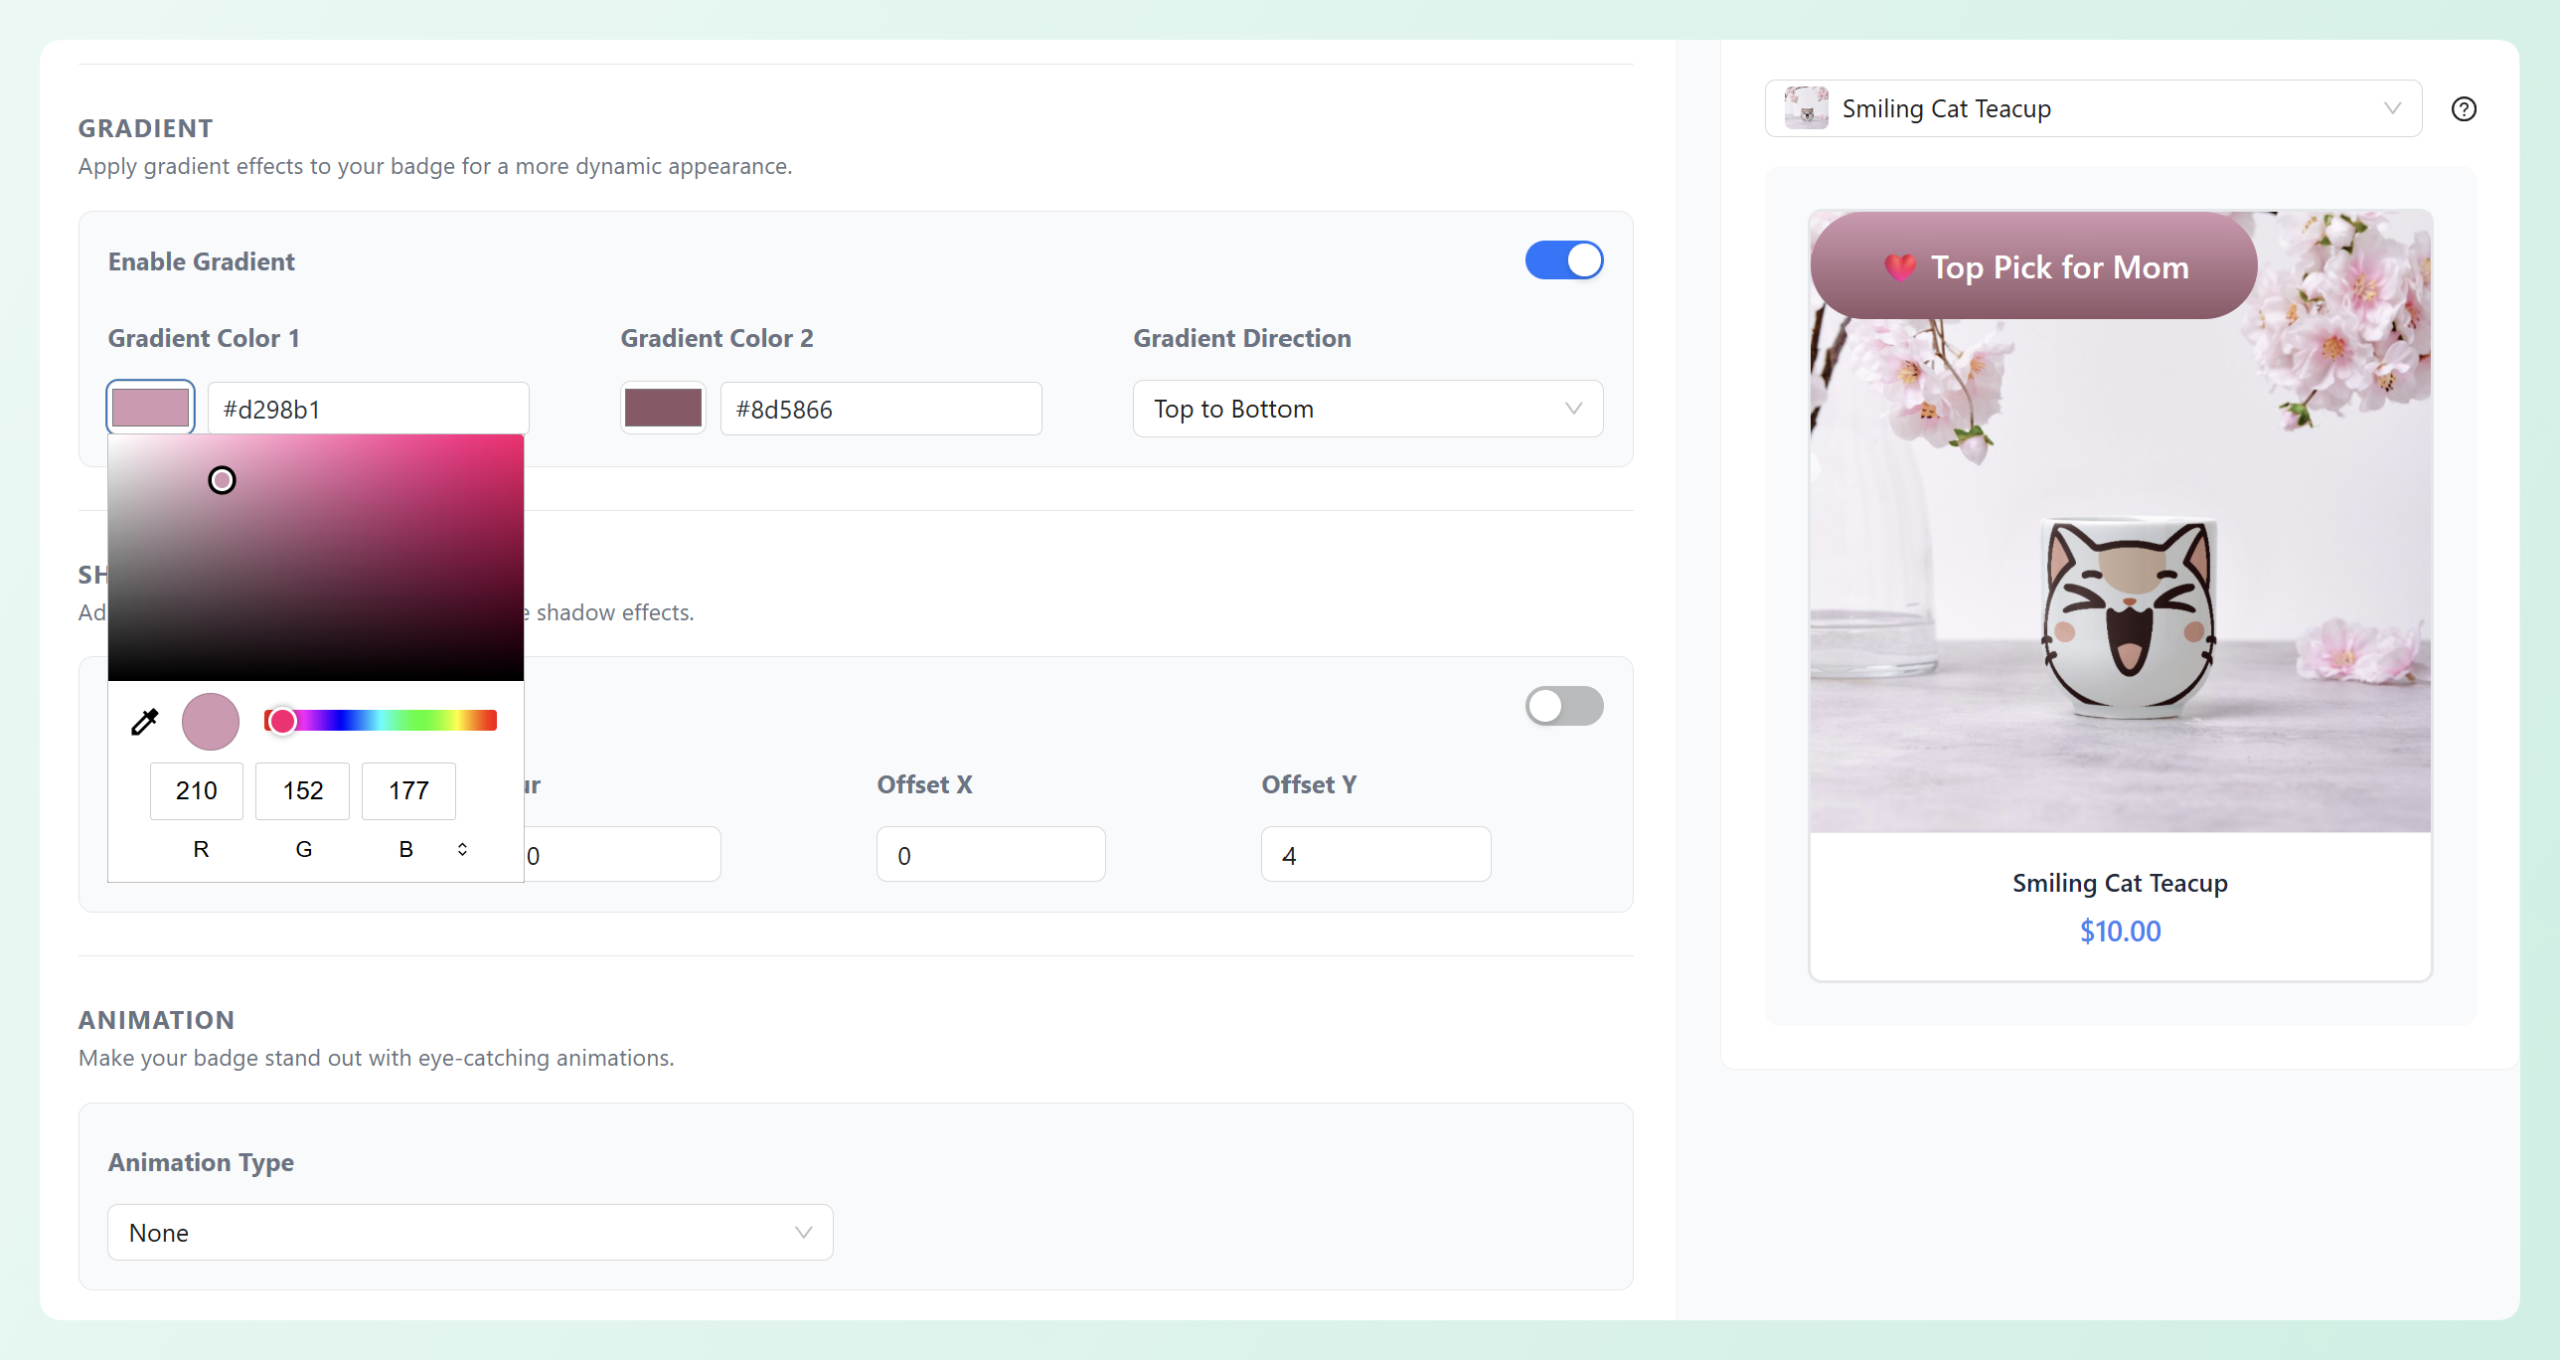
- On-brand styling: Adjust colors, gradient backgrounds, shapes, font size and weight, and placement (on the image or below the product) so badges look native to your theme.
- Clickable labels with tooltips: Make a label clickable and add a hover tooltip, so a “Special offer” badge can guide shoppers toward the deal.
- Custom image badges and live preview: Upload your own badge graphics and preview changes before they go live.
Setting up your first product label
Once the plugin is active, the workflow follows your merchandising plan:
- Create a new label and give it a clear name, such as “Bestseller” or “Low Stock.”
- Set the conditions that decide where it appears, for example stock status for a scarcity badge or a category for a seasonal sale.
- Style the label to match your theme using the color, shape, and placement options.
- Add an animation if the label needs extra attention, and keep it subtle for everyday badges.
- Use the live preview to check how it looks, then publish.
For a deeper look at badge design choices, our guide to sale badges and product labels for WooCommerce walks through the styling options in more detail. Labels are only half the picture, though, so our guide on how to optimize your WooCommerce product pages covers the broader product page experience.
Scarcity labels deserve a careful hand. When they reflect real stock and genuine deadlines, they can create urgency without misleading shoppers. Our guide on how to create urgency in sales explains the difference between a helpful reminder and pressure that can backfire.
Measuring The Impact Of Your Merchandising
Track how labeled products perform instead of judging your visual merchandising changes by appearance alone. Focus on a few signals:
- Click-through rate on labeled products: Compare clicks on badged items against similar unbadged ones. A lift suggests the label is pulling attention where you want it.
- Conversion rate on highlighted items: Watch whether featured and scarcity-labeled products convert better after you add cues.
- Add-to-cart and post-purchase signals: Check whether a “Low stock” label changes add-to-cart behavior, then watch returns, complaints, or customer questions for signs that the message was unclear.
Use product-level event tracking in your analytics tool, then change one element at a time. Test the label copy, color, placement, or conditions separately so it is easier to understand what may have affected the result.
Frequently Asked Questions
What is ecommerce visual merchandising?
Ecommerce visual merchandising is the practice of presenting and signposting products online so shoppers notice the right items and feel motivated to buy. It uses badges, labels, placement, and visual cues to do the job a window display or store layout does in physical retail. The aim is to guide attention, signal value, and reduce the effort it takes to choose.
How is online visual merchandising different from retail?
The principles are the same, but the tools differ. Physical retail uses shelving, lighting, and signage, while ecommerce merchandising uses product grids, badges, labels, and page layout. Online, shoppers scan a screen instead of walking an aisle, so visual cues have to work in the small space of a product thumbnail and the first screen of a page.
Do product badges actually increase sales?
Product badges can help draw attention to a sale, bestseller, or low-stock item, but they do not guarantee more sales on their own. The result depends on the offer, product, design, and audience. Use badges selectively, then track click-through, add-to-cart, and conversion data to see how labeled products perform in your store.
Can I add product labels in WooCommerce without code?
Yes. A plugin like Advanced Promo Kit lets you create and style product labels from a visual interface in your WordPress dashboard, with no coding required. You can set conditions, choose colors and placement, preview the result, and activate the label. WooCommerce’s default “Sale” badge offers far fewer customization options, so a dedicated plugin is useful when you need more control.
How many products should I put badges on?
There is no fixed percentage that works for every store. Start with a small, intentional group of products, then review how the page looks and how shoppers respond. If nearly every item carries a badge, the labels lose contrast. Reserve them for genuine deals, limited stock, new arrivals, or products you want shoppers to notice first.
Start Merchandising Your WooCommerce Store
Good ecommerce visual merchandising makes it easier for shoppers to see what deserves attention. It gives your product grid a clearer hierarchy, so key deals, new arrivals, and standout items do not blend into everything around them.
Here’s how to put it into practice:
- Understand why visual merchandising works online and design around how shoppers scan a page.
- Pick a few merchandising techniques that match how people shop your store.
- Use product labels for ecommerce visual merchandising instead of editing products one by one.
- Measure click-through and conversion so your badges earn their place.
Ready to make your products stand out? Advanced Promo Kit lets you add conditional product labels and sale badges that help shoppers spot your most important products and offers.