Store credit provides a flexible payment option and a reliable return policy. It’s popular with customers and attractive for businesses since you can use it to increase sales and build brand loyalty. This guide will show you how to email store credit to build loyalty, reward your customers, and increase sales.
WooCommerce email automation can help you notify customers that they have received a store credit and to come and use it in the store. In this guide, we’ll show you the exact setup so that when a customer earns store credit, they’ll automatically receive an email notification without you needing to lift a finger.
We’ll also discuss the benefits of using store credit in your e-commerce store. Plus, we’ll guide you through four easy steps for emailing store credit to your customers. So, let’s get started!
Benefits Of Offering Your Customers Store Credit
Store credit can help you become very popular with customers.
For example, 57% of consumers who enjoy receiving emails from businesses say that the emails include offers. Moreover, store credit provides customers with flexible payment methods, including the opportunity to combine multiple payment options.
This helps you tailor the shopping experience to customers’ specific needs. If your business shows that it cares about the customer experience in this way, it can help you build brand loyalty and increase customer retention rates.
Furthermore, store credit provides customers with a reasonable return policy. Customers are encouraged to buy and spend more with you when there’s less risk associated with their purchases. As a result, this can help you increase sales and reduce revenue loss and product returns.
On the other hand, setting up credit for your e-commerce store can be tricky. You’ll want to establish guidelines to determine who receives it, and carefully consider your payment terms and conditions. Plus, you’ll need a way of notifying customers about their credit.
The latter can be a time-consuming task if handled manually.
The best way to alleviate the hassle of managing store credit is by using automation. Once you’ve integrated an automation platform with your e-commerce site and told it what you want it to do, you can take this particular task off your plate.
How To Email Store Credit Using Automation (In 4 Steps)
Now that you know the benefits of offering store credit to customers, you can enable this feature in WooCommerce. After that, the easiest way to send store credit emails is with our own Advanced Coupons plugin, paired with Uncanny Automator.
Step 1: Install and activate Advanced Coupons and Uncanny Automator
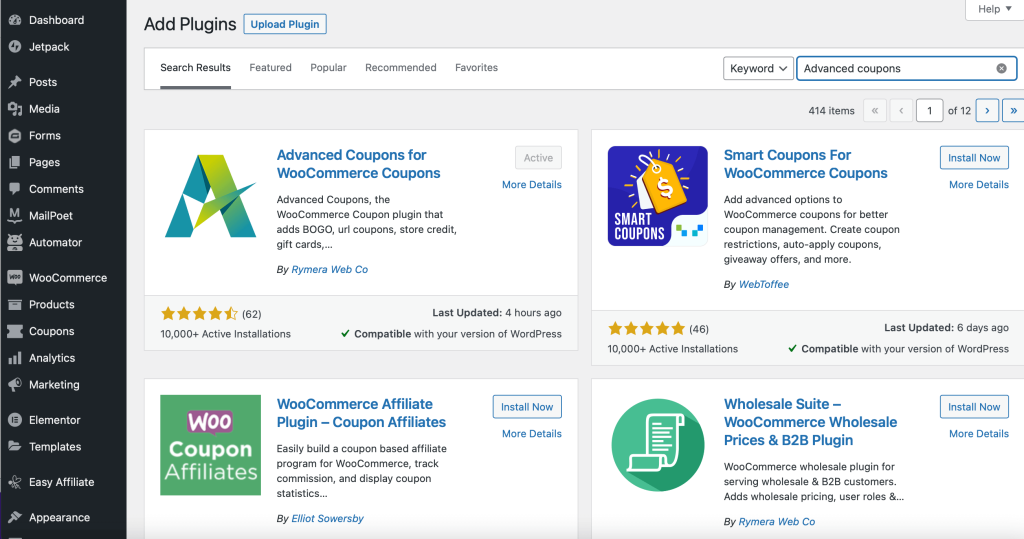
To get started, head to Plugins > Add New in your WordPress dashboard:
Use the search bar to find Advanced Coupons:
Click on the Install Now button, and then select Activate.
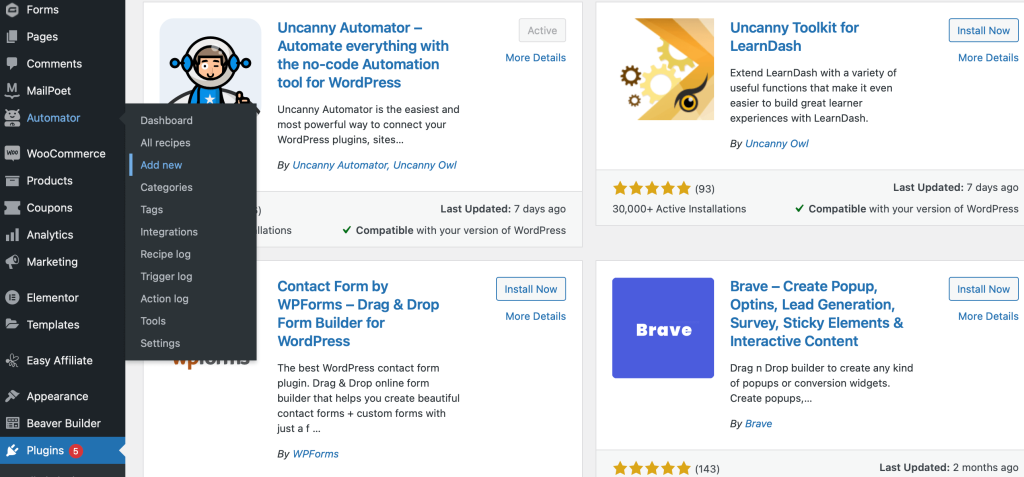
After that, you can follow the same steps above to install and activate Uncanny Automator, so you can configure WooCommerce email automation. Once both plugins have been successfully activated, you should see new Coupons and Automator options appear in the sidebar of your dashboard.
Step 2: Create a trigger for your recipe
To email store credit to customers, you’ll need to create a new recipe using Uncanny Automator and set up a trigger and action sequence. This allows your e-commerce store to generate and deliver emails straight to your customers’ inboxes to notify them about their credit accounts.
Let’s start with the trigger. Head to Automator > Add New to create a new recipe:
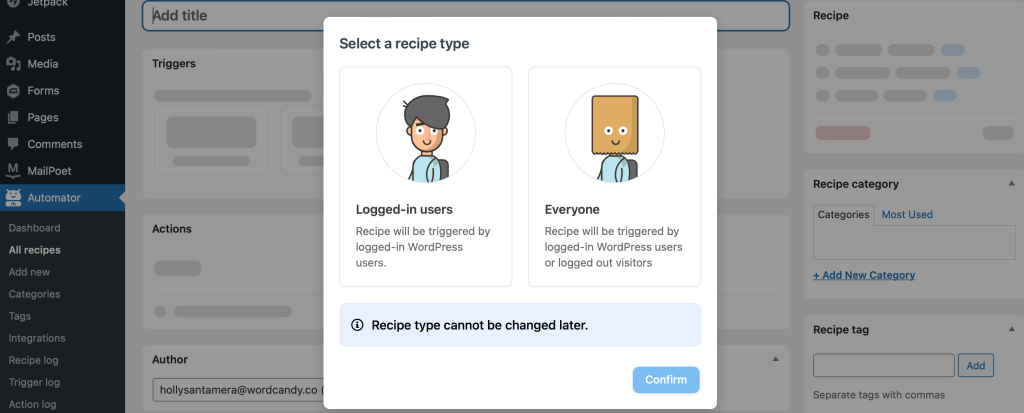
‘Recipe’ simply refers to a sequence that you’d like to set up for your WooCommerce store, consisting of trigger(s) and action(s).
Next, select Logged-in users on the pop-up screen:
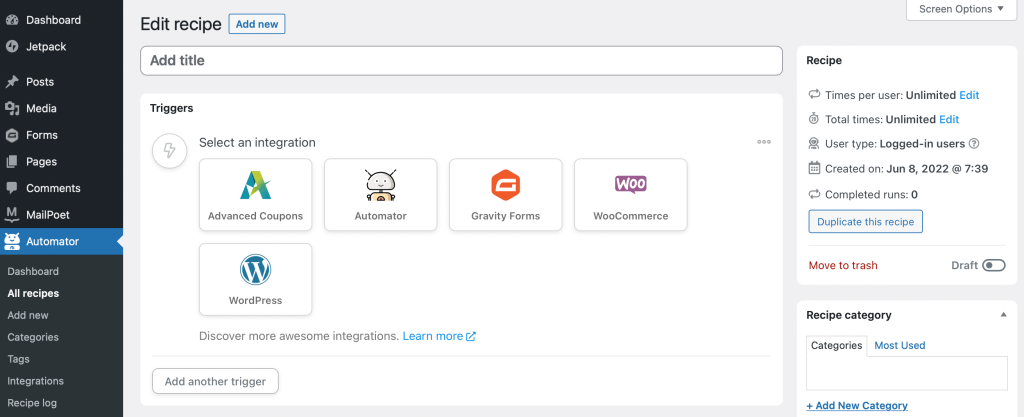
You’ll be taken to an editing screen where you can add your triggers and actions. Under Triggers, you’ll be able to choose from a variety of integration options. Select the Advanced Coupons integration:
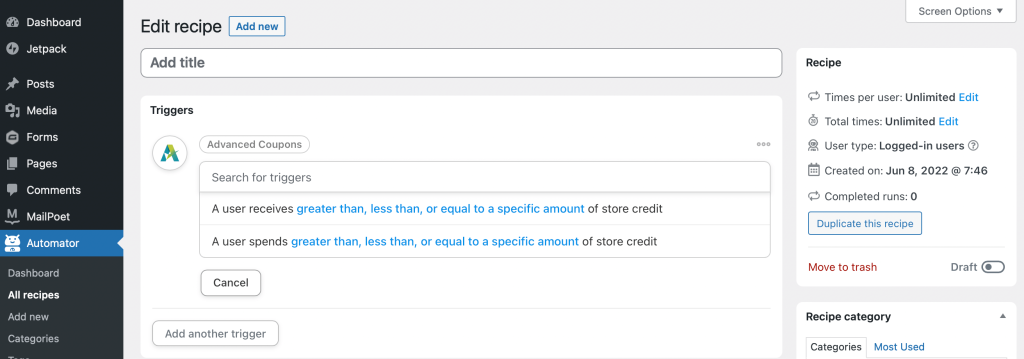
The drop-down box suggests triggers you might like to use. Select the option that says: A user receives greater than, less than, or equal to a specific amount of store credit:
Change the condition box to read greater than, and then click on Save.
In the next box, you’ll need to input an amount. Because of the conditions you’ve set up, any amount over this value will trigger an email to be sent to your customers. Enter “0” in this box:
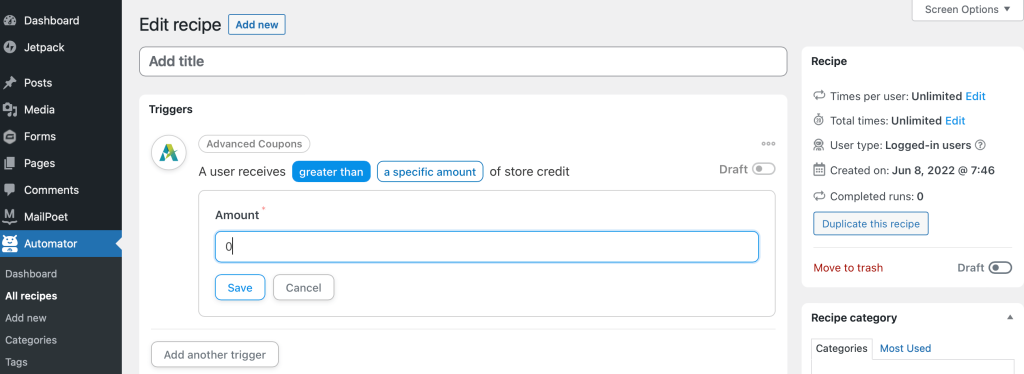
Hit Save to add the trigger. It’s also a good idea to use the slide bar to set the recipe to “draft” while you edit your recipe.
Step 3: Add an action to your trigger to email store credit notifications
Next, scroll down to the Actions section of the editing page, and click on Add Action.
When presented with the options to integrate with, select WordPress. Then use the drop-down box to find the WordPress action Send an email:

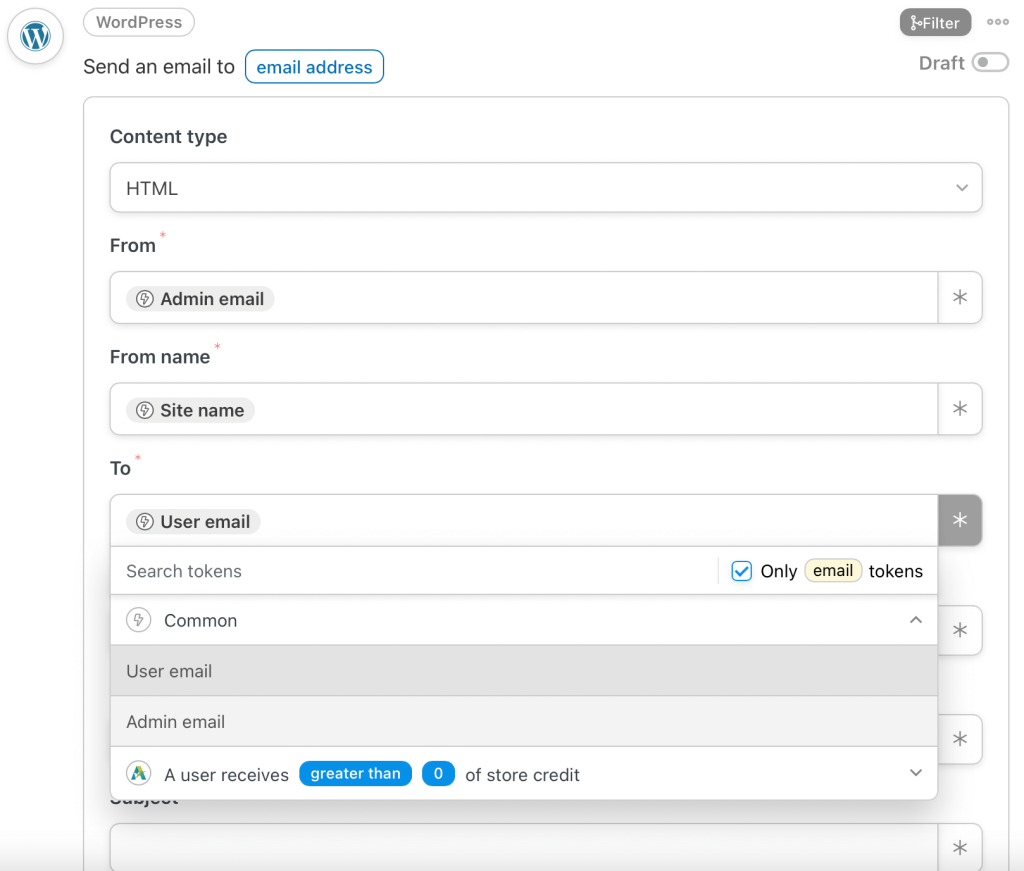
A template email will appear, which you can customize. The From and From name sections will be pre-filled. To fill in the To section, use the icons at the right side of each box to search for tokens. If you click on Common Tokens, you’ll see a User Email option:
Next you can add a subject to your email, such as: “You’ve Received Store Credit!” Then fill your email with body text. When writing emails to customers, it’s important to consider that 21% of customers like emails because they are personalized.
Therefore, it’s smart to make the most of personalization tokens like User first name. To notify your customer of how much store credit they have, you’ll need to click on the token icon, expand the token you selected as your trigger, and select User’s total store credit.
You can also add links to your email to direct customers to your website, and use media such as high-quality images to capture their attention. You could also include a call to action to encourage users to visit your online store. Then hit Save to update your changes:
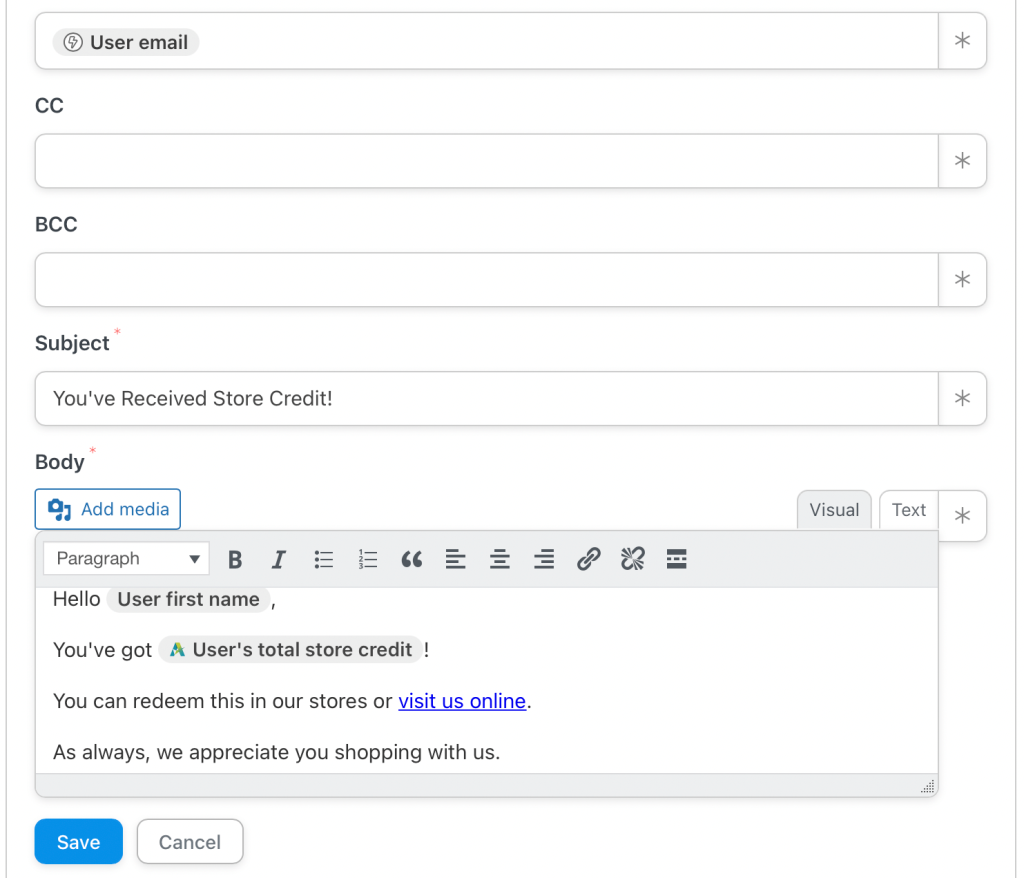
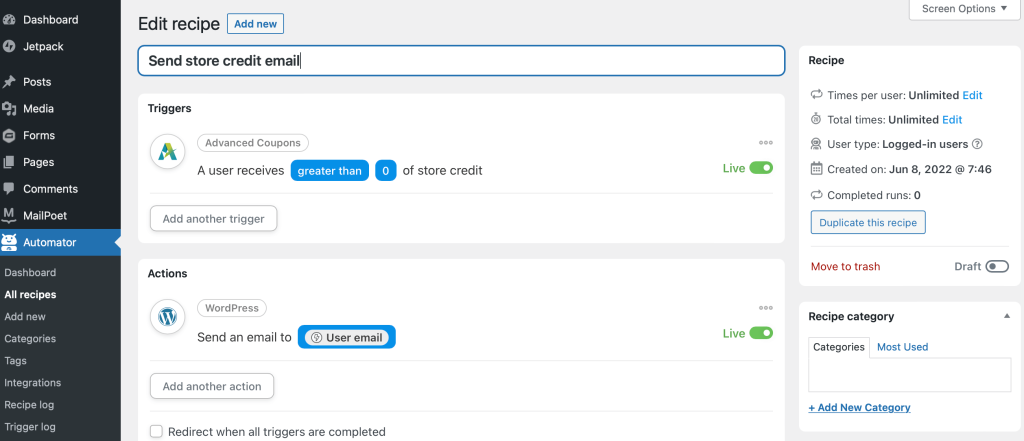
At this point, you’ve created your trigger and action sequence. Don’t forget to give your recipe a title (we called ours “Store credit email”).
Step 4: Review and publish your recipe
At this point, it’s a good idea to review your recipe. There are a few more settings you can alter if you like, such as how often emails will be sent out. You can also add tags and categories if you want to organize your recipes:
Also, you can choose to redirect your users to a different page once the trigger is complete. For example, you might want to send users to your online store once they’ve finished reading the email. Just be careful about sending users to different pages without making it clear upfront.
If you’re happy with how your recipe looks, go ahead and use the slide bars to make your trigger and action live. After that, your new emails will start sending automatically.
Conclusion
Credit can be an excellent way for your e-commerce store to increase sales, build brand loyalty, and lessen revenue losses. Although managing store credit may sound like a lot of work, with WooCommerce email automation, it’s much simpler than you might expect.
To recap, here is how to send a fully automated store credit email to your customers’ inboxes:
- Install and activate Advanced Coupons and Uncanny Automator.
- Create a trigger for your recipe.
- Add an action to your trigger.
- Review and publish your recipe.
Do you have any questions about sending automated store credit emails? Let us know in the comments section below!


