Getting a user to sign up for your email list is the first of many steps in their customer journey. Thanks to opt-in email marketing, you can reach out to users with offers, personalized messages, information about upcoming products, and more.
Store credit after email opt-in is another option you can do. If you can get subscribers to make that first purchase, you’re off to the races. For instance, you encourage subscribers to become buyers by offering them discounts for their first purchases.
In this article, we will talk about why opt-in email marketing can be such a powerful tool and what options you have to manage subscribers. Then we’ll show you how to offer WooCommerce store credit for opt-ins. So, let’s dive deeper into it!
Why You Should Offer Store Credit For Email Opt-Ins
A lot of websites offer benefits or freebies for users who sign up for their email list.
The goal of opt-in email marketing is to encourage as many signups as possible. How effective this approach is will depend on what you’re offering and whether users find your emails engaging or not.
The main advantage of offering store credits as a reward for email opt-ins is that users only benefit if they make a purchase. You may lose out on getting the maximum revenue for a product, but in exchange, you get a client.
Getting users to make that first purchase is often the hardest part of the road. Once they know they can trust the quality of your products and that the purchasing and shipping process works, users are more likely to return to your store.
The probability of closing a sale with an existing customer can be as high as 60-70%. Returning customers are also 50% more likely to try out new products. Investing in discounts and special offers for onboarding new customers can pay off big time if you can retain those users.
What Is The Best Opt-In Email Marketing Service For Your Store?
WordPress doesn’t offer opt-in email marketing functionality out of the box.
The Content Management System (CMS) can send transactional emails. However, if you want more advanced email functionality, you’ll need to turn to a third-party service. Here are our top picks:
- Drip: This is one of the few email marketing services built with e-commerce in mind. Drip can keep track of orders that users make and lifetime revenue. You can use the service to build complex campaigns that include triggers, and the platform can even show you projected revenues.
- ActiveCampaign: If you’re looking for an email marketing service that integrates with a broad range of platforms and apps, this is it. ActiveCampaign can help you sign users up for an email list, and it offers over 800 app integrations.
- OptinMonster: This service enables you to set up highly optimized opt-in forms using popups, exit-intent elements, and other similar options. It’s also one of the best solutions that you can use to lower cart abandonment rates for your website.
- Campaign Monitor: This platform gives you access to both email and SMS marketing. Moreover, the service offers one of the most intuitive email builders in the market alongside a massive selection of templates for your campaigns.
- Klaviyo: With Klaviyo, you get an email marketing service designed for online stores. The platform can integrate with your store, track user behavior, and help you configure messages that will be sent to specific audiences.
- SendX: This service enables you to create a double opt-in list resulting in a highly qualified email list. Further, you can access free abandoned cart email templates to reach out to users.
Any of the opt-in email marketing services we mentioned before can integrate with WordPress.
Some of them come with official plugins whereas others will provide you with the code that you need to embed opt-in forms in your website. In the next section, we’ll show you how that process works.
How To Give WooCommerce Store Credit After Email Opt-In
For this tutorial, you’re going to need the free version of Advanced Coupons and a premium Uncanny Automator license. That’s because the integration that we need to use is only available with the premium version of Uncanny Automator.
Step 1: Create an opt-in email marketing form
If you don’t have an email signup form set up yet, now is the time to do so. Uncanny Automator integrates with several email marketing services and plugins.
However, the easiest way to set up this automation is by using WPForms. The premium version of WPForms integrates with several of the email marketing services we mentioned earlier, including OptinMonster, Active Campaign, and Drip.
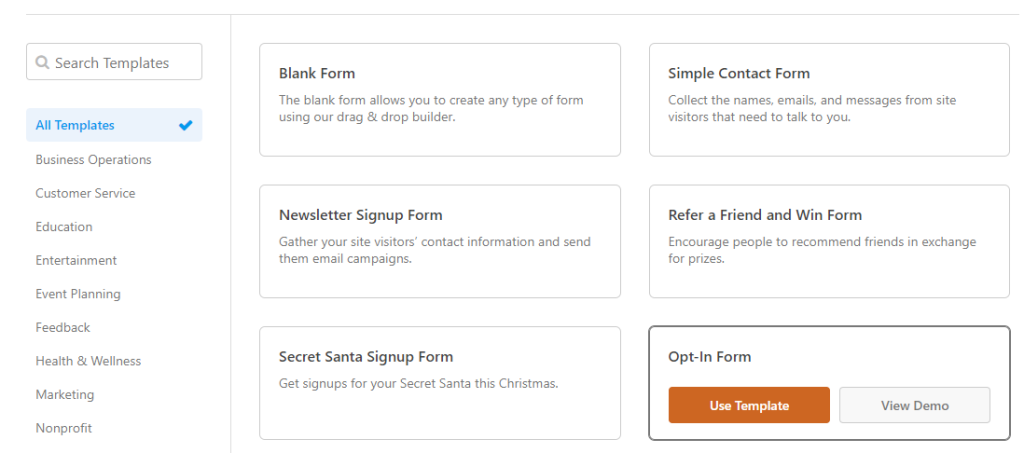
This process works similarly with most WordPress form plugins. Look for the option to add a new form and select the opt-in option:
WPForms offers a broad range of form templates that you can use to save time. The plugin’s opt-in email marketing form template enables you to collect first and last names and email addresses. However, you can pick and choose which fields to add using the plugin’s drag-and-drop form builder:
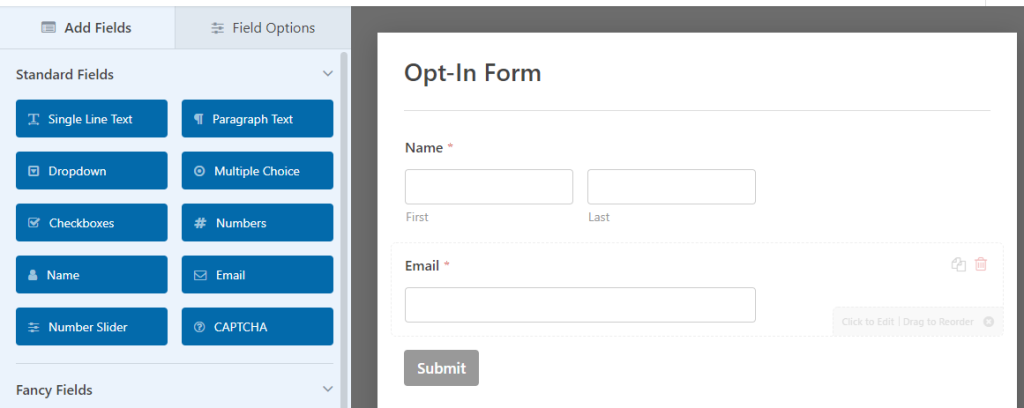
Once you’re happy with your form’s design, move to the Marketing tab.
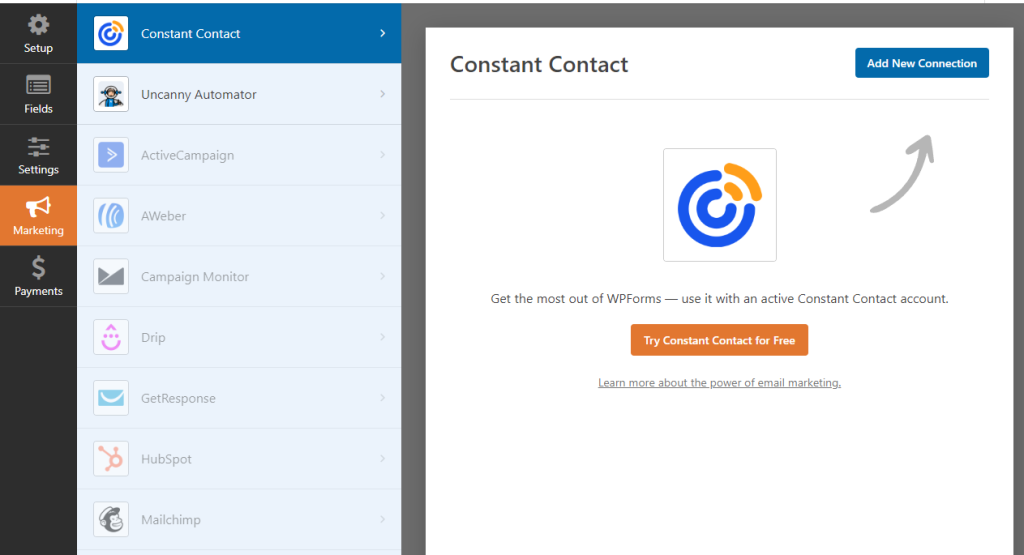
Here you’ll see options for available email marketing integrations. The free version of WPForms can only integrate with one provider, Constant Contact:
Connecting an email marketing service with WPForms works similarly for most options. The plugin will ask you for your account information and, in some cases, for an API key.
After connecting the opt-in form with a marketing service, close the editor. The form is ready to use so you can go ahead and place it on your website using blocks or shortcodes:
Now that the form is ready, it’s time to configure its integration with Advanced Coupons. For that, we’re going to need to use Uncanny Automator.
Step 2: Configure the Uncanny Automator trigger
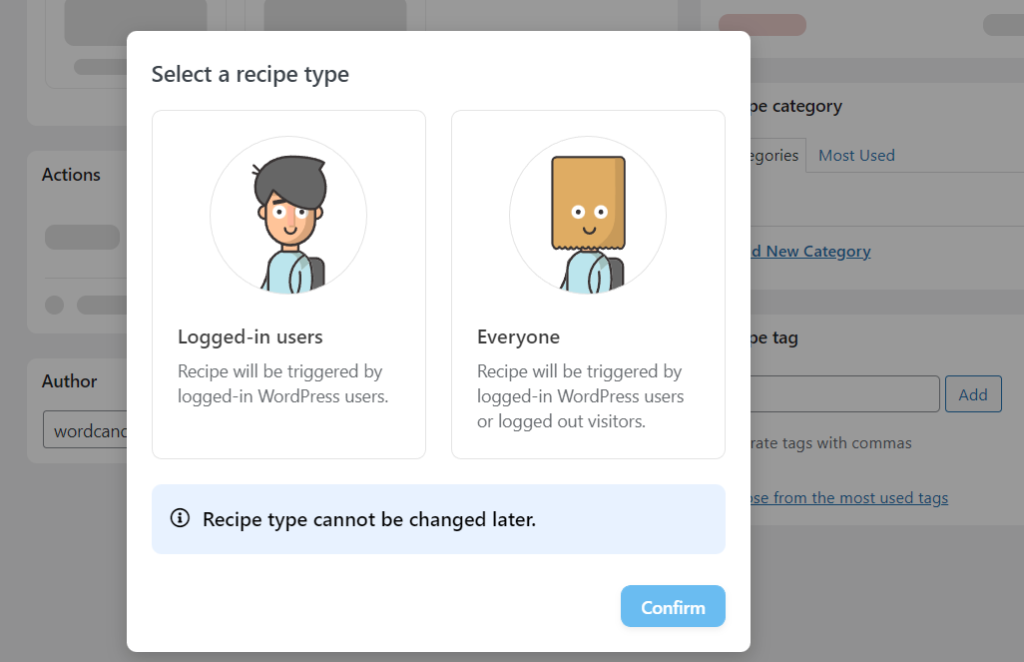
To get started, go to Automator > Add New and select the Everyone recipe type. This is so that even non-logged-in users will be able to fill out the opt-in form and get their corresponding credits:
On the next page, click on the WPForms option under Triggers. Select the A form is submitted option and Uncanny Automator will enable you to select what form this applies to. Choose the opt-in form that you created during step one:
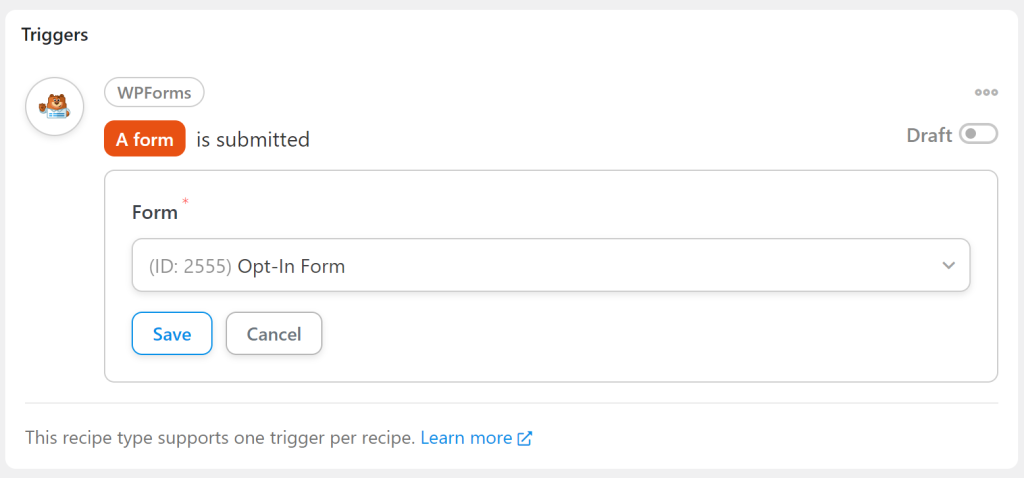
Save your choice and make sure the trigger status is set to Live.
Now let’s move on to the action part of the recipe.
Step 3: Configure Advanced Coupons to add store credits
Scroll down to the Actions section of the page and look for the Advanced Coupons option. As we mentioned earlier, this option is only available if you’re using Uncanny Automator Pro:
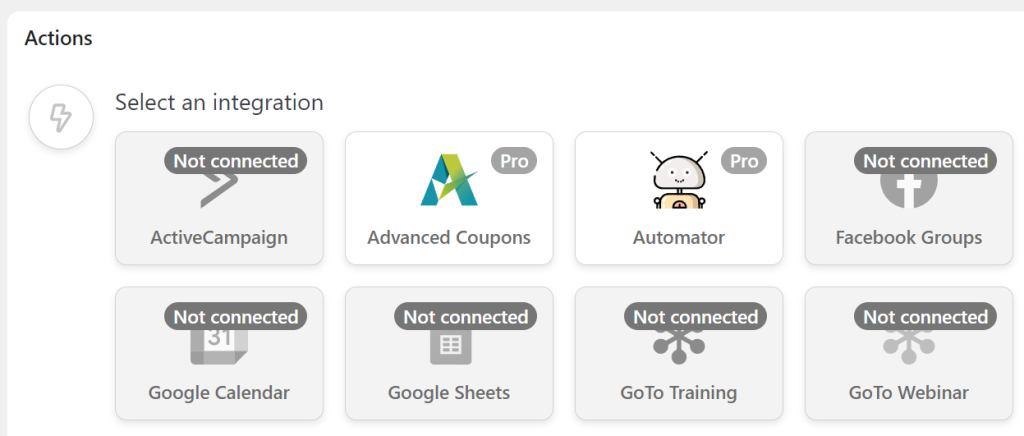
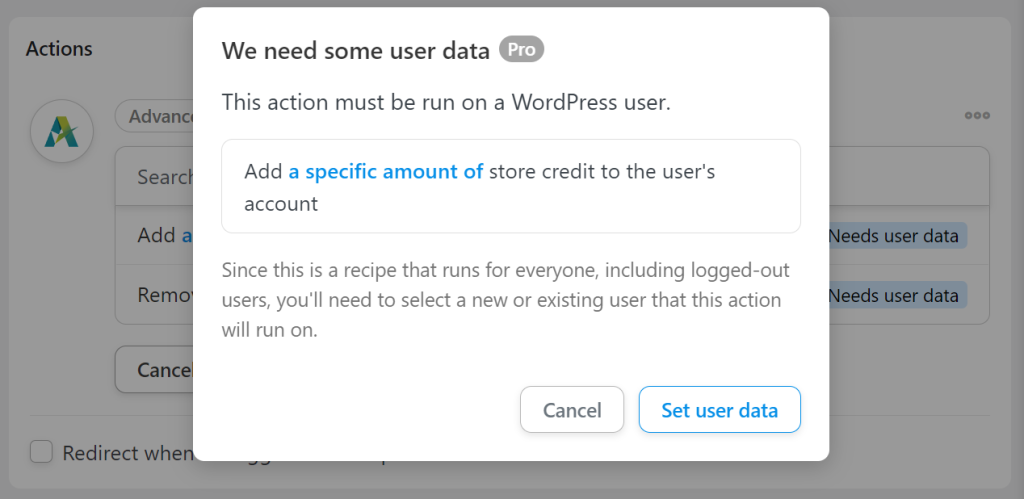
After selecting the action, look for the option that says Add a specific amount of store credit to the user’s account. The plugin will let you know that this action needs a WordPress user account to work:
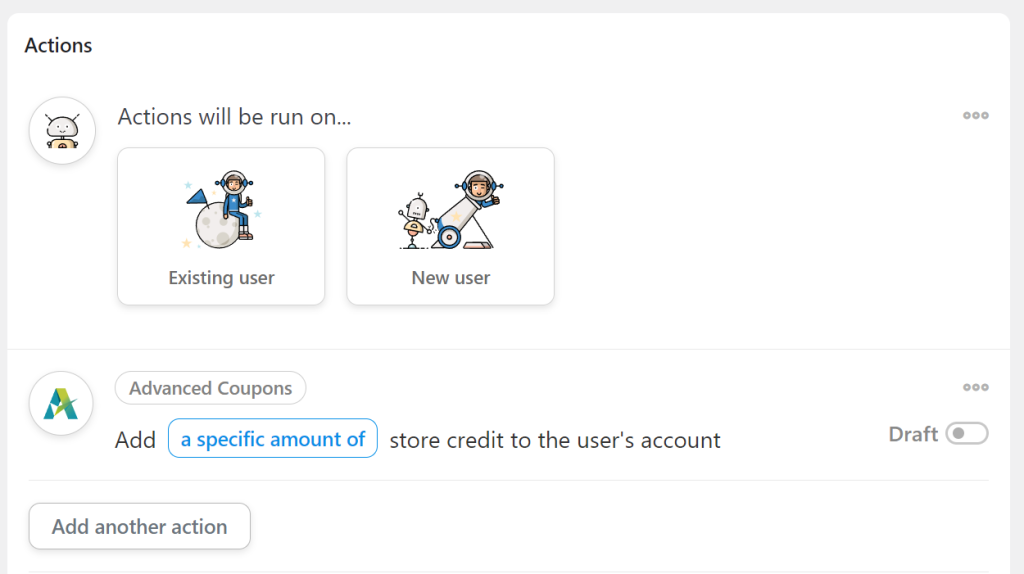
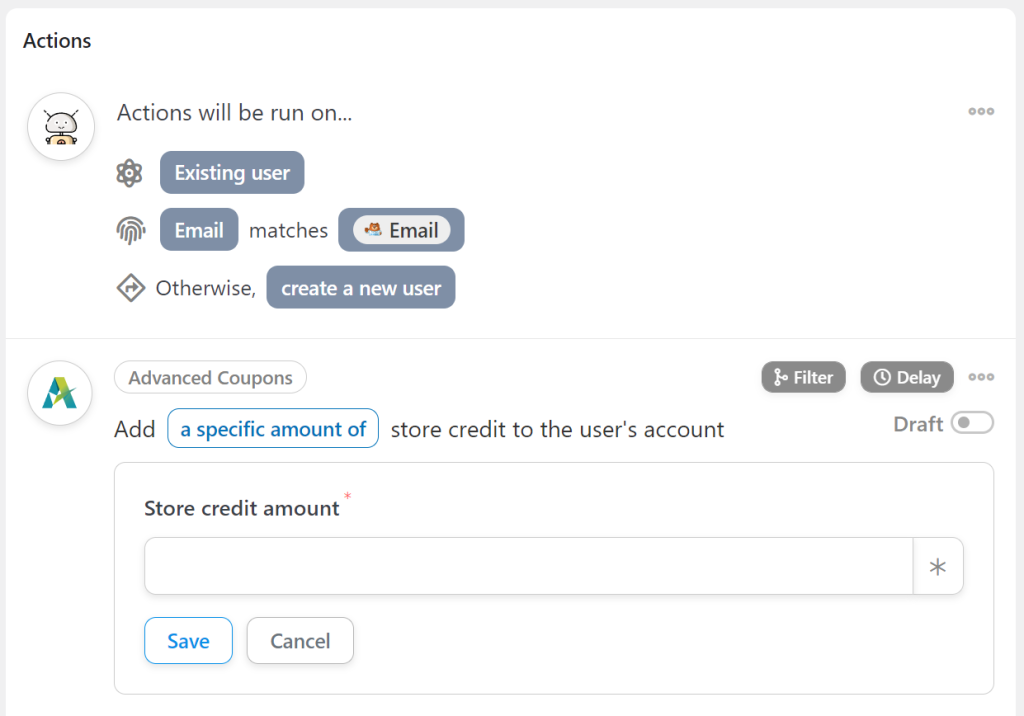
Click on Set user data and Uncanny Automator will ask you if you want to run the action on existing or new users. Let’s go with the Existing user option, as we can also use the plugin to configure what happens if a visitor fills out the opt-in form:
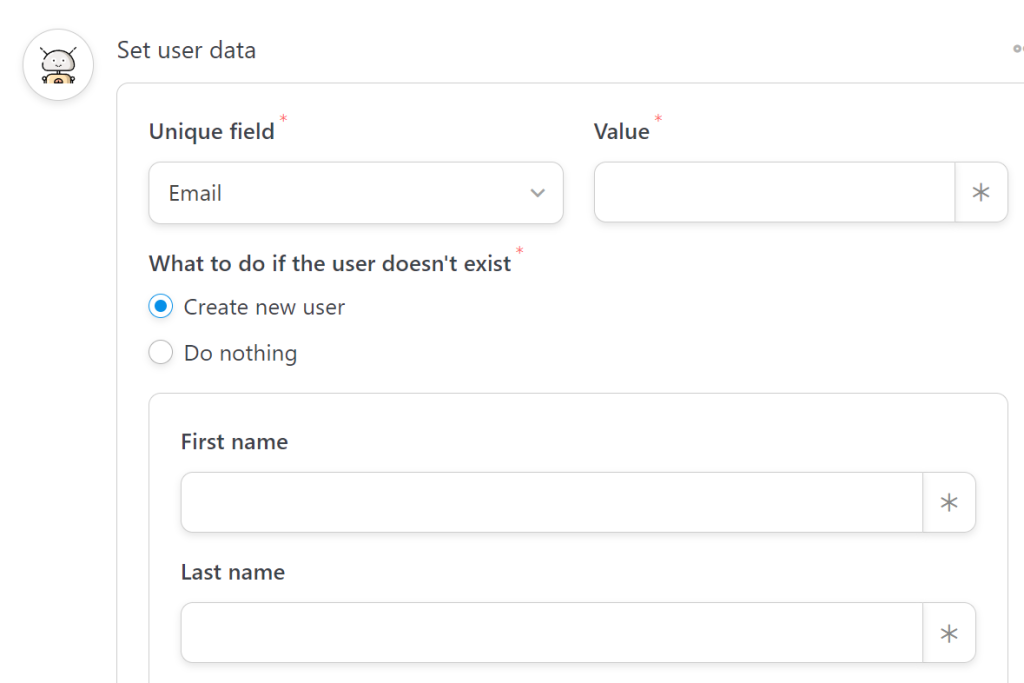
Select the Email option under the Unique field and choose Create new user under What to do if the user doesn’t exist. What this does is tell WordPress that if the email value doesn’t match any existing users’, it should create a new account. This is essential because you can’t assign store credits to guest accounts:
Configuring the values for new accounts
The last thing we need to do is to configure the values for these new accounts.
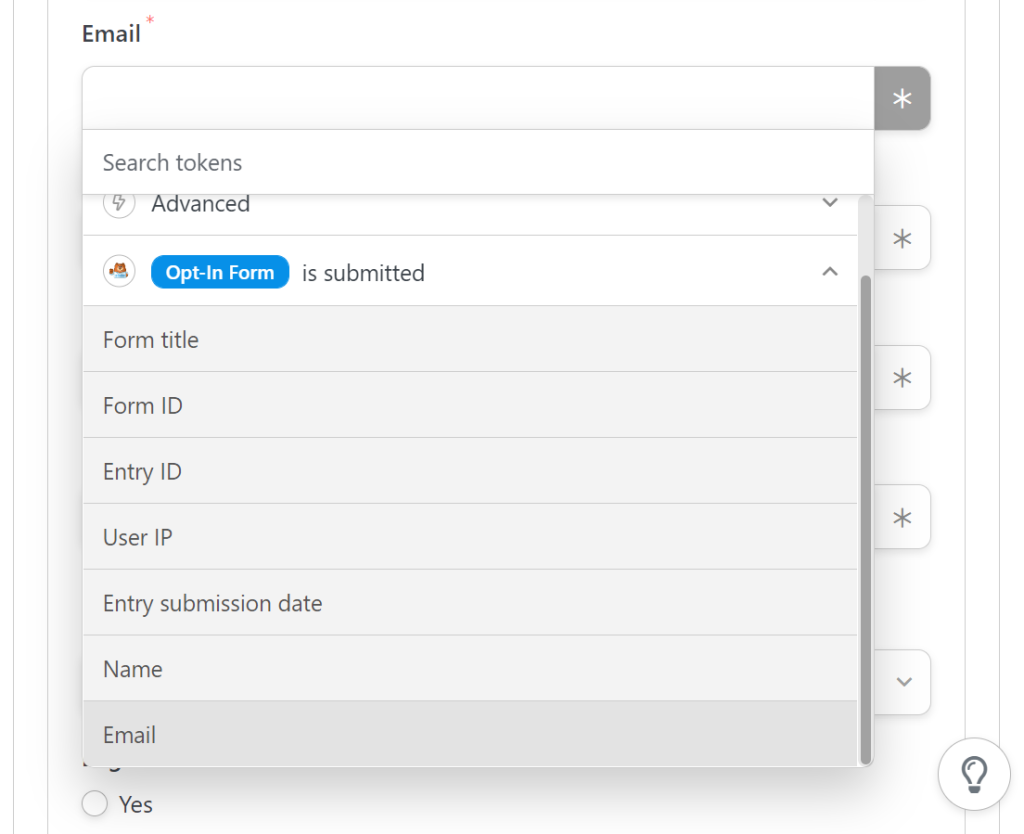
There are two required values needed to create a new user account, which are Email and Username. Select the asterisk icon next to the Email field and look for the Opt-in Form > Email value:
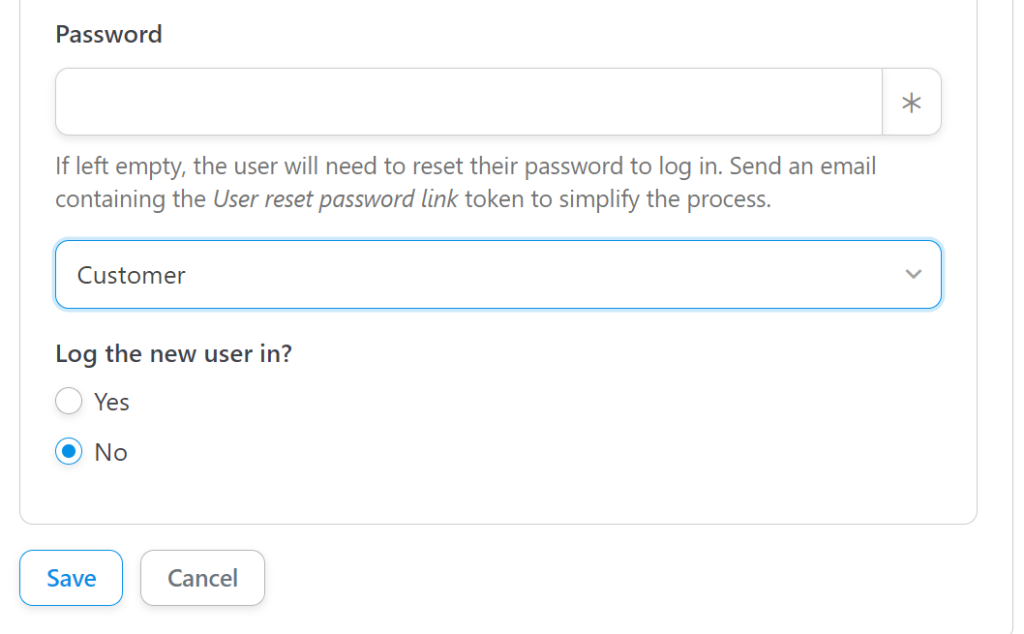
Repeat the same process with the Username field but select the Opt-in Form > Name value instead. Finally, scroll to the bottom of the section and select the role that WordPress should assign to new users. Since we’re using WooCommerce, set the role to Customer and save the action’s configuration:
We’re not setting automatic passwords for this integration because that can lead to security vulnerabilities. Instead, it’s best to leave the Password field blank and have users reset their passwords before they log in. Users will get confirmation emails when they opt in and register, and resetting the password in WordPress is fairly simple.
Before saving the recipe, click on the option that says a specific amount under Advanced Coupons to set how much store credit users will get:
Save the configuration and that’s it. Remember to switch the recipe’s status from Draft to live and new subscribers will start to get store credit.
Conclusion
Opt-in email marketing is a fantastic way to incentivize visitors to both sign up for your email list and make their first purchase. More so if you leverage store credit in the process. Once a user makes that purchase, they’re much more likely to return to your store.
In other words, a small amount of store credit can pay off big time in terms of lifetime revenue.
If you’re using Uncanny Automator Pro and Advanced Coupons, you can give WooCommerce store credit after email opt-in following three steps:
- Create an email marketing opt-in form.
- Configure the Uncanny Automator trigger.
- Configure Advanced Coupons to add store credits.
Do you have any questions about how to offer email opt-in store credit in WooCommerce? Let’s talk about them in the comments section below!





Will definitely be implementing this!
Awesome Fran! Get after it!