Product categories are likely something you don’t always think about as a WooCommerce store owner. However, they play a crucial role in creating a better shopping experience for your customers! By setting up WooCommerce product categories, you make it easier to group related products, guide browsing behavior, and help customers find exactly what they’re looking for.
In this complete guide, we’ll walk you through how to create and manage product categories in WooCommerce. Plus, we’ll show you how you can use them to create smarter and more targeted promotions using Advanced Coupons. Interesting, right? Let’s get started!
What Are WooCommerce Product Categories?
WooCommerce product categories help store owners group similar products together. If you run an apparel store, for instance, you might add categories like “Sweaters”, “Shirts”, and “Dresses.” These categories help shoppers find what they’re looking for faster. Instead of combing through your entire product catalog, customers can easily filter by category and head straight to the products they’re interested in.
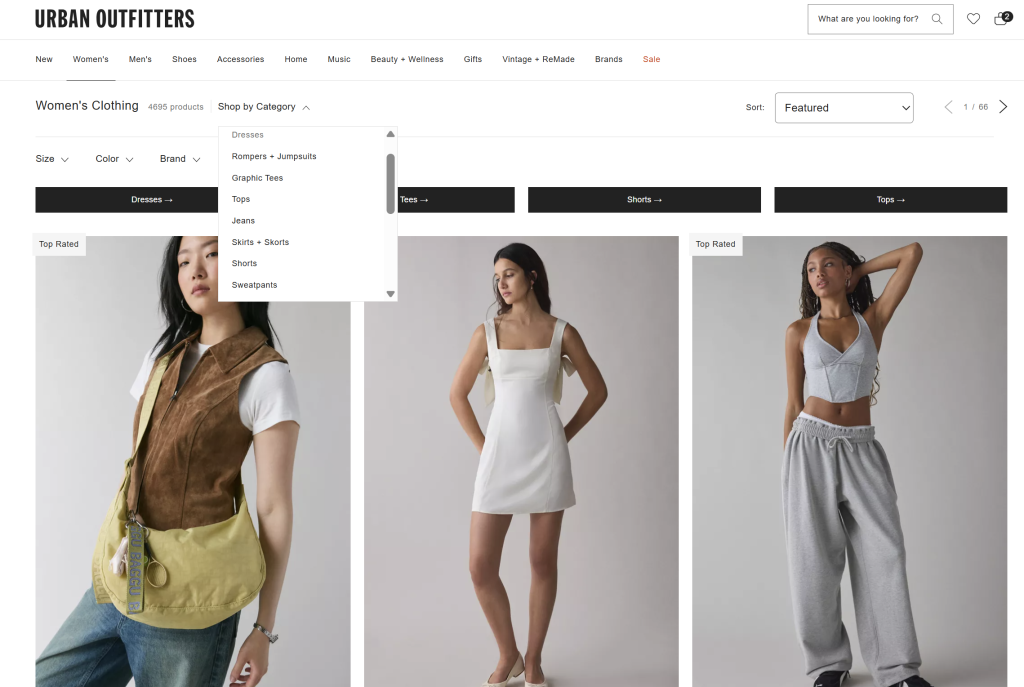
You can go as broad or as specific as you want: WooCommerce gives you the flexibility to structure your product catalog. For instance, you can assign a parent category (such as “Furniture”) and create subcategories under it (such as “Tables” and “Sofa”). This allows you to create a more intuitive browsing experience for your shoppers.
Setting up clear and structured product categories can improve your store’s overall structure and make it easier to navigate. It also lays the groundwork for smarter, more targeted promotions.
With plugins like Advanced Coupons, you can create deals based on specific categories, reward loyal customers for shopping within certain product types, or even offer free shipping for selected categories!
How To Set Up WooCommerce Product Categories
Creating WooCommerce product categories is simple, but it can be tricky if you’re new to the WordPress interface. So, let’s walk through the process step by step.
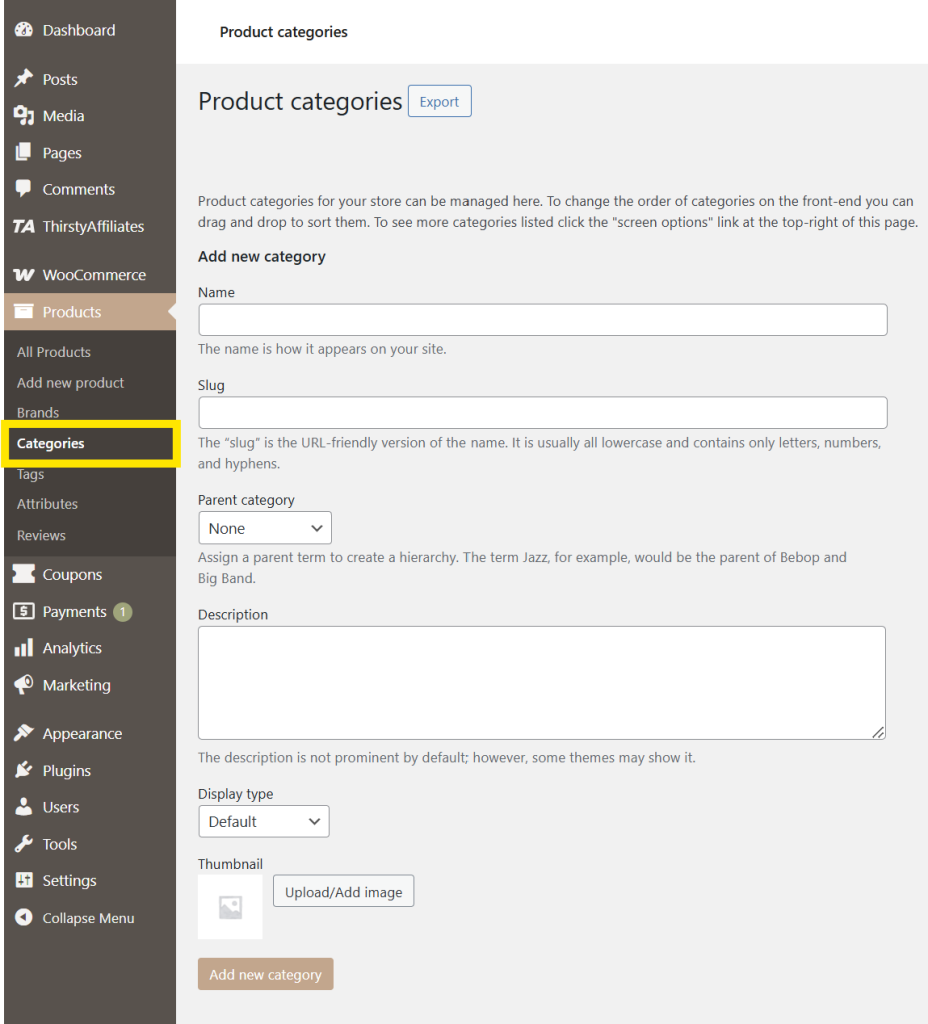
Step 1: Head to the Product Categories Page
From your WordPress dashboard, head to Products > Categories. This will take you to the Product Categories page, where you can create new categories and manage existing ones.
Step 2: Create product categories
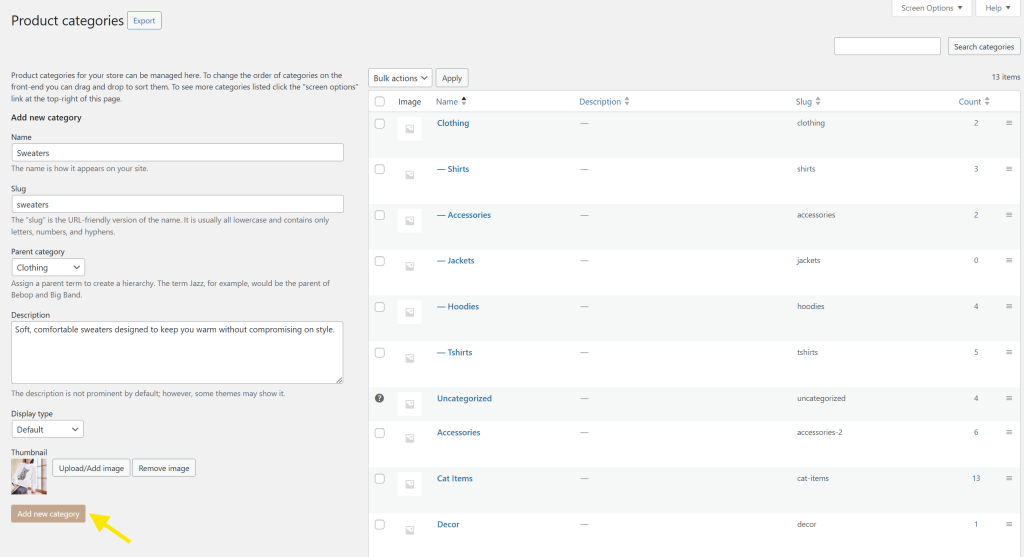
You’ll notice a form on the left side of the interface. You can create a new category by filling out the following fields:
- Name: This is the category title (e.g., “Sweaters”).
- Slug: The URL-friendly version of the name (usually lowercase and hyphenated, like sweaters).
- Parent Category: If you’re creating a subcategory, you can assign a parent (like “Clothing”).
- Description (optional): A short description that may appear depending on your theme.
- Display type: This option determines what will show when someone views the category page. You can choose:
- Default: Uses your theme’s default setting.
- Products: Only products will appear on the category page.
- Subcategories: Only subcategories will appear.
- Both: Shows both products and subcategories.
- Thumbnail: You also have the option to upload an image to represent the category.
Once you’ve filled out all the necessary information, hit “Add New Category.” Your new product category will now appear in the list on the right side of the page.
Step 3: Assign products to categories
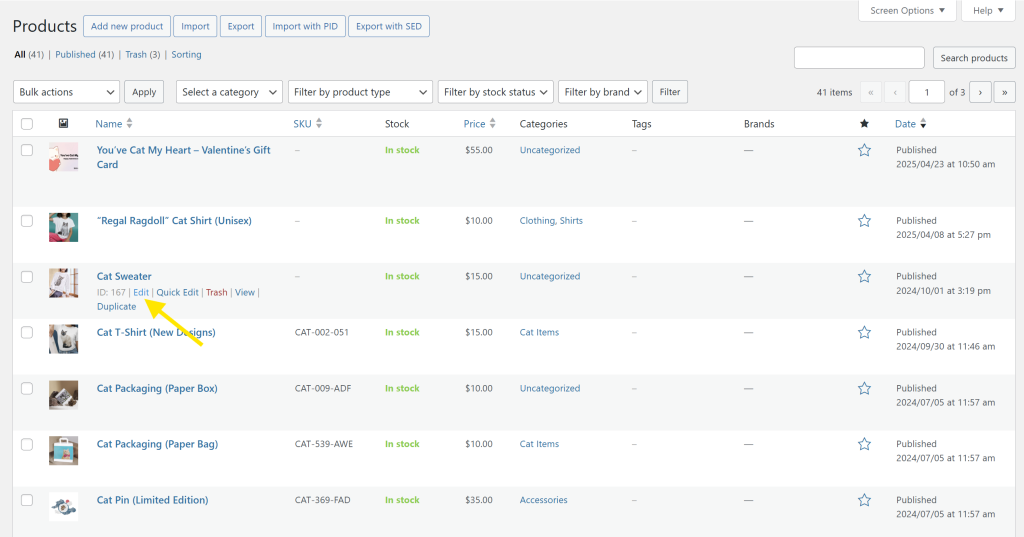
Now that we’ve created our WooCommerce product categories, we can start assigning products to them. To do so, head to Products > All Products and click “Edit” on the item you want to categorize.
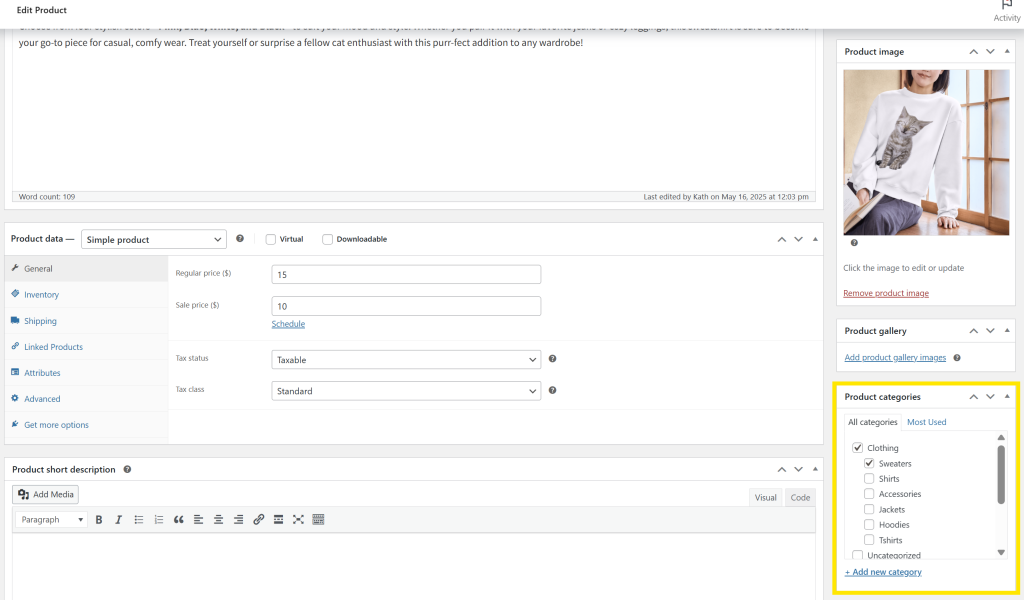
On the right-hand side of the editing screen, you’ll find the Product Categories panel. Simply tick the box next to the relevant category (or categories), and click Update to save your changes!
💡 POWER TIP: WooCommerce also allows you to create new product categories right within the product page. Simply click “+ Add New Category” link–this is a huge time-saver, especially if you’re creating a new product listing.
How To Manage WooCommerce Product Categories (Extra Tips)
WooCommerce makes it easy for you to manage and feature your categories in your site’s navigation. Let’s take a quick look at your options:
Reordering WooCommerce Product Categories
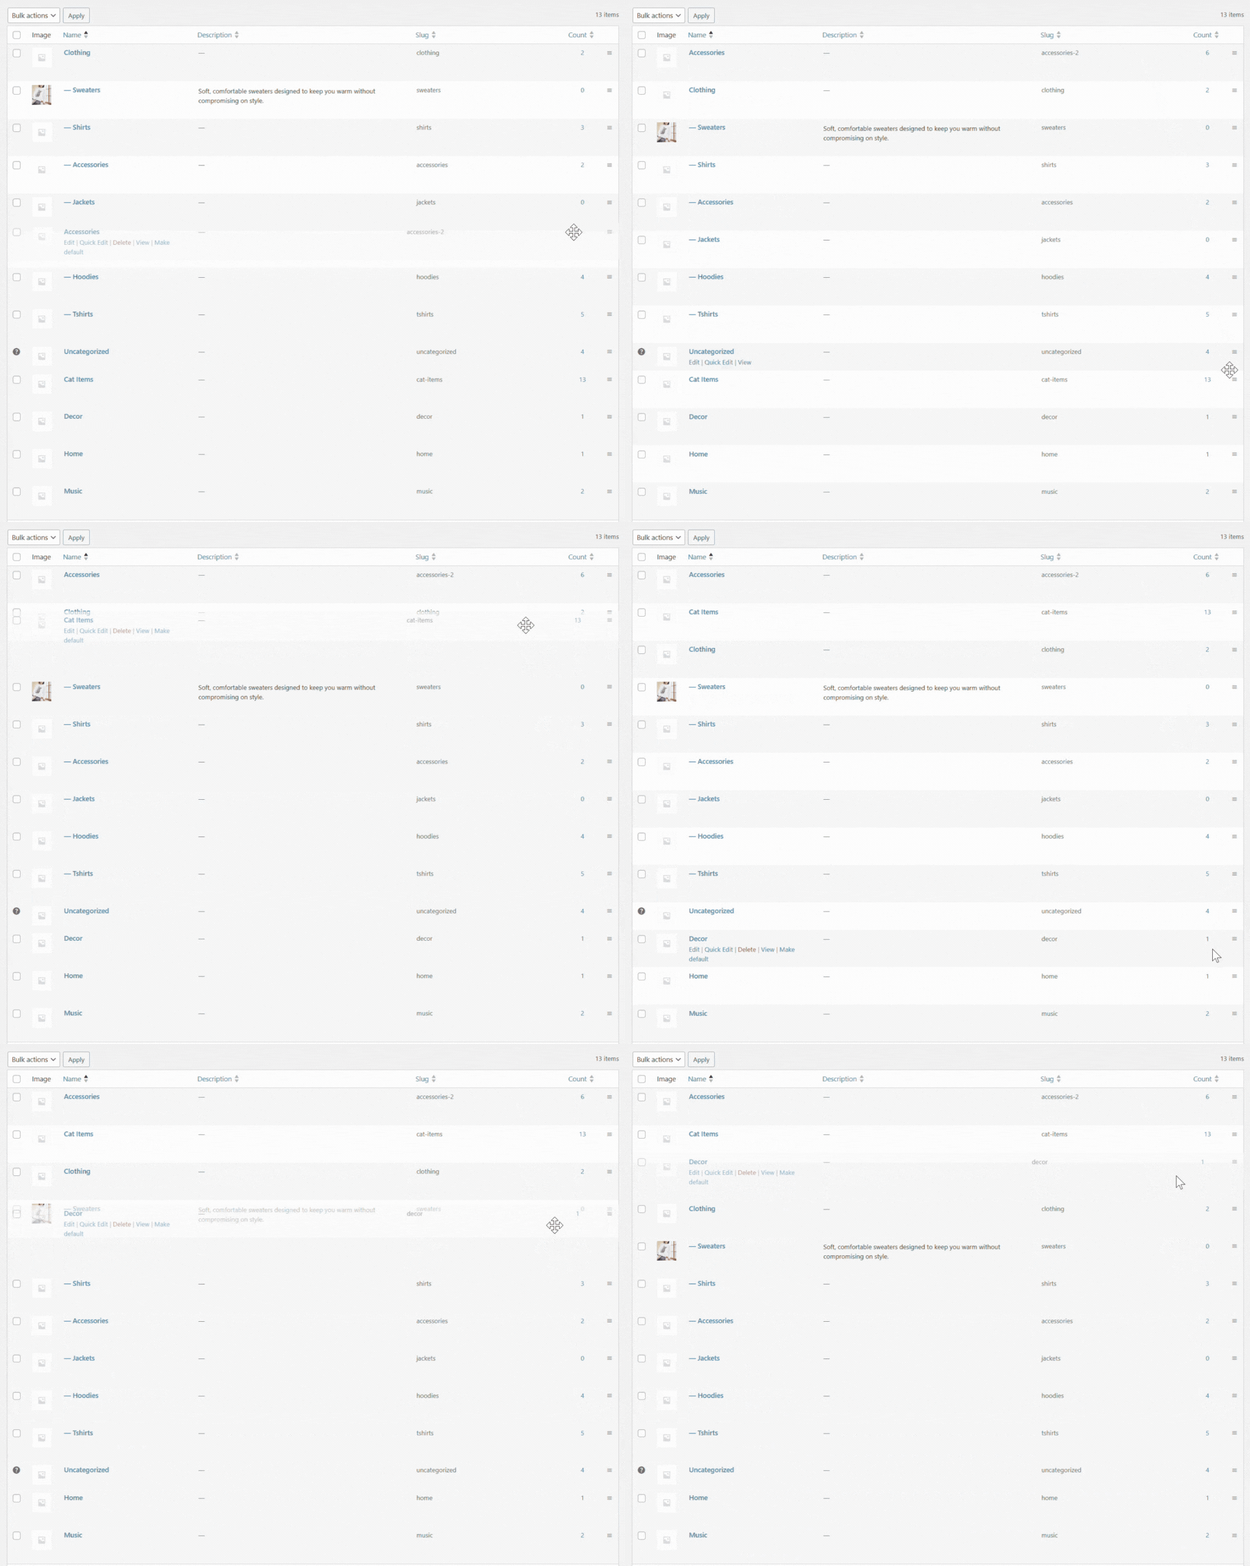
Sometimes, you may want to change the order in which your product categories appear. For instance, you might want to do this if you want to highlight certain collections, move best sellers towards the top, or promote seasonal items.
To do so, just head to Products > Categories. From there, you can drag and drop categories to change their arrangement. This order will apply in places like category widgets and shop pages, depending on how your theme displays them.
🔧 IMPORTANT: If the drag-and-drop feature isn’t working, make sure you don’t have any active sorting plugins or settings that might override the default order.
Deleting and editing product categories
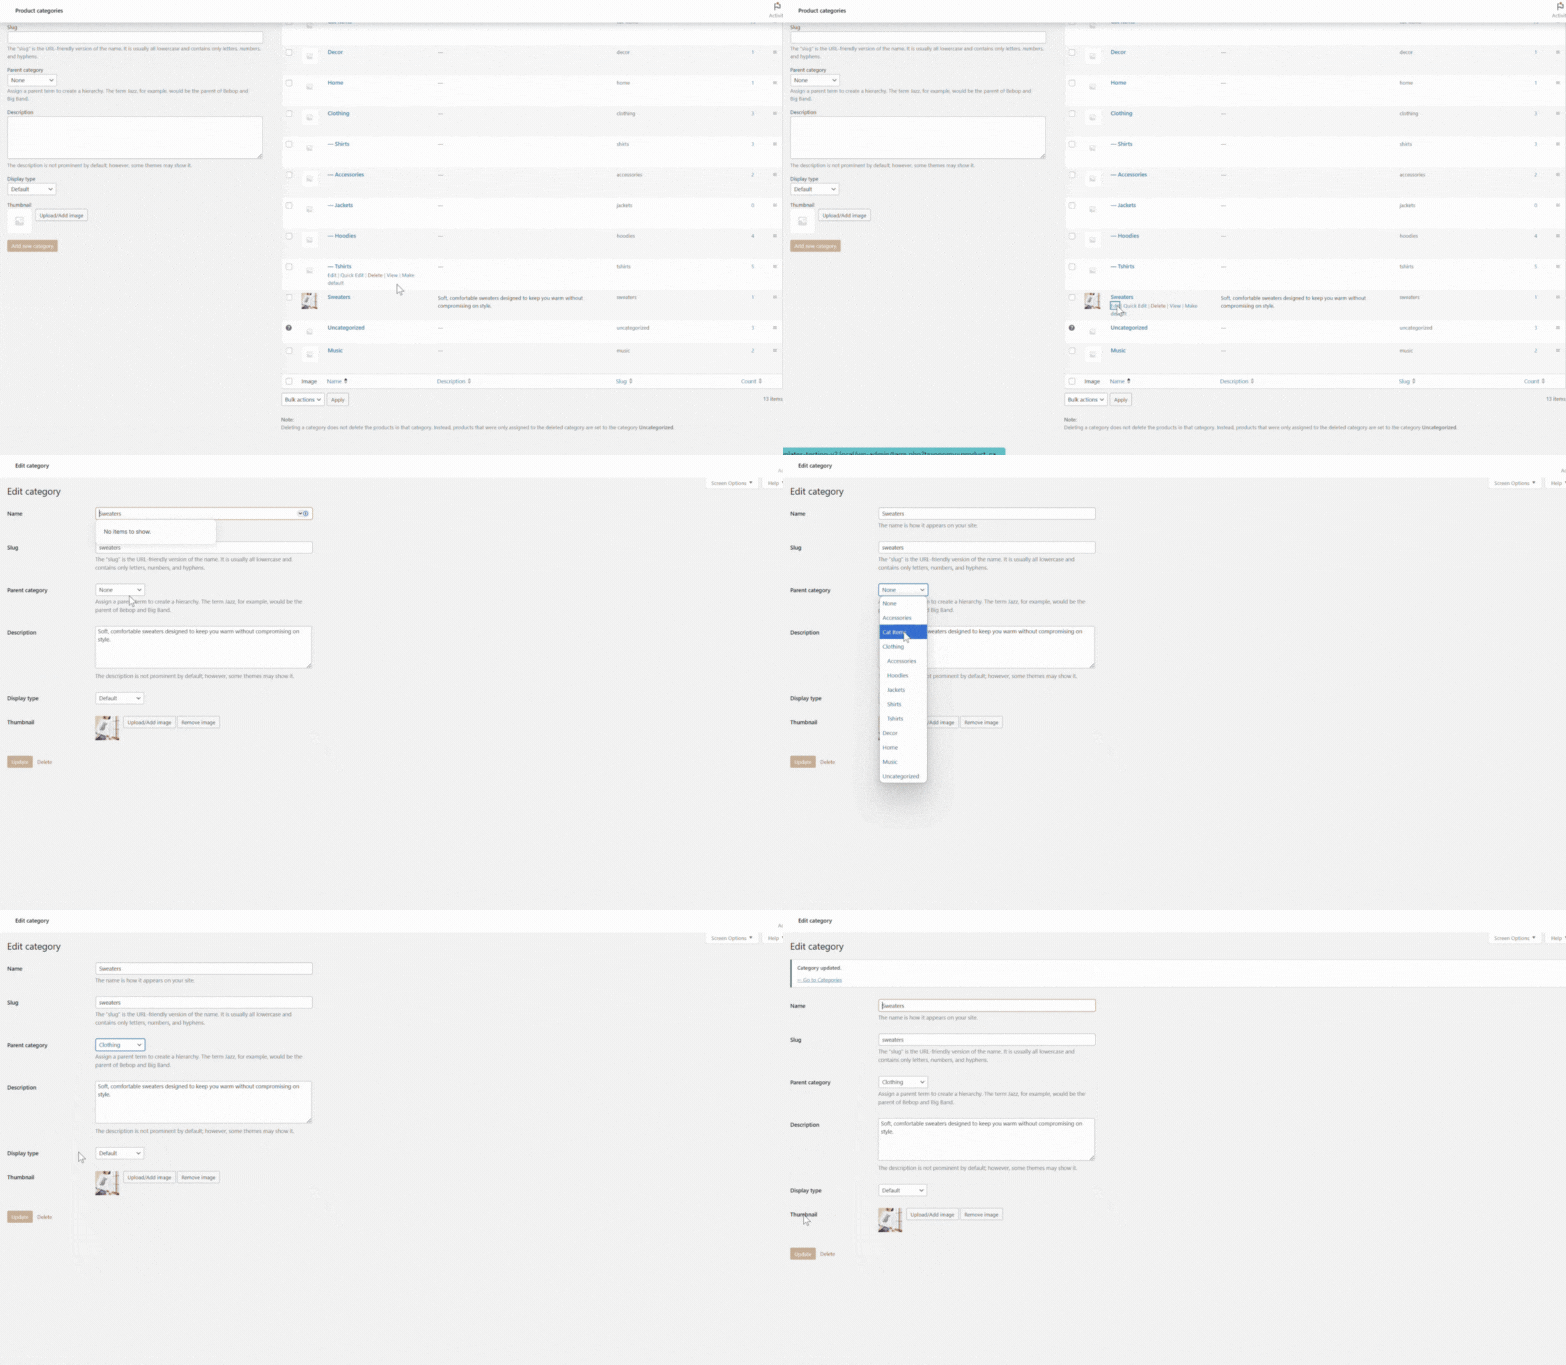
It’s also simple to edit and delete WooCommerce product categories. Just head to Products > Categories and click “Edit.” This option allows you to change the name, slug, description, and other key details of your categories:
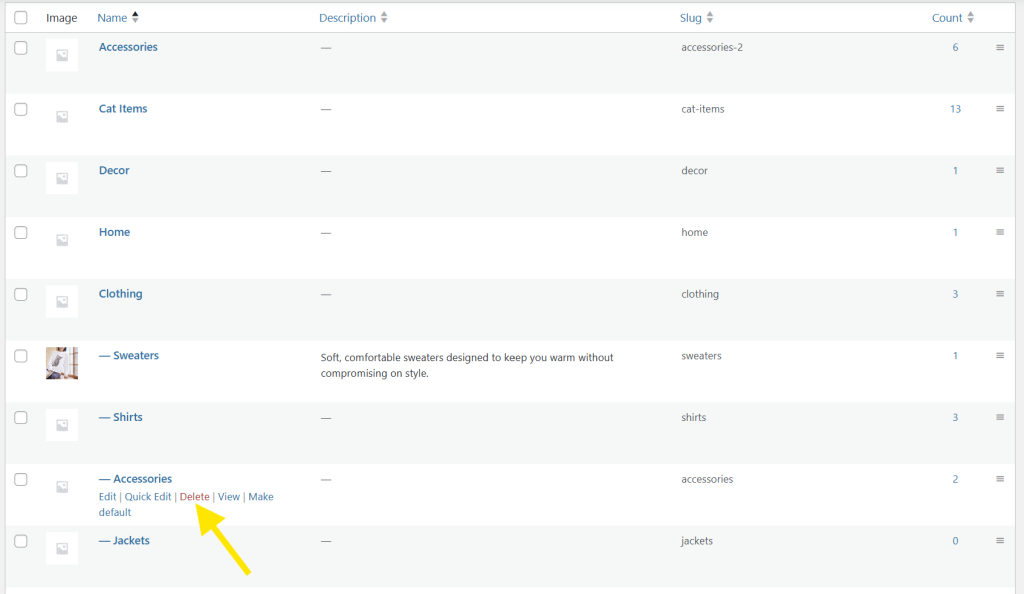
If you need to remove a category, simply click “Delete” under the category name.
🔧 IMPORTANT: Deleting a category will not delete the products assigned to this category. Instead, they’ll be assigned to the default “Uncategorized” category. You can always go back and reassign them to a different category at any time.
Adding product categories to your site menu
There are some instances when you want to highlight WooCommerce product categories in your website’s main navigation. This option comes in handy if you’re running a collection-based store or want to highlight bestsellers right from the homepage.
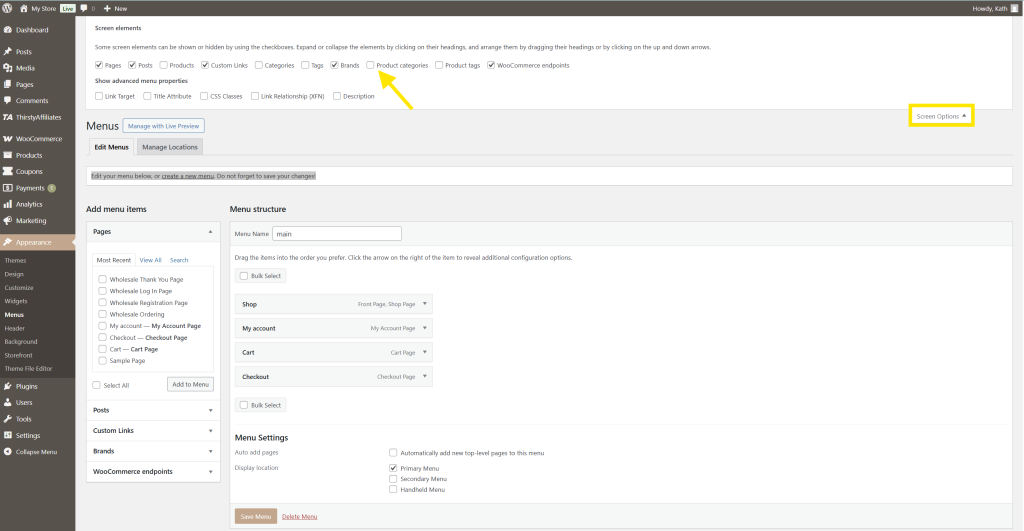
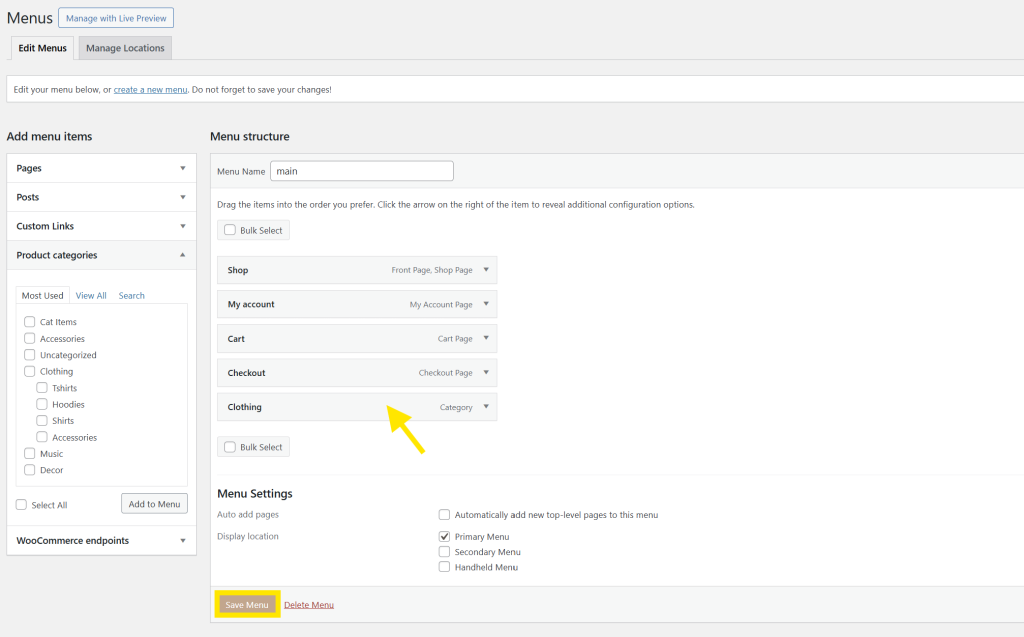
To do this, head to your WordPress dashboard > Appearance > Menus. From the top-right corner of your screen, click “Screen Options.”
Tick “Product Categories” – you’ll notice that your list of WooCommerce product categories will appear below. Simply select the categories you want to add to your menu and click “Add to Menu.”
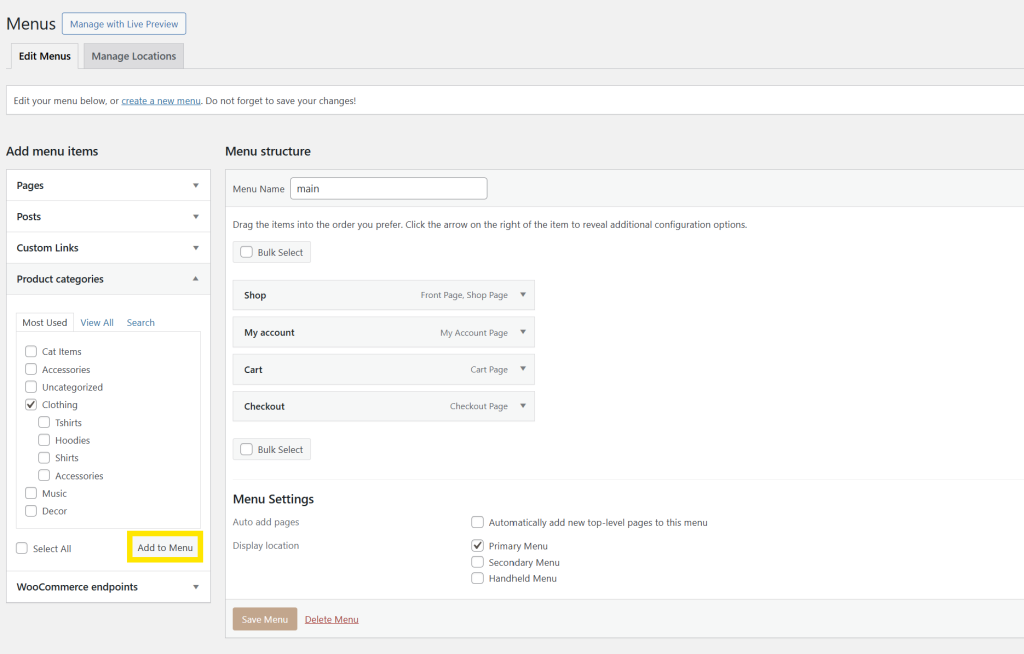
From here, you can drag and reorder how you want your menu to appear. Once you’re happy with the order, click “Save Menu.”
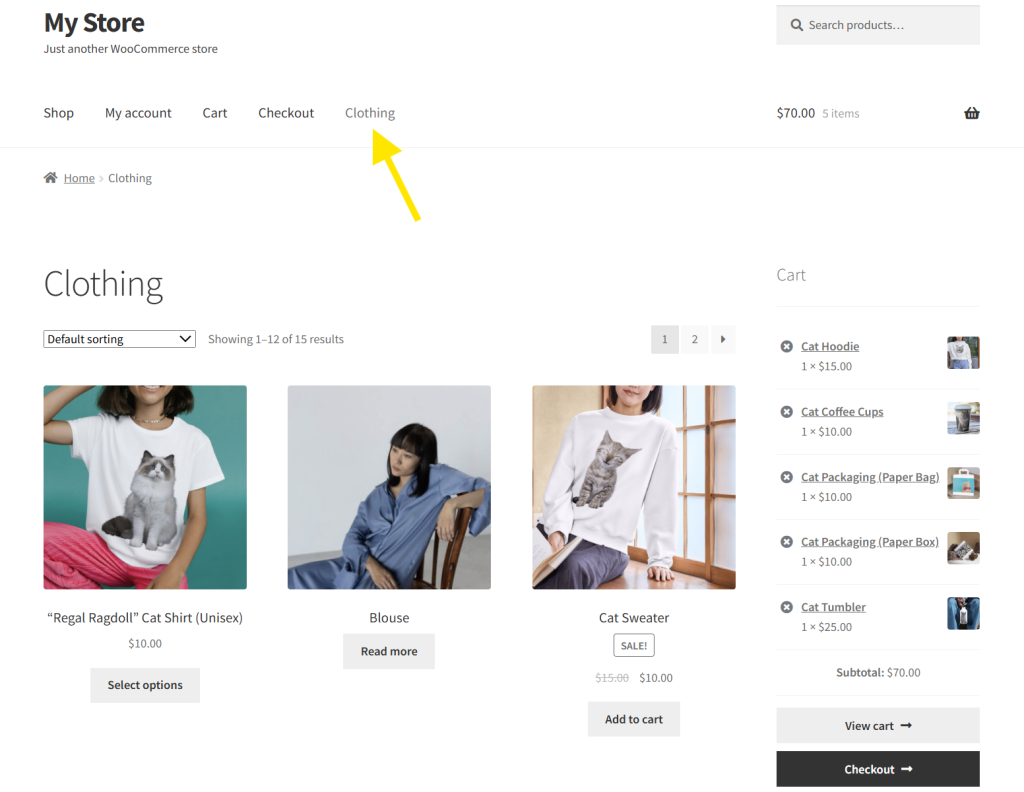
These links will now appear in your store’s main navigation, depending on where your theme displays it.
💡 POWER TIP: Some themes support dropdown menus, where you can nest subcategories under parent categories for a cleaner and more intuitive browsing experience.
How To Use WooCommerce Product Categories To Run Smarter Promotions
Setting up product categories doesn’t simply improve your store’s organization and browsing experience; it also allows you to run more targeted and effective promotions! Using plugins like Advanced Coupons, you can craft category-based discounts that feel more relevant and personalized to your customers.
For instance, you can:
Offer exclusive discounts on certain product categories
This is perfect if you want to highlight a newly launched product category or want to move stock that’s been sitting for too long. The possibilities are endless with Advanced Coupons–you can set specific cart conditions to trigger discounts when certain product categories are added to the cart, or combine it with other rules like cart subtotal, user role, and more.
If you want to learn more about crafting WooCommerce product category discounts, check out our full guide here.
Run targeted loyalty-building campaigns
If you’re using WooCommerce Loyalty Program, you can reward points for purchases in certain product categories. This can help encourage customers to explore certain collections or make repeat purchases in the categories you want to move, such as new arrivals and seasonal collections.
Real store example
One of our recently featured stores used category-based discounts to fine-tune their promotions and boost sales. Layers of Learning, a homeschool curriculum brand, sells both paperback and digital versions of their educational materials.
Depending on the time of the year, they either run a digital-only sale or offer discounts on full curriculum sets. Using Advanced Coupons, they can easily set up and schedule these category-based discounts. Their strategy showcases how you can use product categories to launch smarter and more intentional promotions that align with your store’s goals.
Frequently Asked Questions
How to make categories in WooCommerce?
To create WooCommerce product categories, head to your WordPress dashboard > Products > Categories. This will take you to the Product Category creation screen, where you can enter a new category name, slug, description, parent category (if applicable), display settings and more. After filling out these necessary fields, click “Add New Category.” This will instantly generate your new category on the list.
Note that you can also create new categories directly from a product page by clicking “+ Add New Category” in the Product Categories panel while editing the product.
How do I arrange product categories in WooCommerce?
You can reorder product categories by heading to Products > Categories. From here, you can drag and drop the categories on the list. This custom arrangement will appear in your layout, depending on the theme you’re using.
What is the difference between product tags and categories in WooCommerce?
Product categories help organize your store into broad sections like “Clothing” and “Accessories”, helping shoppers navigate your store better. Product tags, on the other hand, are more specific and descriptive. They highlight specific product features and themes, such as “vegan”, “handmade”, or “cotton.” Unlike categories, tags don’t follow a hierarchy and are mainly used for search filters and internal linking.
Conclusion
WooCommerce product categories help organize your store and enhance the shopping experience. By setting up clear, structured categories, you make it easier for shoppers to navigate your store and find what they’re looking for.
Even better? They can help you craft targeted promotions that align with your store’s marketing goals. With plugins like Advanced Coupons, you can create targeted category-specific discounts that resonate with your audience.
In this guide, we’ve covered:
- What WooCommerce product categories are
- How to create product categories in WooCommerce
- Extra tips to manage WooCommerce product categories
- How to use product categories for smarter promotions
Do you have any questions about this topic? Let us know in the comments!


