
If you’ve been wanting to do WooCommerce tiered pricing on your store, you have probably encountered the common roadblocks:
- Standard coupons in WooCommerce aren’t powerful enough to do it, they don’t have the option
- Pricing rule & discounts plugins are complicated and slow and no other reason to install them (big cost for little benefit)
- Put-together solutions are hard for the customer to understand (eg. have to remember coupon codes based on what they added to the cart and manually apply) which leads to lots of support questions making it hardly worth the effort
This article will teach you how to do tiered discounts for a customer’s cart based on the subtotal but without those hassles. It will also show you how to do it with automatically applied coupons which means your customers don’t have to lift a finger.
And the beauty is when customers don’t have to do anything, they’re more likely to accept and convert.
Giving Automatic Discounts Isn’t Something That’s New
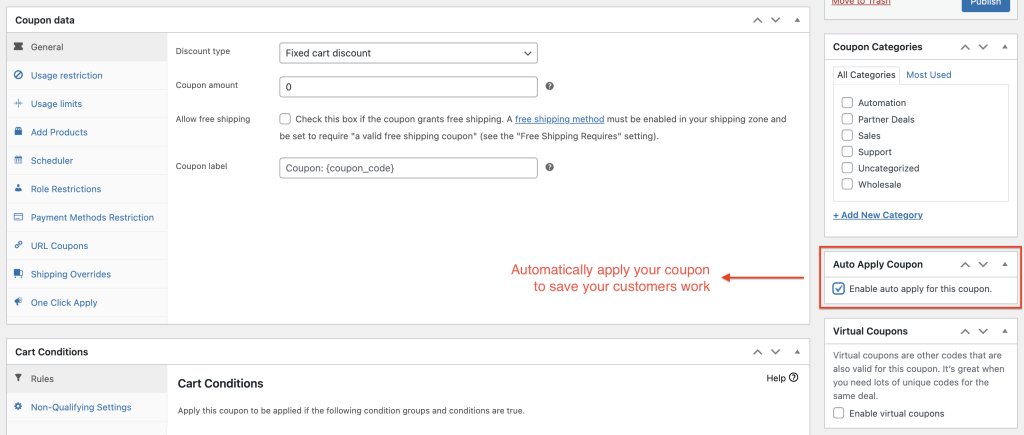
Advanced Coupons has had this auto-apply coupon feature since the beginning:
If you want to run WooCommerce tiered pricing without any hassle, this is a must! This strategy is used by hundreds of our users to make giving coupons to their customers less work for the customer.
I’ve personally used this strategy as well on my own stores for automatically:
- Giving renewal discounts for people who are due based on their purchase history
- Applying holiday-themed discounts for scheduled times throughout the year
- Applying discounts for specific products when we have one thing we are trying to promote
When applying a deal like a tiered discount automatically, or any kind of deal for that matter (as you can see with what I’ve done), you will experience a much higher take-up rate compared to promotions where you don’t use it.
The automatically applied part is just one part though. So what is the rest?
The Other Part You Need To Get Right Is Your Conditions
You don’t want to be giving away discounts like tiered discounts in the wrong circumstances. The obvious restriction is to ensure you only apply the discount with the correct cart subtotal ranges.
For example:
Tier
- 1: $50 to $100 – give the customer 10% off
- 2: $100 to $150 – give the customer 15% off
- 3: $150 to $200 – give the customer 20% off
- 4: $200 and above – give the customer 25% off
We call these “Cart Conditions”. It’s a set of conditions that must be true in their shopping cart before they can claim a deal. The above are the minimum cart conditions you would need for a tiered discount structure. But are there other conditions that you can test for in addition to these? You bet.
You might also want to only give the deal to existing customers with an account, not guest customers. Or you might only want to give the deal to someone who is buying from a particular category. Or you might want to only give the deal to someone who is buying again within a certain period.
All of these things are possible to do in conjunction with your WooCommerce tiered pricing coupon deal.
Who Is This Strategy For?
Specifically, this WooCommerce tiered pricing discount strategy is for WooCommerce store owners that want to reward their customers for buying more in a single order.
Additionally, it is particularly well suited if you run a store selling multiple products, especially those that you need to ship to a customer. Physical products as opposed to digital products.
Goal Of The Strategy: Why Would You Do A WooCommerce Tiered Pricing Deal?
The big goal of the strategy is to increase the Average Revenue Per Order (also called Average Revenue Per User, or ARPU for short). By continually dangling the carrot of additional discounts just in front of them, the customer is tempted to spend more on their order to claim the next discount level.
1. Setting up your coupons
To make this work you’ll need:
- A WooCommerce store
- A copy of Advanced Coupons for WooCommerce – our popular coupon feature extension plugin
- One coupon for each level in your tiered discount
I’m going to assume you have 1 & 2 and you’re now onto bringing it all together.
The first step is to set up your coupons. For this, I will assume you are doing 4-tiers.
You can, of course, do this strategy with fewer tiers. But I recommend you consider 4 tiers because it makes the amounts for the levels closer together.
That has the flow-on effect of your customer seeing that they’re “oh so close” to hitting the next tier and that bit more likely that they will add something else to their cart to unlock the next discount level. It’s more achievable in their minds, which is the key to making this work.
Here are the levels I will use in my example setup:
- #1: $50 to $100 – give the customer 10% off
- #2: $100 to $150 – give the customer 15% off
- #3: $150 to $200 – give the customer 20% off
- #4: $200 and above – give the customer 25% off
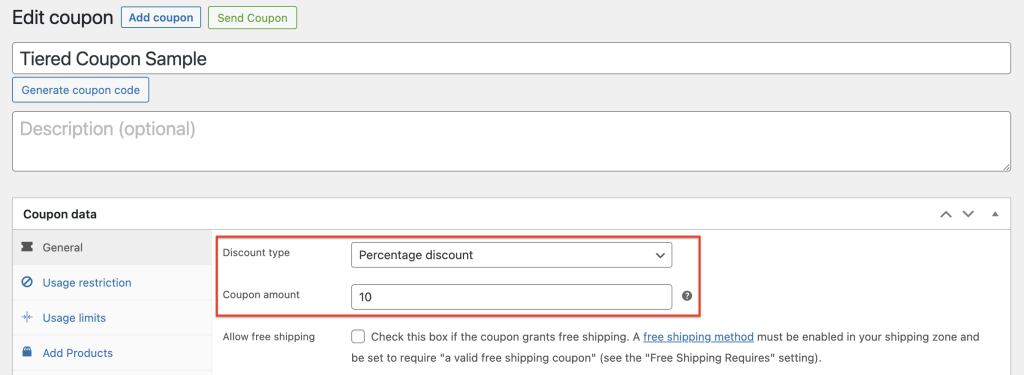
Create your coupons by going to WooCommerce > Coupons and clicking Add Coupon up the top. You’ll need to set the name for each tier and the amount of discount which is found on the General tab. You will need to set the discount type to “Percentage discount”:
To add more control to your coupon offer, you may want to set a Percentage Discount Cap. This feature allows you to limit the maximum amount of discount that can be applied to an order, providing more control over your promotions:
Remember, the code doesn’t need to be decipherable by humans because it is going to be automatically applied. But for visual reference, it is still nice to name it something that makes sense to the end user.
Repeat this step for all the tiers in your deal. What you should end up with is 4 new coupons, each of which has an increasing coupon amount.
2. Setting the cart conditions
This is where you will define the conditions the user has to satisfy for each of the coupons.
- The tier conditions for that particular coupon in the deal
- Any additional conditions that need to be true that you have decided on
To keep the explanation simple I’m just going to demonstrate the cart conditions for the tiers themselves.
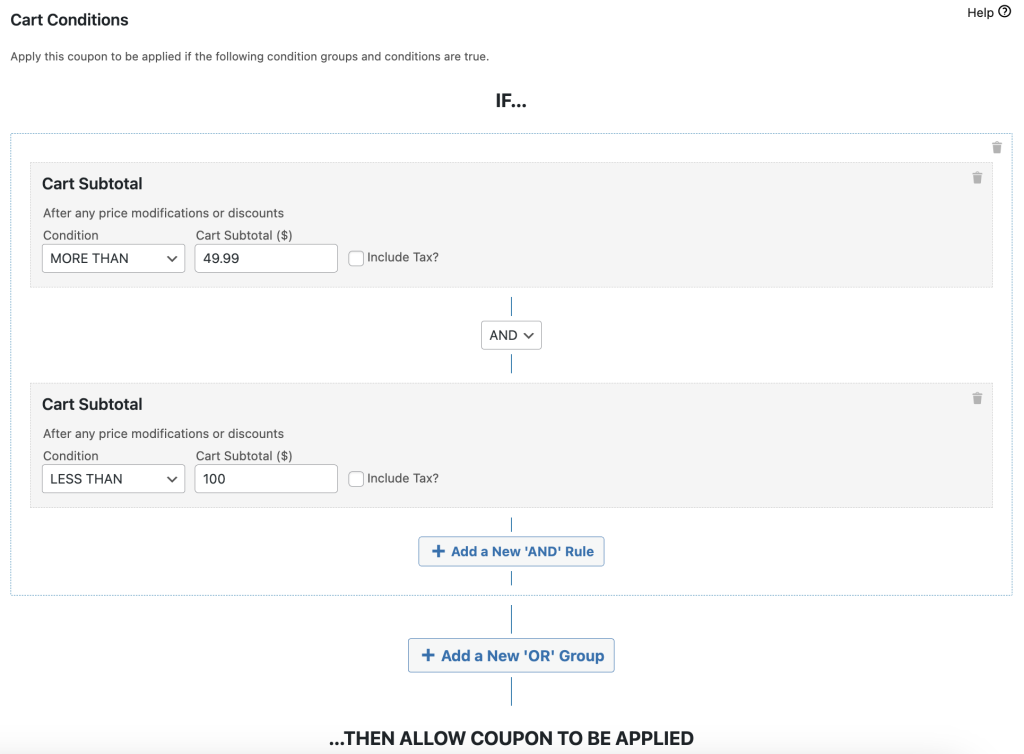
- Click on the Cart Conditions tab and add a new “Condition Group”. This is just a group of distinct Cart Conditions.
- Now click “+ Add Condition To Group” and add a “Cart Subtotal” condition.
- Configure that Cart Subtotal condition to be the starting point for this coupon. You’ll need to use the MORE THAN condition and set your Cart Subtotal to 1c less than what you want it to start at (eg. in the screenshot it says “MORE THAN $49.99” or said another way it starts at $50 and above).
- Next, add another “Cart Subtotal” to the group. There should be a small drop-down box between the conditions, ensure this is set to AND. This means checking that the preceding condition and the condition after it should both be true.
- Configure this next one to be the upper boundary for that coupon. You’ll need to use the LESS THAN condition and set the Cart Subtotal amount to be the upper boundary amount (eg. in the screenshot it says “LESS THAN $100”).
And that’s all you need to do for the conditions to set up your WooCommerce tiered pricing.
Repeat this same step until you have all coupons configured properly for each tier level.
3. Set them to automatically apply
Finally, we get to do the “magic” part.
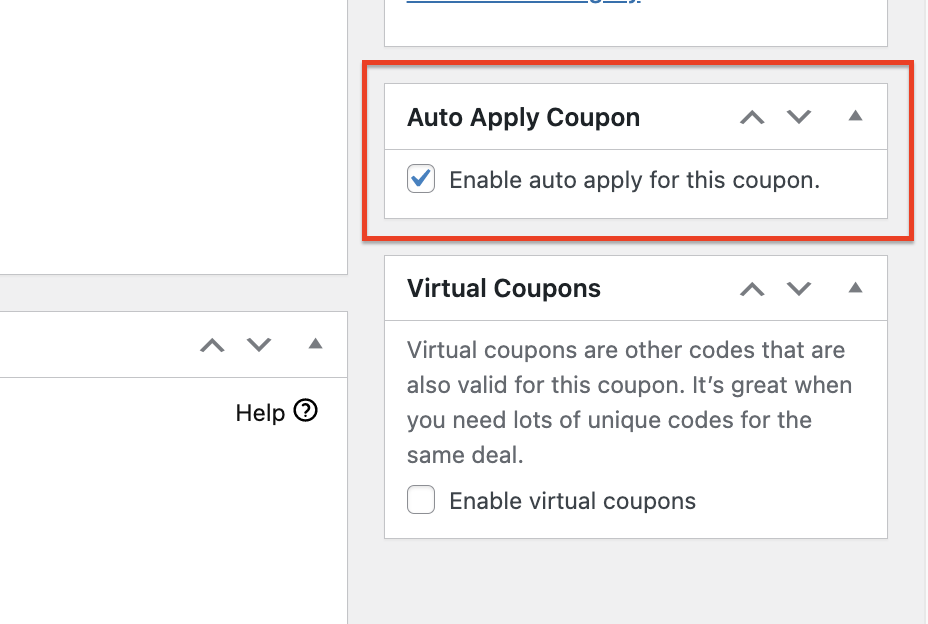
Setting a coupon to automatically apply is very simple, but you do need to ensure that you have your cart conditions set up before enabling it (otherwise it will auto-apply all the time and that might cause issues!).
Just check the box and save the coupon. That’s it – you’ll have an auto-applied WooCommerce tiered pricing discount strategy in place!
Final Step: Test
Oops! Before you can run your WooCommerce tiered pricing, you’ll need to test.
The last step when setting up any kind of coupon deal is to test it on the front end.
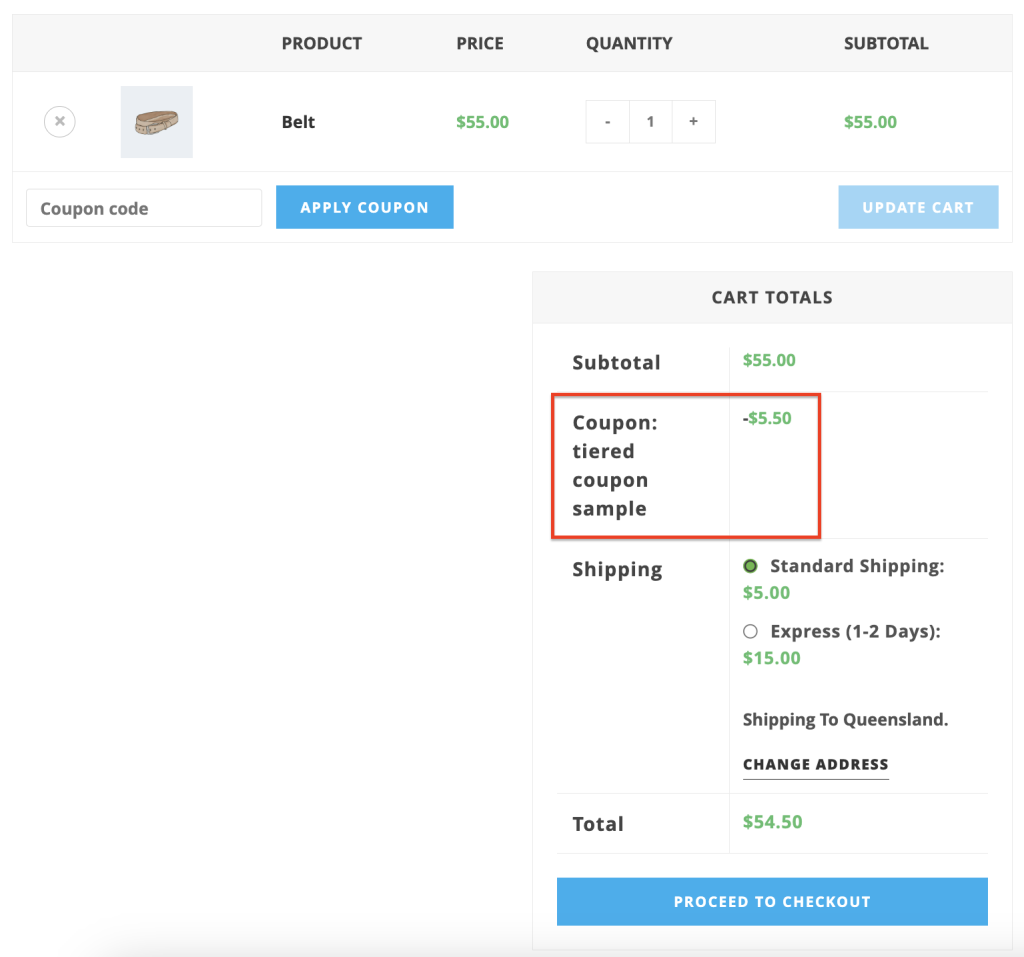
As you can see in the screenshots I have added a belt to my cart which is worth $55. This triggers the automatic application of the first tier’s coupon.
And so on and so forth.
Conclusion
The coupon features in WooCommerce aren’t capable of doing this kind of deal. You will need to purchase a coupon feature extension plugin called Advanced Coupons. You can view all the features and get Advanced Coupons for WooCommerce here.
In this article, we discussed how to create a WooCommerce tiered pricing discount offer using Advanced Coupons. And check this: all it takes is three easy steps:
Do you have any questions about WooCommerce tiered pricing? Let us know in the comments below!





Just the info I needed, thanks!
Great Brenden thanks for stopping by!
Thanks for the valuable post.
You’re very welcome Rocky 🙂
Looks Pretty Cool and easy to use. I am currently building a WooCommerce site – will definitely consider your plugin after it’s done!
Looking forward to having you on board Cato!
Well this is something new. I will give it some thought
Thanks for stopping by Tammy 🙂
Hi Josh! Is it possible to set User as one of the conditions for a particular coupon? In other words, the coupon only gets applied at the checkout if a certain user is doing the shopping?
Hey Kim, we don’t have specific user as a cart condition yet, but its something we will likely add in the near future.
The other way you might be able to do this is by using the Email Restriction in WooCommerce itself found on the Usage Restrictions tab.