
Handing out a store-wide credit bonus, clearing stale balances at the end of a financial year, or cleaning up test credit before you go live all mean touching hundreds of customer accounts. The Bulk Adjust tool in Advanced Coupons Premium does all three from one guided screen. This guide walks you through finding the right customers, choosing between adjusting, resetting, and deleting their credit, and running the job safely.
Advanced Coupons Premium 4.0.9 turned this tool into a three-step wizard, and added extra confirmation steps to the two destructive operations. If you have used the older single-form version, the controls are the same but they are now spread across Find users, Configure, and Review & run.
Before you start
- Advanced Coupons Premium installed and activated. Store credits are a Premium feature, so the free plugin shows an upgrade prompt on this tab instead of the tool.
- The Store Credits module switched on. If it is off, the Manage Store Credits menu item is hidden entirely. See Advanced Coupons: How To Use Store Credit (Setup Guide).
- An account that can manage WooCommerce. Shop managers and administrators qualify.
- A fresh database backup if you plan to use Reset to Zero or Delete All Entries. Neither can be undone from inside the plugin.
Take the backup before you start rather than at the confirmation screen. Once a destructive run is queued, the only way back is restoring the database.
Open the Bulk Adjust tool
- In your WordPress admin menu, go to Coupons > Manage Store Credits.
- Select the Bulk Adjust tab.
The tab opens on step one of the wizard with a How it works notice at the top. You can dismiss that notice, and it stays hidden until you reload the page.
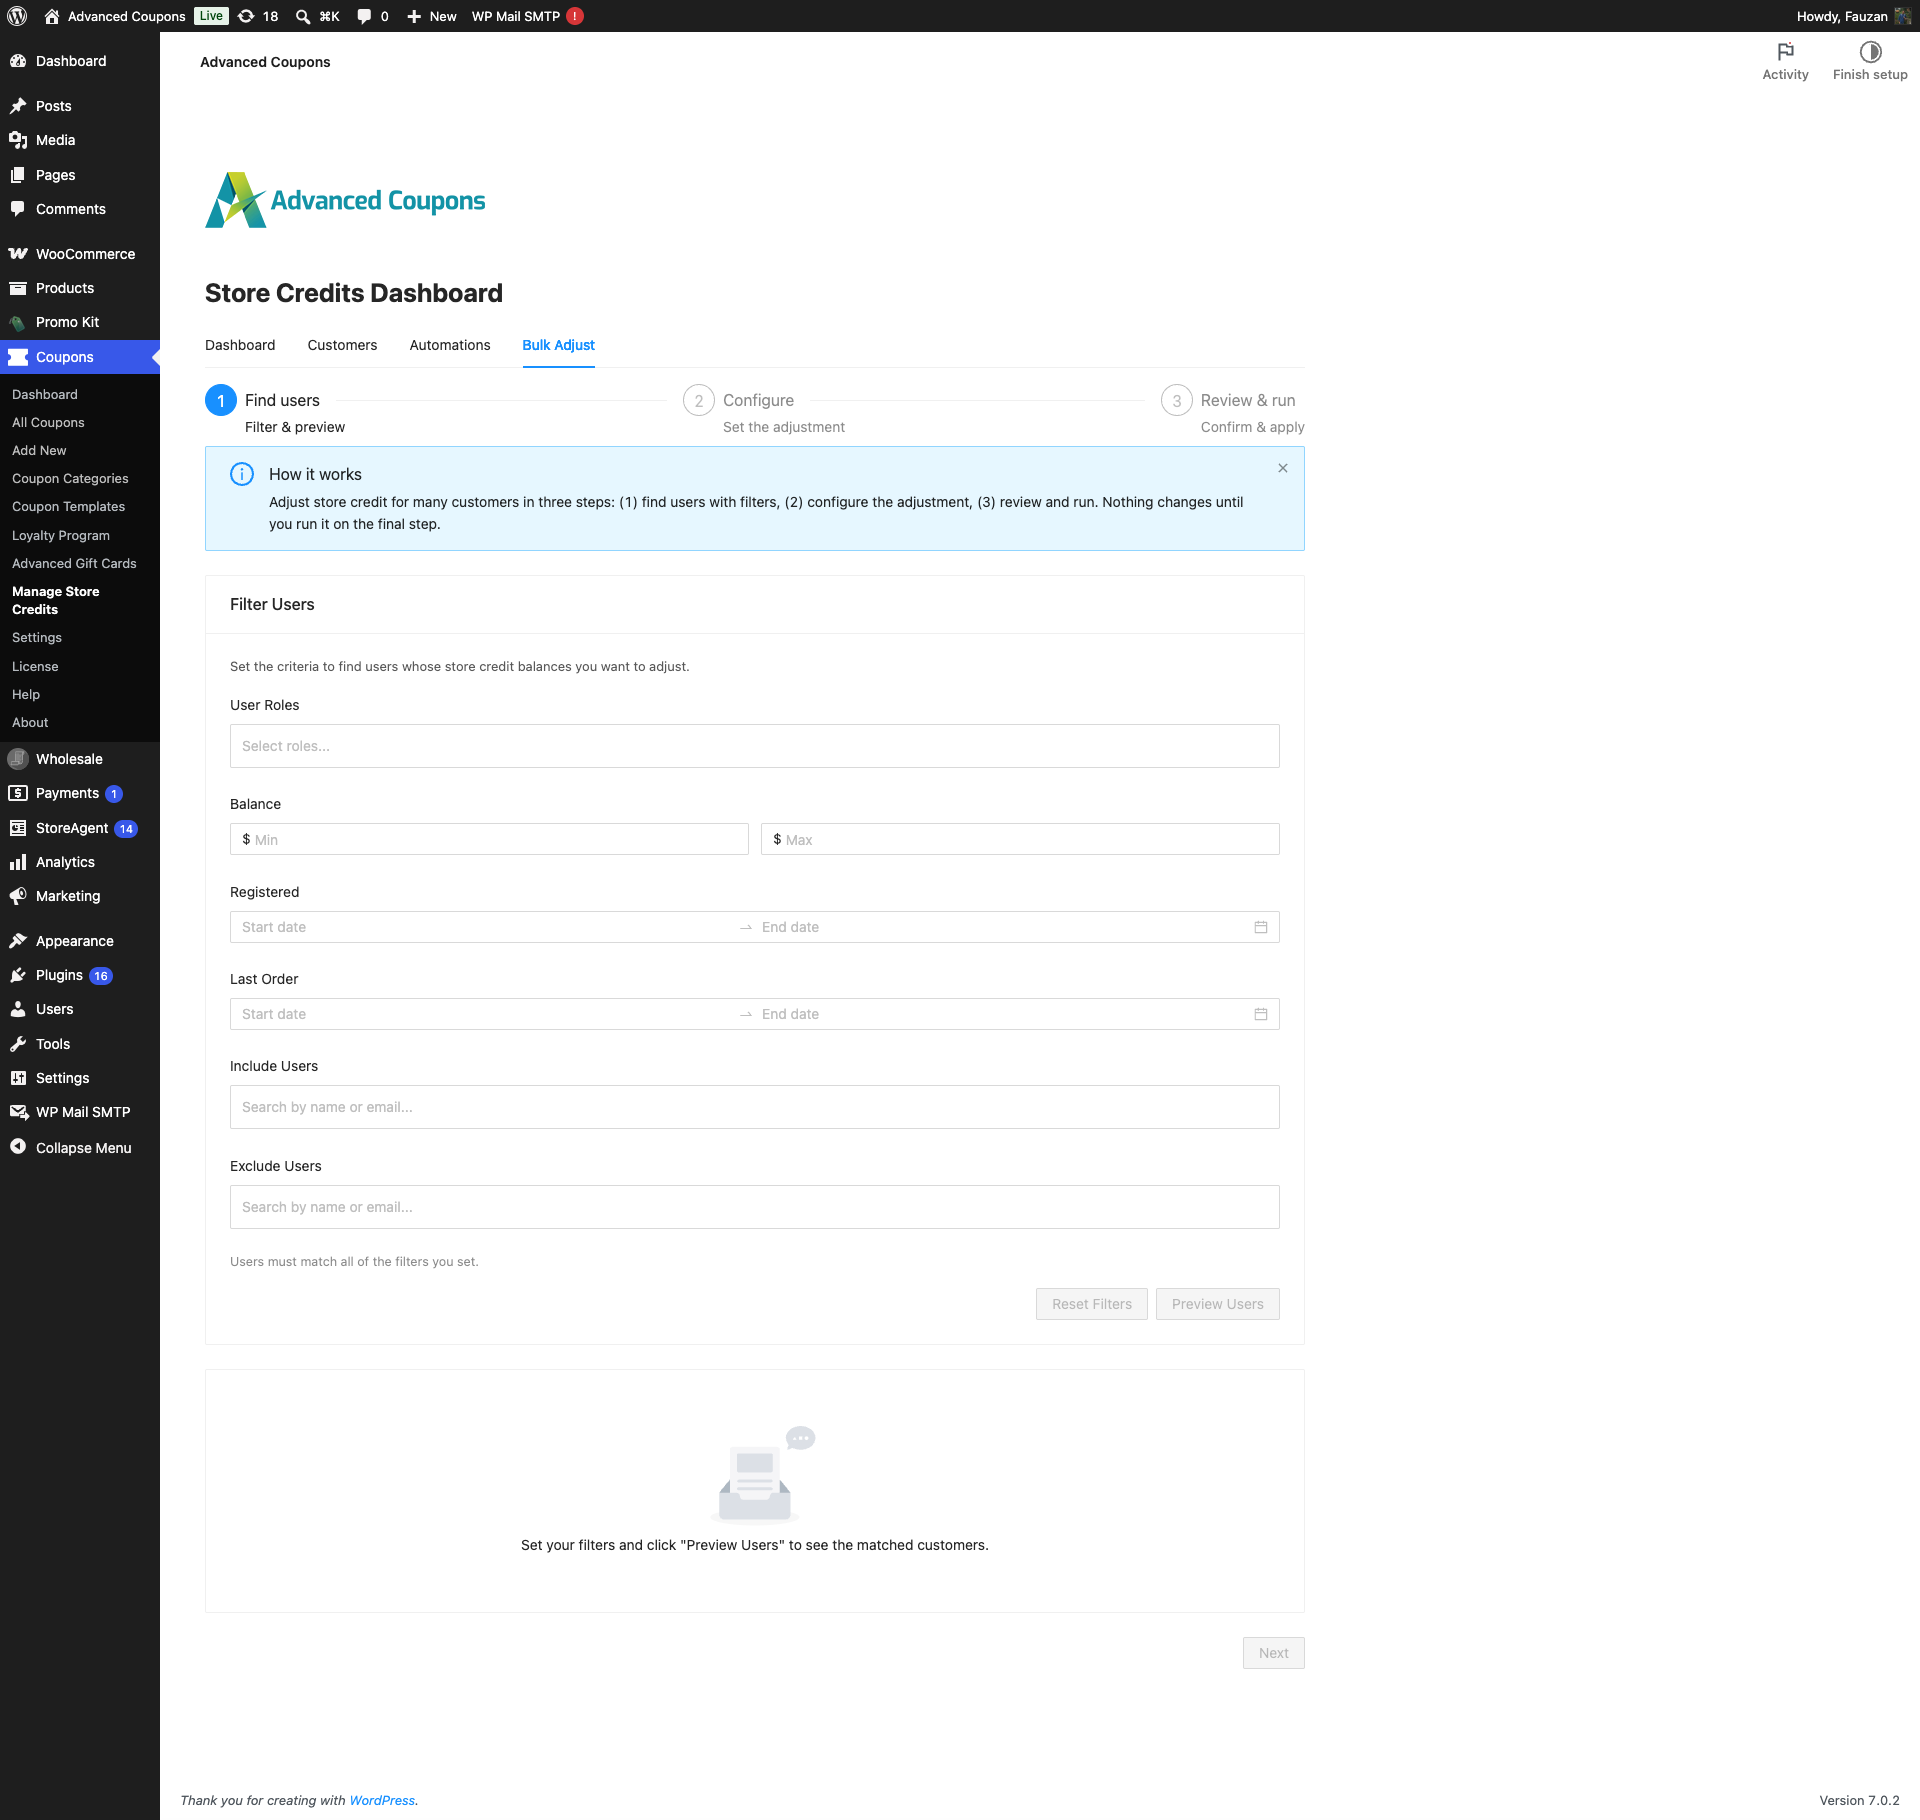
The step header along the top shows where you are and doubles as navigation. Steps you have not unlocked yet cannot be clicked, so you cannot jump ahead to the run button.
| Step | Sub-heading | What you do |
|---|---|---|
| Find users | Filter & preview | Build the list of customers the operation will touch, and preview it. |
| Configure | Set the adjustment | Pick the operation, and for adjustments, the amount. |
| Review & run | Confirm & apply | Check the summary, confirm, and start the job. |
Nothing changes on any customer account until you confirm on the third step.
Step 1: find the customers you want to change
Everything in the Filter Users card narrows the same list. Filters combine, so a customer has to match every filter you set. That is what the Users must match all of the filters you set line under the fields is telling you.
| Filter | What it matches |
|---|---|
| User Roles | Only the roles you pick. The list offers Customer and Subscriber, since staff roles are rarely what you mean by bulk-adjusting customers. |
| Balance | Customers whose current store credit balance falls between the Min and Max values. Set only one side to leave the other open. |
| Registered | Customers whose account was created inside the date range. Both ends are included. |
| Last Order | Customers with at least one order in the date range. Only processing, on-hold, and completed orders count, so a cancelled, failed, or refunded order will not pull a customer in. |
| Include Users | Adds the customers you name even when they fail the other filters. Useful for a customer on the wrong role who should still get the credit. |
| Exclude Users | Removes the customers you name. Exclusions are applied last, so an excluded customer can never slip back into the list. |
- Set one or more filters. Search Include Users and Exclude Users by name or email.
- Click Preview Users.
- Preview Users stays greyed out until at least one filter or user is set. Hovering it explains why: Set at least one filter or user to preview.
- Future dates cannot be picked in Registered or Last Order, since no existing customer can match them.
- Reset Filters clears the whole form. It asks Clear all filters? first, and it also sends you back to step one.
The preview lists the matched customers with a %s users matched count above the table, and an Export CSV button so you can keep a record of who was in scope before you run anything. The table columns are Name, Email, Current Balance, and Role.
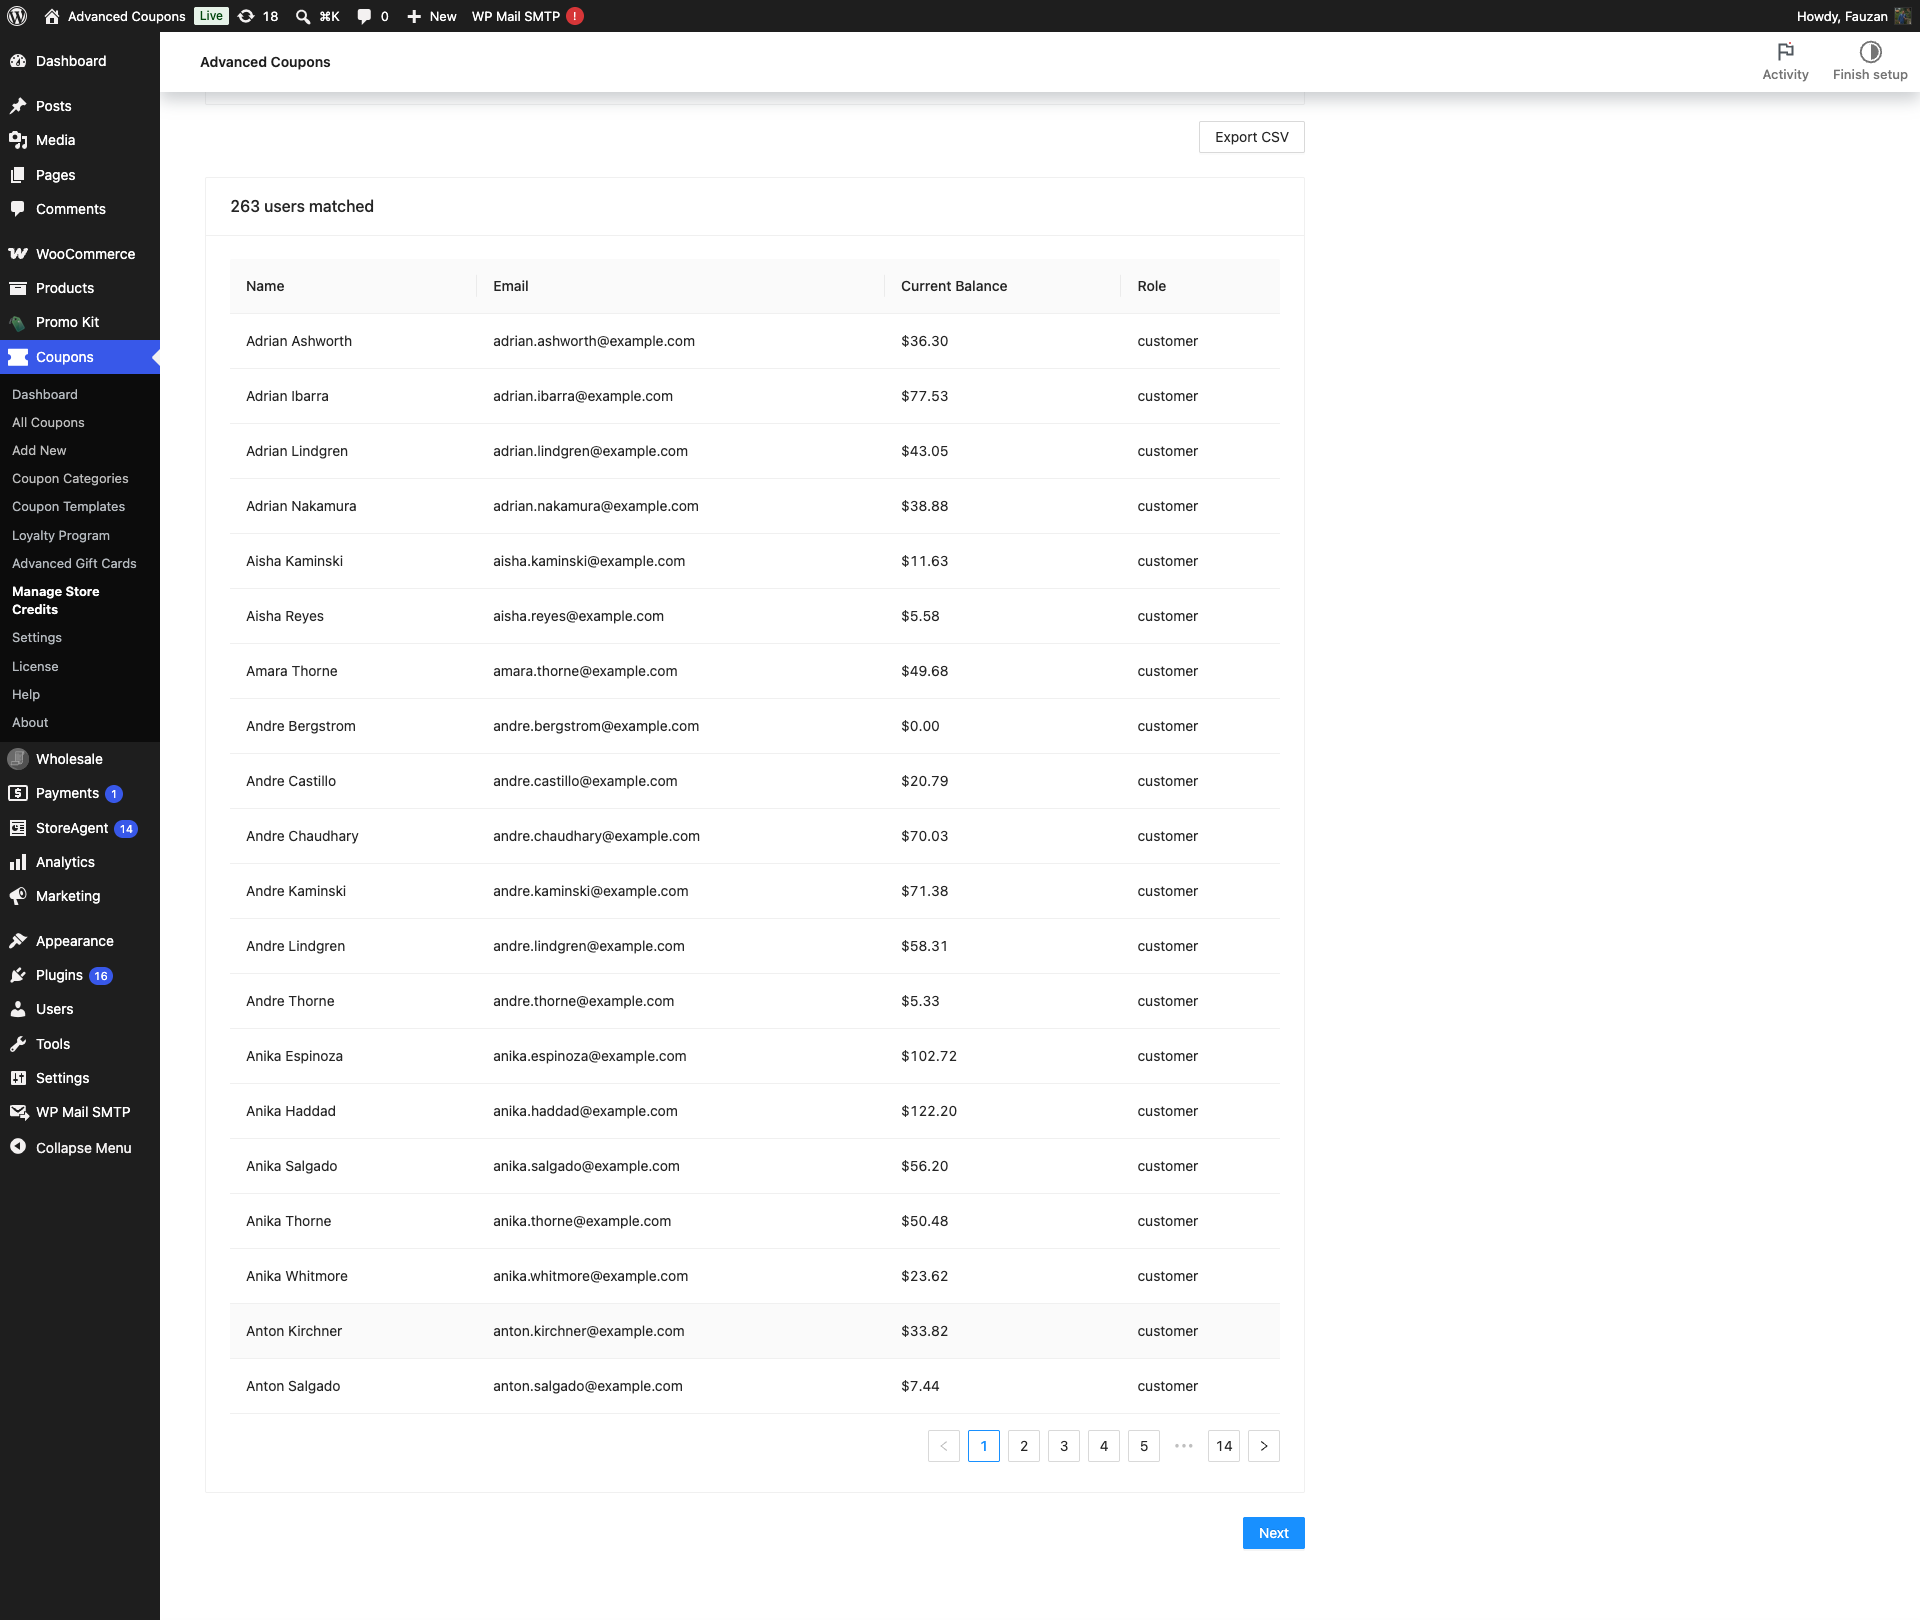
Click Next to move on. It unlocks only once a preview has returned at least one customer, and hovering the disabled button says Preview at least one matching user to continue.
Editing a filter after previewing locks Next again on purpose. That stops an operation running against a different set of customers than the one you actually looked at.
Step 2: choose what the operation does
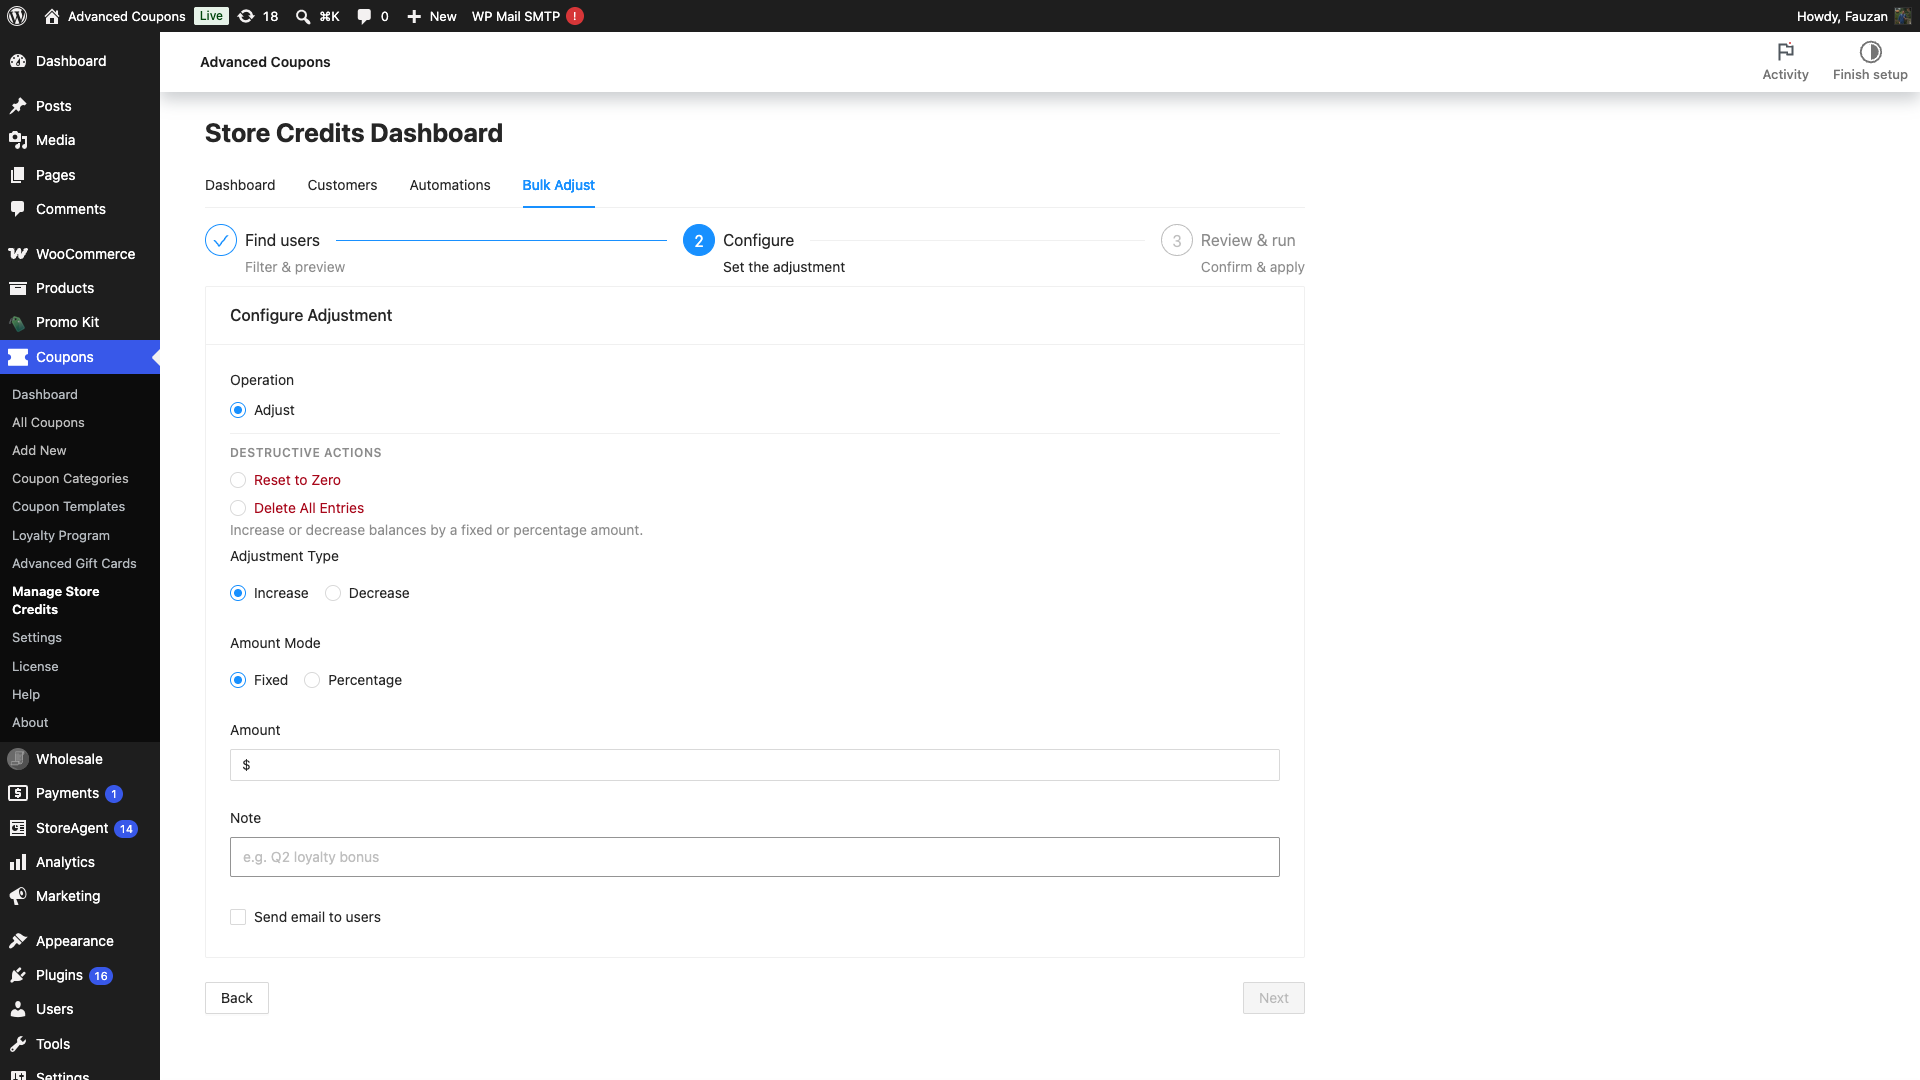
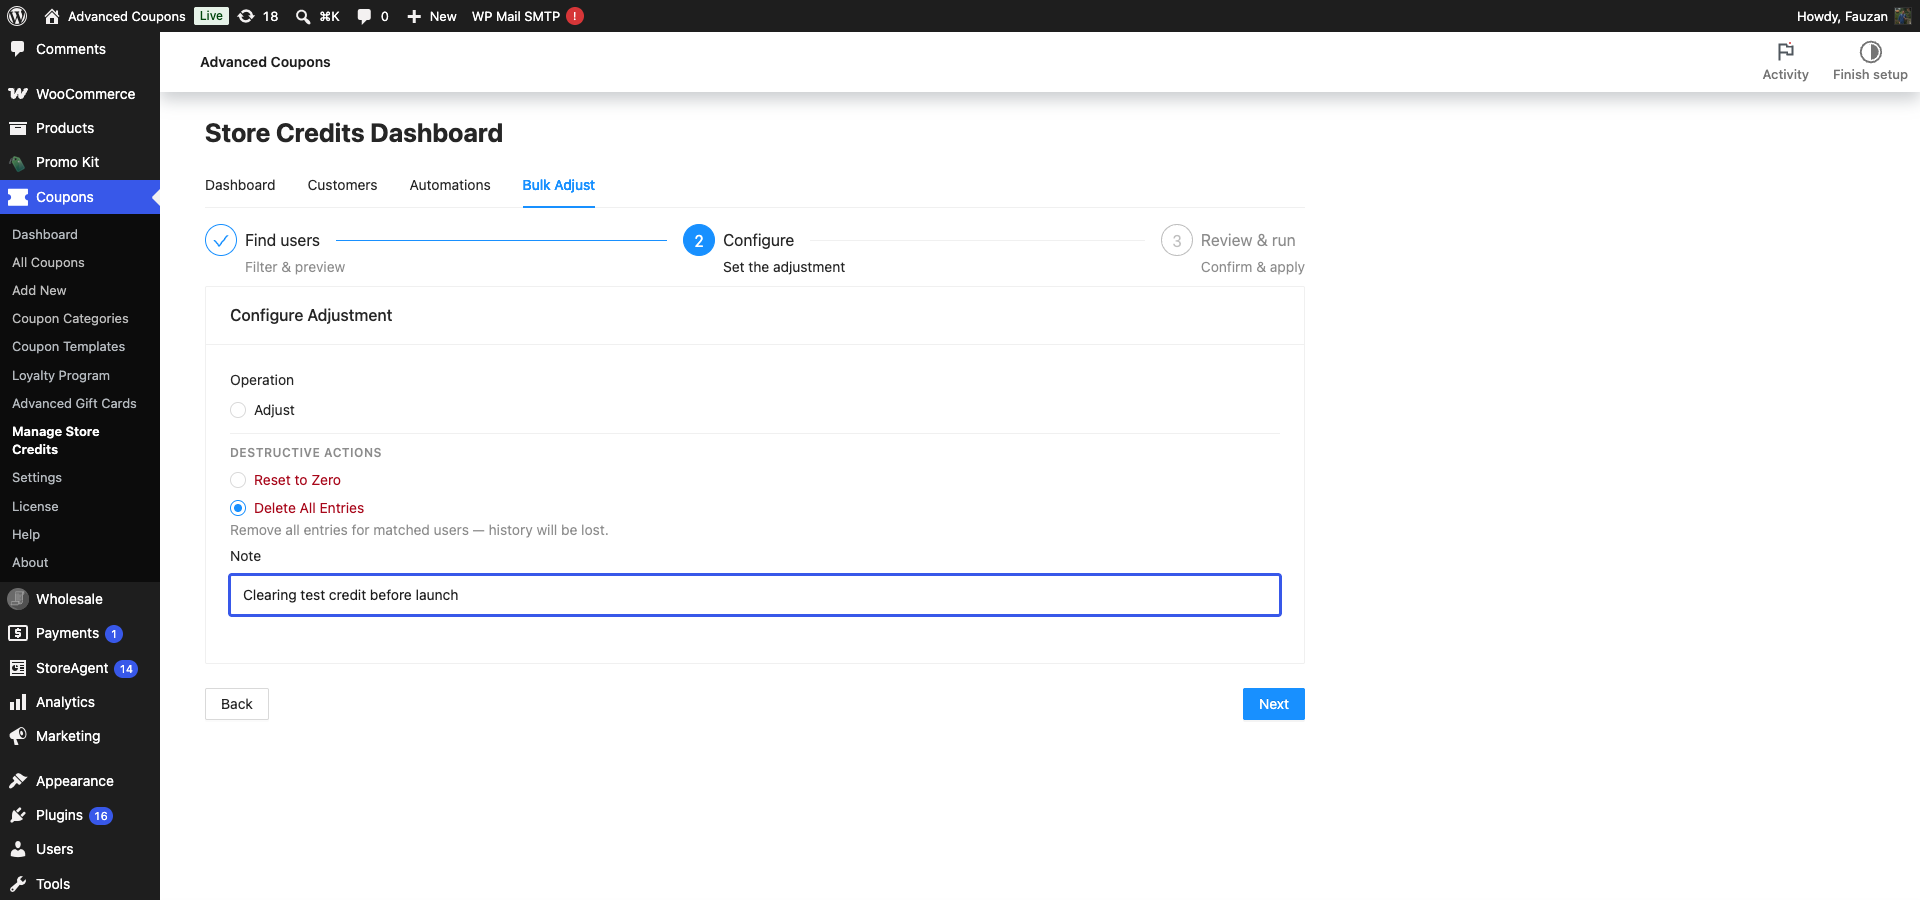
The Configure Adjustment card opens with an Operation choice. Adjust is selected by default and sits on its own. The two destructive options sit below it under a Destructive actions heading, deliberately separated so a routine-feeling click cannot wipe data.
| Operation | What it does | Balance afterwards | Credit history | Reversible |
|---|---|---|---|---|
| Adjust | Increases or decreases each matched balance by a fixed amount or a percentage | Previous balance plus or minus the amount | A new entry is added for every change | No |
| Reset to Zero | Writes one decrease entry for each customer’s whole remaining balance | Zero | Kept in full, and gains one more entry recording what was cleared | No |
| Delete All Entries | Deletes every store credit entry belonging to each matched customer | Zero | Erased completely | No |
This is the distinction worth getting right before you click anything. Reset to Zero empties the wallet but leaves the receipts, so you can still see what a customer earned and spent. Delete All Entries throws away the wallet and the receipts.
Adjust: increase or decrease balances
Selecting Adjust shows the help line Increase or decrease balances by a fixed or percentage amount and reveals the amount fields.
- Set Adjustment Type to Increase or Decrease.
- Set Amount Mode to Fixed or Percentage.
- Enter the Amount.
- (Optional) Type a Note.
- (Optional) Tick Send email to users.
- Switching between Fixed and Percentage clears the amount, because the two run on different scales.
- Fixed amounts show your store currency symbol and two decimal places. Percentages accept up to 1000.
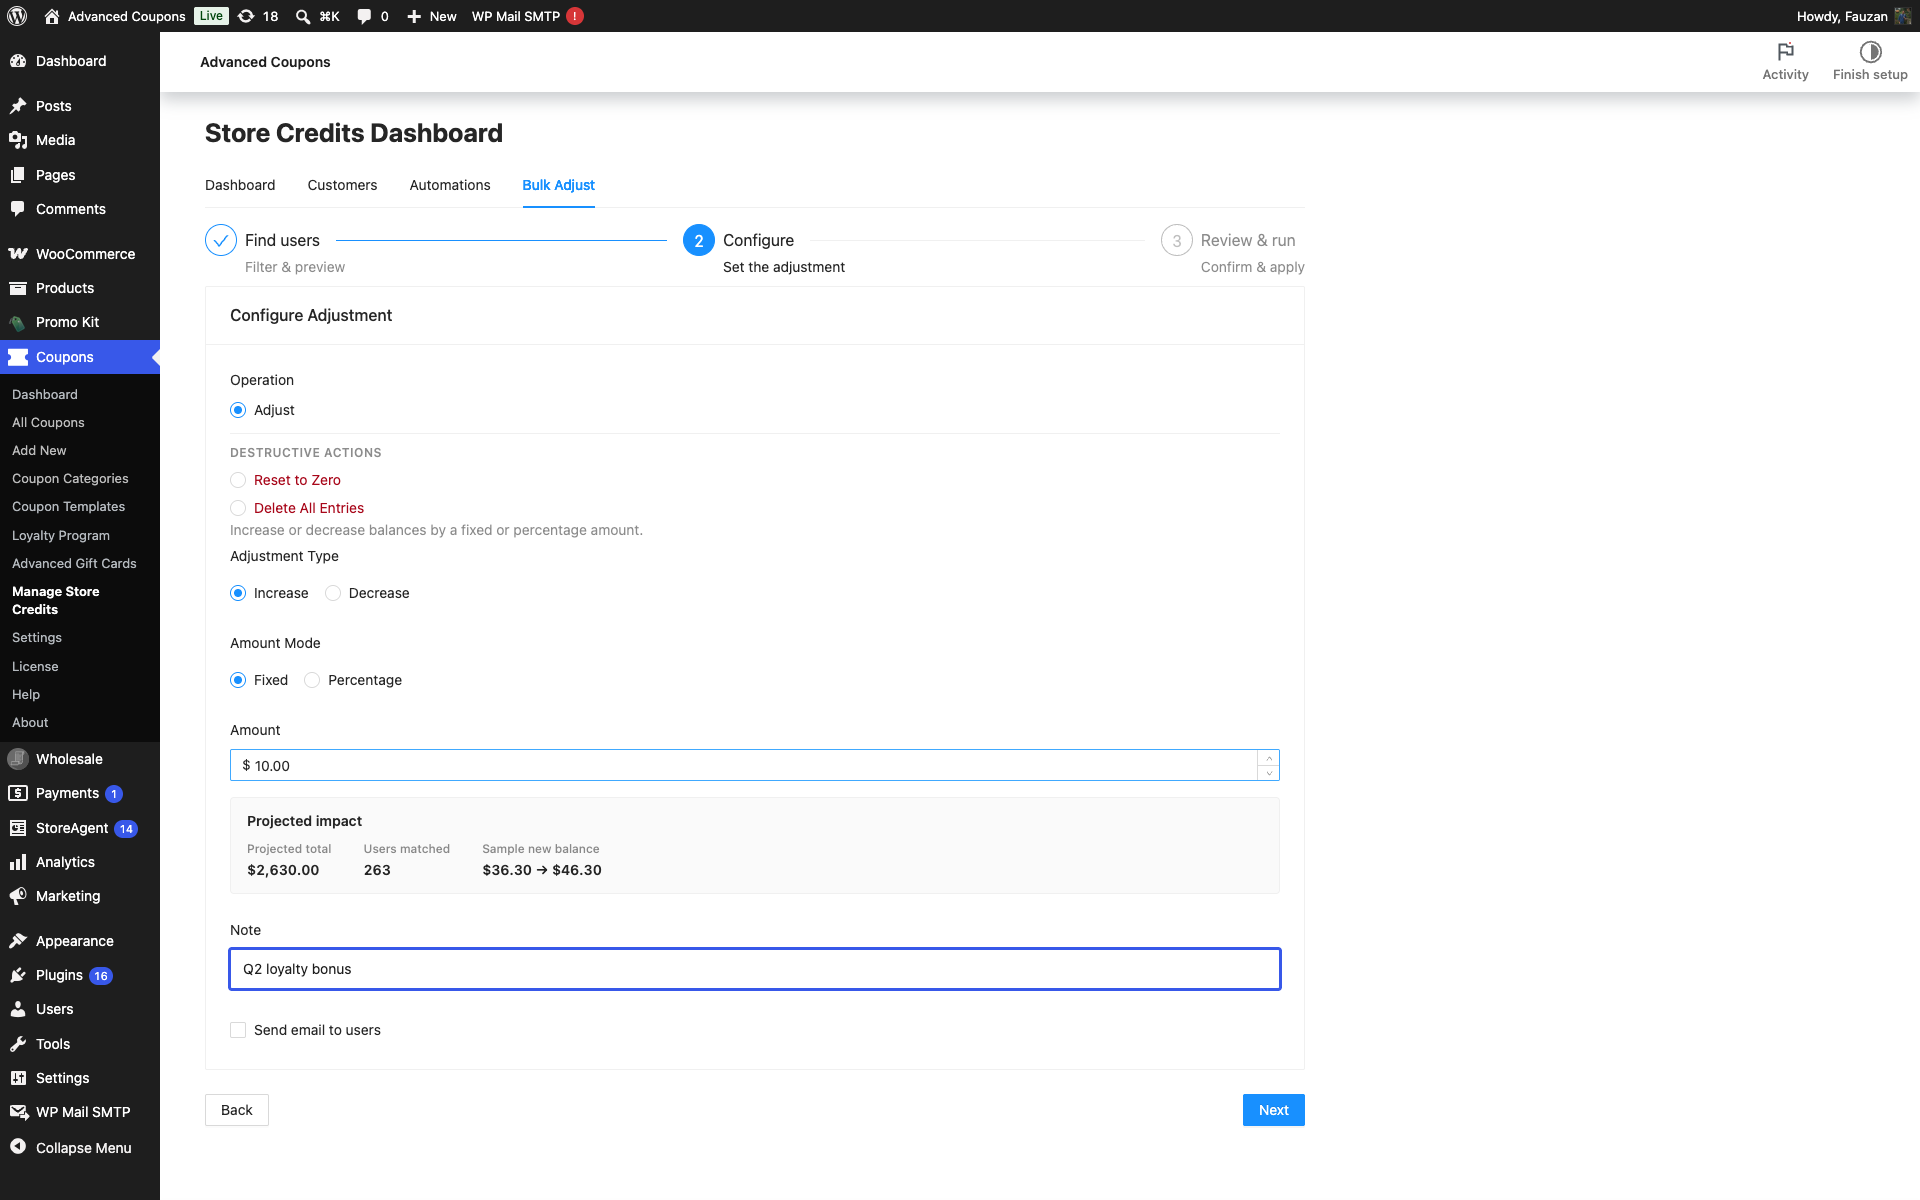
- The Note is saved on every credit entry the run creates, so e.g. Q2 loyalty bonus shows up in each customer’s credit history.
- Send email to users is an opt-in for this run only. The store credit adjustment email still has to be enabled in your WooCommerce email settings, otherwise nothing goes out. See How to Enable Email Notifications for Store Credit Adjustments.
As soon as the amount is valid, a Projected impact panel appears under the field with three figures: Projected total across everyone matched, Users matched, and a Sample new balance showing one real customer’s before and after. It refreshes as you type, and shows Updating preview… while it catches up.
Reset to Zero: clear balances, keep history
Selecting Reset to Zero shows the help line Set balance to zero, keep history and hides the amount fields, since there is nothing to set. Only Note stays available.
Behind the scenes the run writes a single decrease entry for each customer’s full remaining balance. That is why the history survives: the ledger keeps every earlier entry and gains one more line showing exactly how much was cleared and by whom. Customers with a balance already at zero are skipped rather than given an empty entry.
- The Send email to users checkbox is hidden for this operation, so a reset never sends a customer a balance-changed email.
- The note you type is stored on the decrease entry, which makes it the easiest place to record why the reset happened.
Delete All Entries: remove balances and history
Selecting Delete All Entries shows the help line Remove all entries for matched users — history will be lost. Only Note stays available here too.
This run deletes every store credit row belonging to each matched customer and forces their balance to zero. Their credit history is gone from the plugin: no earlier entries, no record of the deletion in the customer’s credit list. Because there is no ledger trail left to inspect, each deletion is written to the WooCommerce log instead, under the source acfwp-bulk-store-credits, recording who ran it, which customer was affected, how many entries went, and what the balance was beforehand. You can read those at WooCommerce > Status > Logs.
Reach for this one only when you genuinely want the data gone, such as clearing test credit from a store you are about to launch. If your goal is a clean slate that you can still audit later, use Reset to Zero instead.
Step 3: review and run
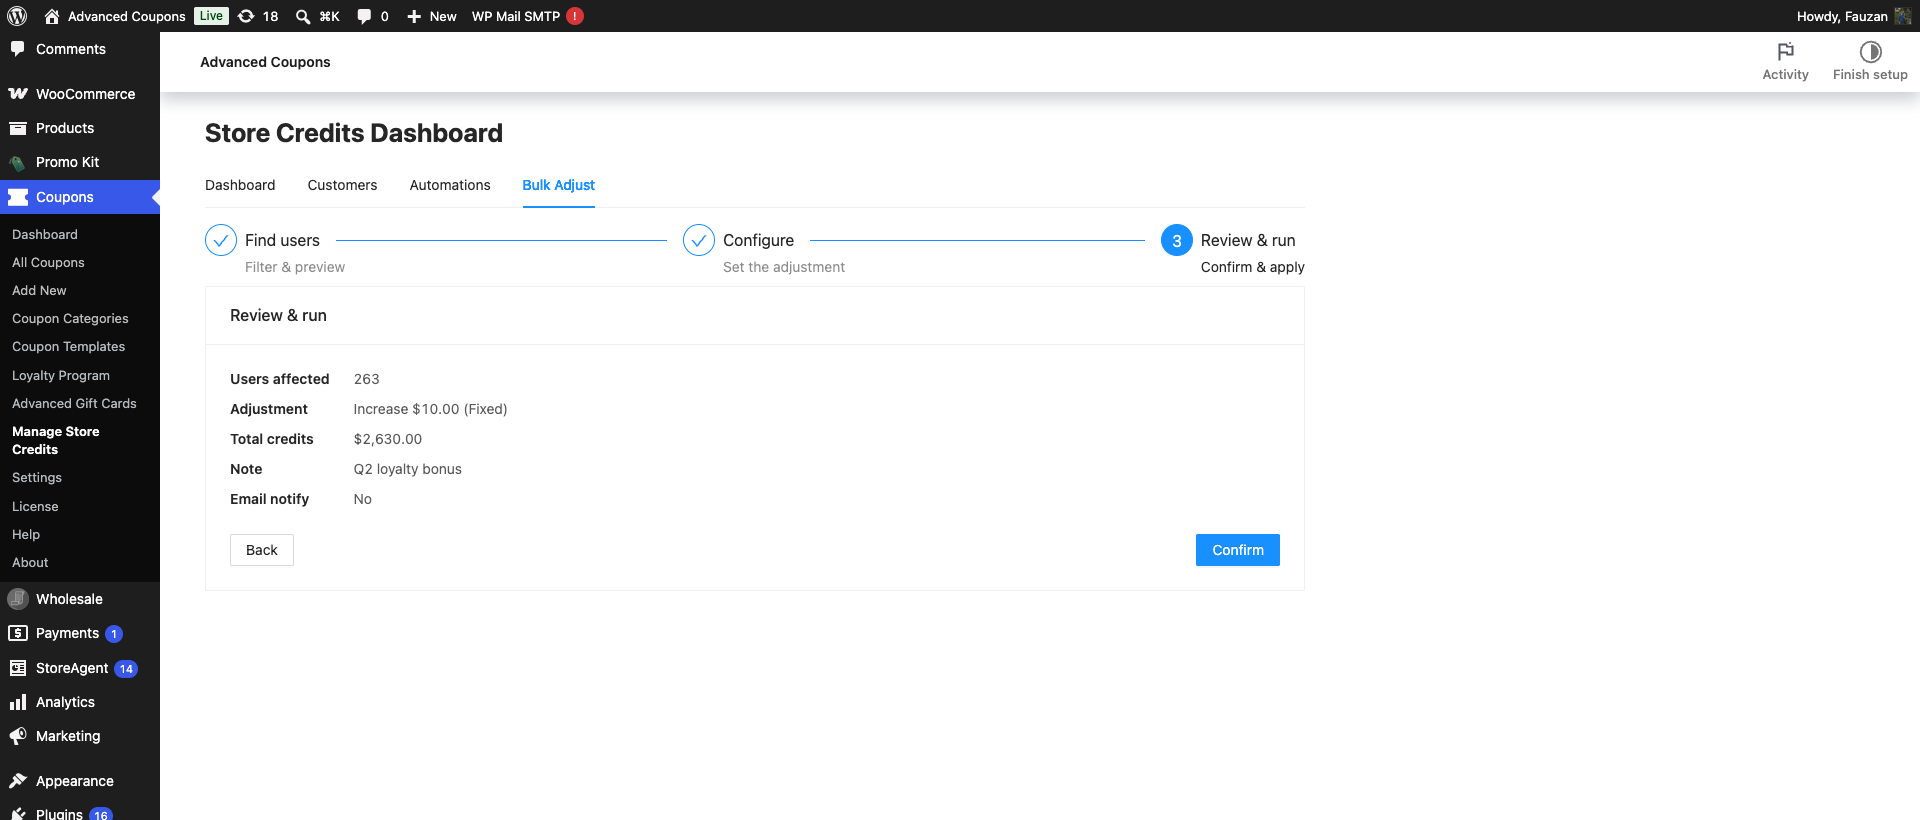
The Review & run step is where the operation actually starts. It shows a summary you should read line by line: Users affected, the operation or adjustment, Total credits for adjustments, your Note if you set one, and Email notify.
- Check the summary against what you expected, especially Users affected.
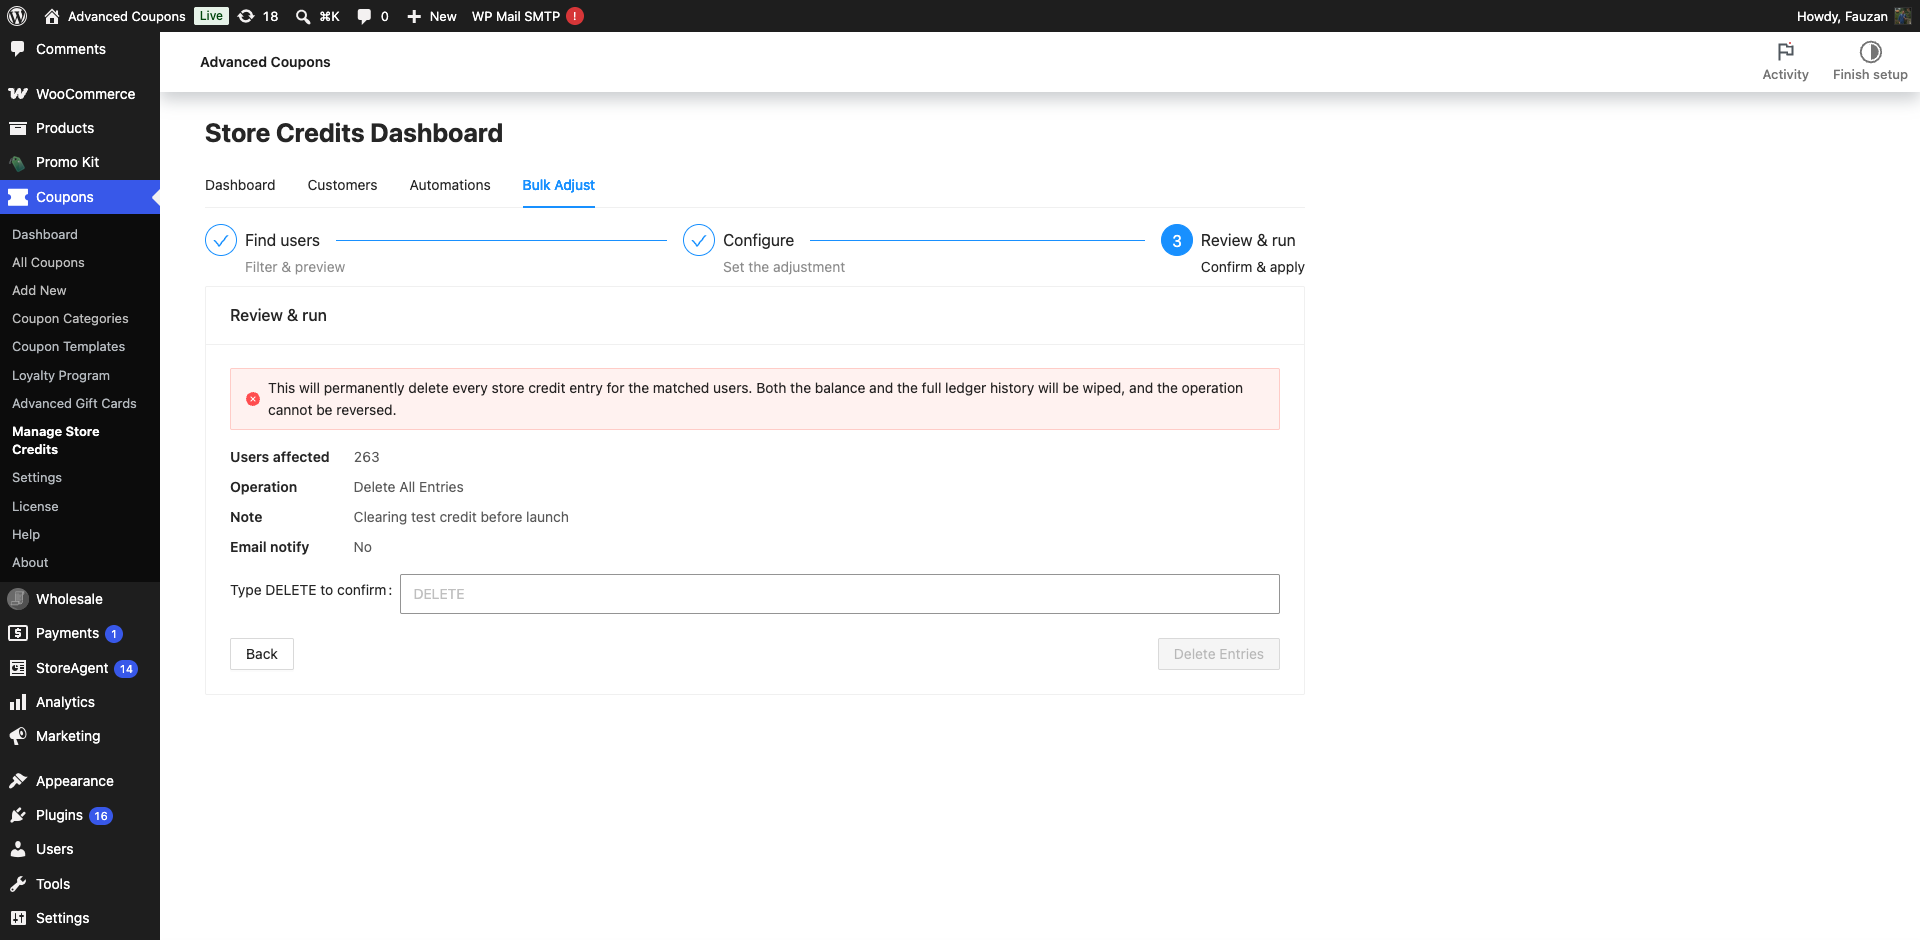
- For a delete, type DELETE in the Type DELETE to confirm field.
- Click the run button: Confirm for an adjustment, Reset Balances for a reset, or Delete Entries for a delete.
You can still click Back from here and change anything. Nothing has happened yet.
The guardrails on destructive runs
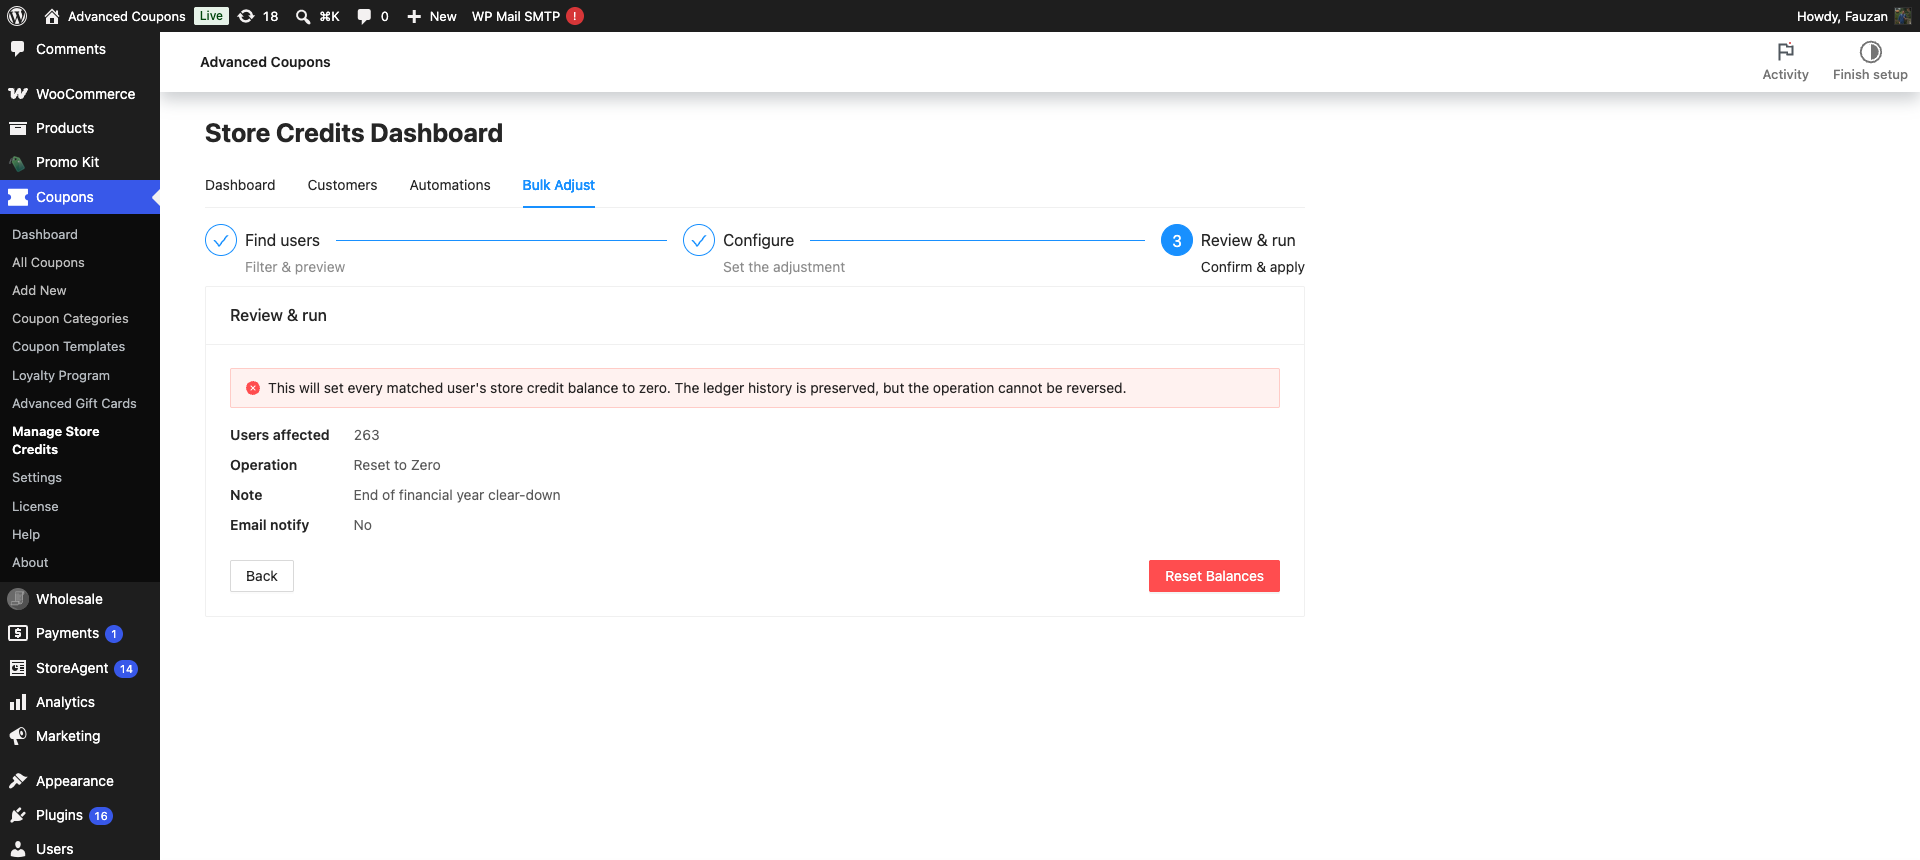
Both destructive operations get a red warning across the top of the step, and the run button is styled as a danger action rather than the usual primary button.
- A reset warns: This will set every matched user’s store credit balance to zero. The ledger history is preserved, but the operation cannot be reversed.
- A delete warns: This will permanently delete every store credit entry for the matched users. Both the balance and the full ledger history will be wiped, and the operation cannot be reversed.
A delete adds one more gate. Delete Entries stays disabled until you type the word DELETE into the confirmation field. Stepping back and returning clears that field, so a previous confirmation can never pre-approve a second run.
What happens after you run it
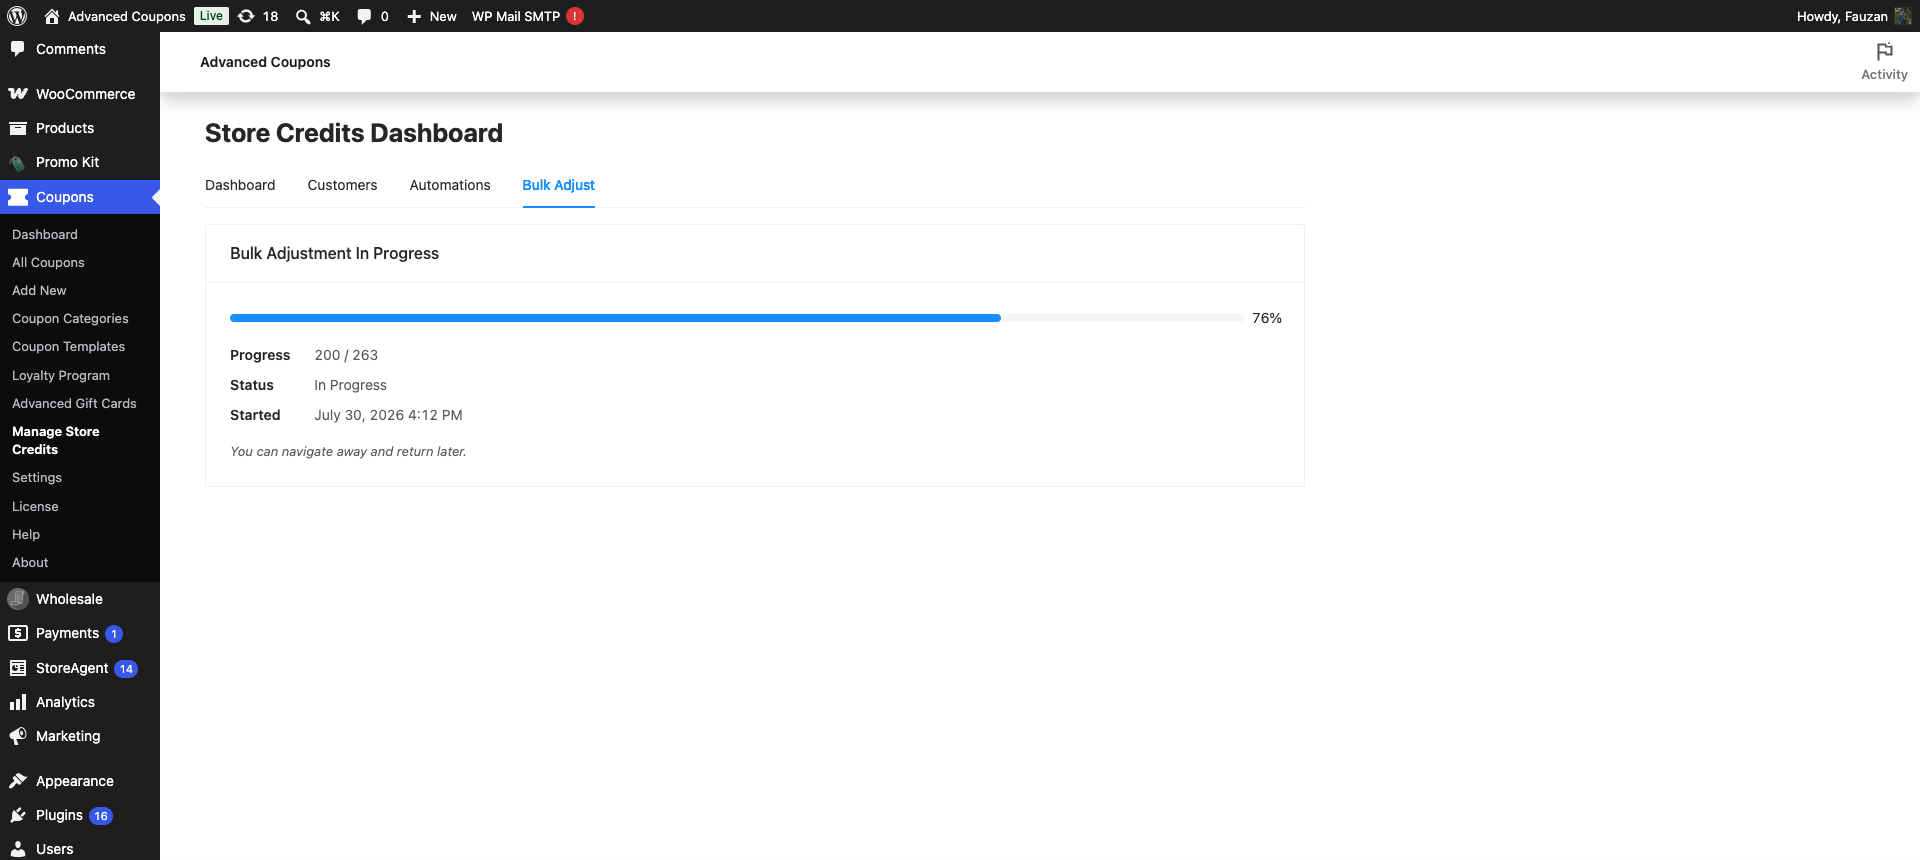
Confirming schedules the job rather than processing it in your browser. You get a Bulk adjustment scheduled successfully message and the wizard is replaced by a progress panel. This is how every run behaves, on a store with 12 customers or 12,000.
Customers are processed in batches of 200, with each batch queued a few seconds after the previous one finishes. Running them one after another rather than all at once keeps a big job from overwhelming your server.
The progress panel shows a completion bar, Progress as a processed-of-total count, Status, and Started. It refreshes every few seconds on its own, and the line You can navigate away and return later means what it says: closing the tab does not stop the job. Come back to the Bulk Adjust tab and the panel picks up where things are.
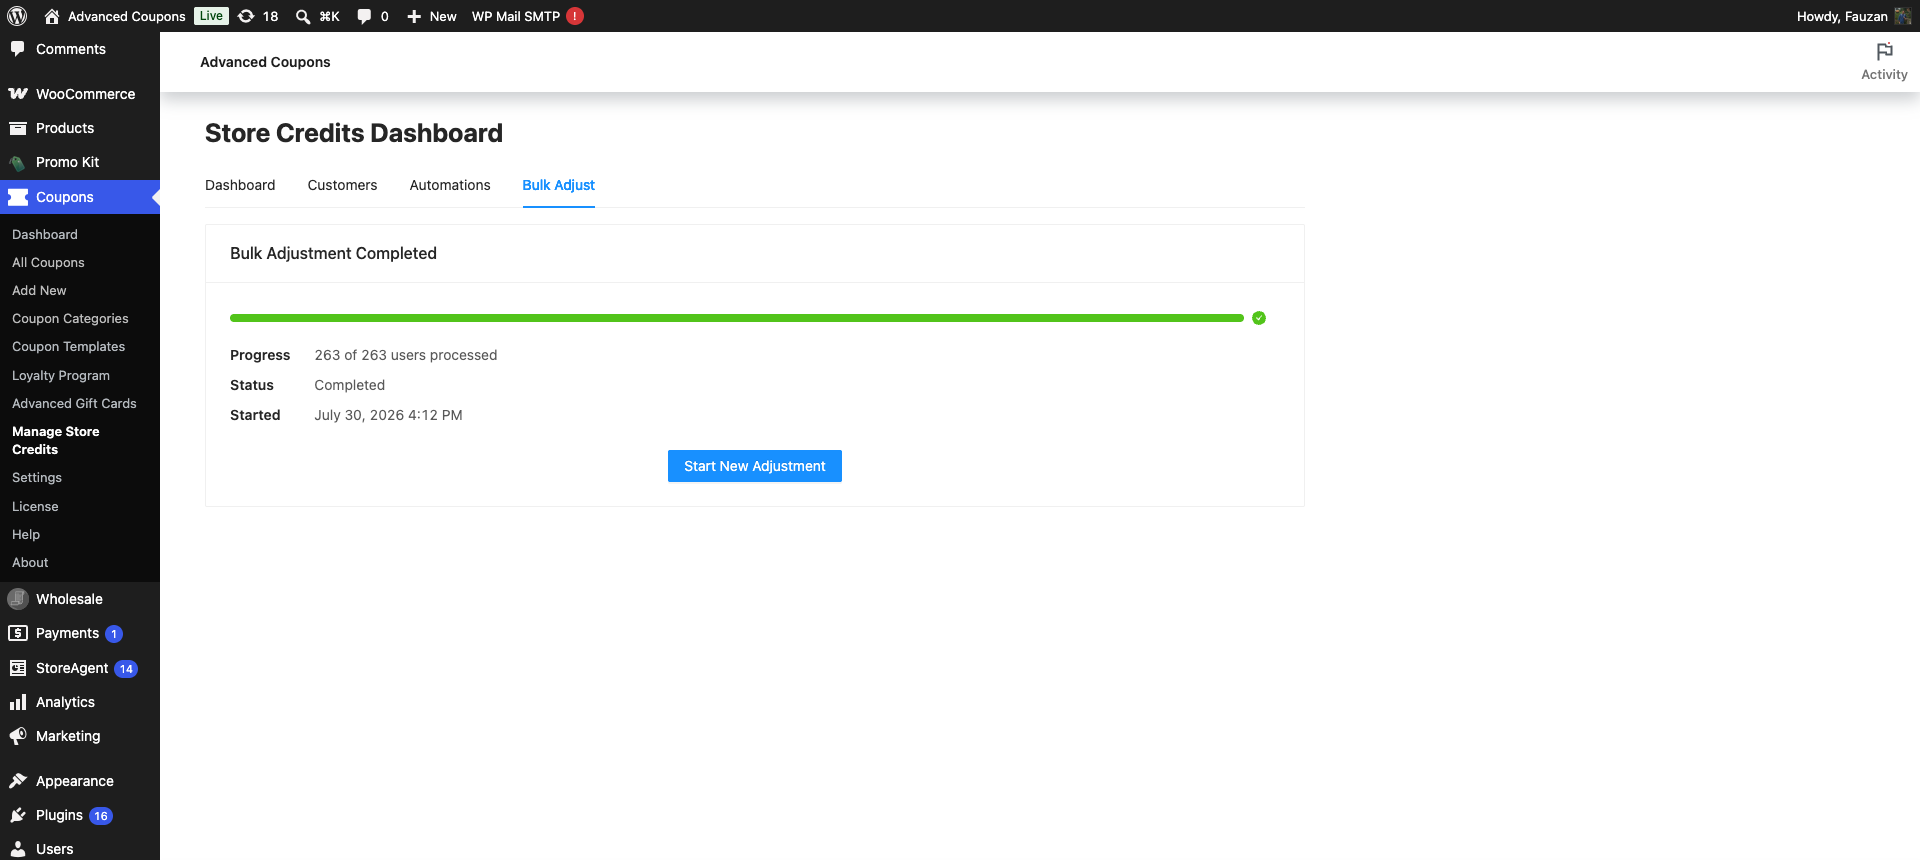
When it finishes, the heading becomes Bulk Adjustment Completed and the count reads as X of Y users processed. All three operations share these headings, so a completed reset or delete is also labelled a bulk adjustment. Click Start New Adjustment to clear the panel and get a fresh step one. If you leave it, the completed record clears itself after 24 hours.
Only one bulk operation can run at a time. Confirming a second run while one is still going is refused with A bulk store credit adjustment is already in progress. Please wait for it to complete.
Limits worth knowing
| Limit | What it means |
|---|---|
| One run at a time | A second operation cannot be started until the current one finishes. |
| 50,000 customers per run | Filters that match more than this are refused, on preview, export, and run. Narrow the filters and split the job. |
| At least one filter | An empty filter set is rejected, so you cannot accidentally target every user on the site. |
| Decreases stop at zero | A decrease is capped at the customer’s available balance, so no one is pushed into a negative balance. |
| Percentages resolve at run time | A percentage is calculated against each customer’s balance when their batch runs, not against the preview figure. |
Troubleshooting
The Next button is greyed out on step one
Click Preview Users and make sure the result is at least one customer. If you changed a filter after previewing, preview again: an edited filter deliberately locks Next so the run cannot target a list you have not seen.
Preview Users is greyed out
Set at least one filter, or add someone under Include Users. The tool will not preview an unfiltered list.
The filters matched too many users
Add a narrower filter, such as a tighter Registered range or a Balance minimum, then split the work into several runs. A single operation caps out at 50,000 customers.
A bulk adjustment is already in progress
Open the Bulk Adjust tab and read the progress panel. Wait for it to reach Bulk Adjustment Completed, then click Start New Adjustment. If the panel shows a warning that it could not verify whether an operation is running, click Retry to poll again.
A reset finished but some customers have no new entry
Those customers were already at zero. A reset skips them rather than writing a zero-value entry, and they still count towards the processed total.
Customers did not get an email about their adjustment
Tick Send email to users on the Configure step, and check that the store credit adjustment email is enabled under WooCommerce > Settings > Emails. The checkbox is an opt-in for one run, and it cannot override a disabled email. Resets and deletes never email customers, which is why the checkbox is hidden for them.
The amounts changed between the preview and the result
This is expected in Percentage mode. Each customer’s percentage is worked out from their balance at the moment their batch runs, so a customer who spends credit between your preview and the run gets a smaller adjustment. Use Fixed mode when you need every customer to get exactly the same amount.
Progress has not moved in a while
Batches run through WooCommerce’s scheduled-action queue. Check WooCommerce > Status > Scheduled Actions for pending or failed actions in the acfwp_bulk_adjust group. A queue that is not running usually points at a stalled WordPress cron rather than at the bulk tool.
Frequently asked questions
Can I undo a bulk run?
No. None of the three operations can be reversed from inside the plugin. An adjustment can be countered with an opposite adjustment, but a reset or a delete needs a database restore, which is why the backup matters.
Does a reset delete a customer’s credit history?
No. A reset zeroes the balance and leaves every earlier entry in place, plus one new entry showing what was cleared. Only Delete All Entries removes history.
Will customers be notified when I reset or delete their credit?
No. The email option only exists for adjustments, and it is hidden for both destructive operations.
Do I have to keep the page open while it runs?
No. The job runs in the background, so you can close the tab and check the progress panel later.
Can I do this without the admin screen?
Yes. Premium registers a WP-CLI command, wp acfwp store-credits bulk-adjust, which accepts the same operations through --type=increase, --type=decrease, --type=reset, and --type=delete. Adding --dry-run lists the customers it would affect without changing anything.
Is Bulk Adjust available in the free plugin?
No. The Bulk Adjust tab in the free plugin shows an upgrade prompt instead of the tool.
What’s next
- Advanced Coupons: How To Use Store Credit (Setup Guide)
- How to Enable Email Notifications for Store Credit Adjustments
- How to Delete Invalid Store Credit Entries in Advanced Coupons
- How to import store credits from other plugins
Need help?
If you have a question or run into any issues, we’re here to help.
- Premium users: Open a support ticket
- Free users: Visit our community forum