Are you tired of running flat discounts in your store only to see disappointing sales returns? Maybe it’s time to step up your coupon game with tiered coupons!
You can motivate greater purchases and improve your overall revenue by offering discounts that rise in value as the customer adds more products to their cart. Additionally, you can reward your customers for making larger purchases using this viable strategy!
So, where do you start? In this article, we’ll walk you through the process of creating tiered coupons step-by-step, so you can start seeing the benefits for your business in no time. Let’s get started!
What Are Tiered Coupons?
Flat discounts can easily become boring. If you want a more personalized touch (and to play with mind tricks for better coupon conversion), running tiered coupons is the way to go!
Tiered coupons are a type of coupon that allows store owners to provide discounts on products or services dependent on how much money customers spend.
Customers are enticed to spend more money in order to earn a larger discount through tiered coupons, which can result in greater profits and sales for the business.
For example, an online retail store can provide a tiered coupon that provides customers with a 10% discount on orders of $50 or more, a 15% discount on orders of $100 or more, and a 20% discount on orders of $200 or more.
In this case, customers are urged to spend more money in order to snag bigger savings. This can be a powerful motivator for those on the fence about making a purchase.
Tiered coupons are frequently used in marketing to attract prospective customers and keep existing ones. Customers are more likely to spend more money if they believe they are receiving an advantageous deal, therefore they can be especially useful for businesses that sell high-priced items or services.
How To Create Tiered Coupons In WooCommerce
By default, WooCommerce’s built-in features are limited when it comes to running complex discounts like tiered offers. This can make the process frustrating and time-consuming, especially for beginners.
However, with the help of Advanced Coupons, you can easily create and manage tiered coupons to boost your sales and keep your customers happy. And in this article, we’ll discuss 3 easy ways to create tiered coupons using this powerful plugin:
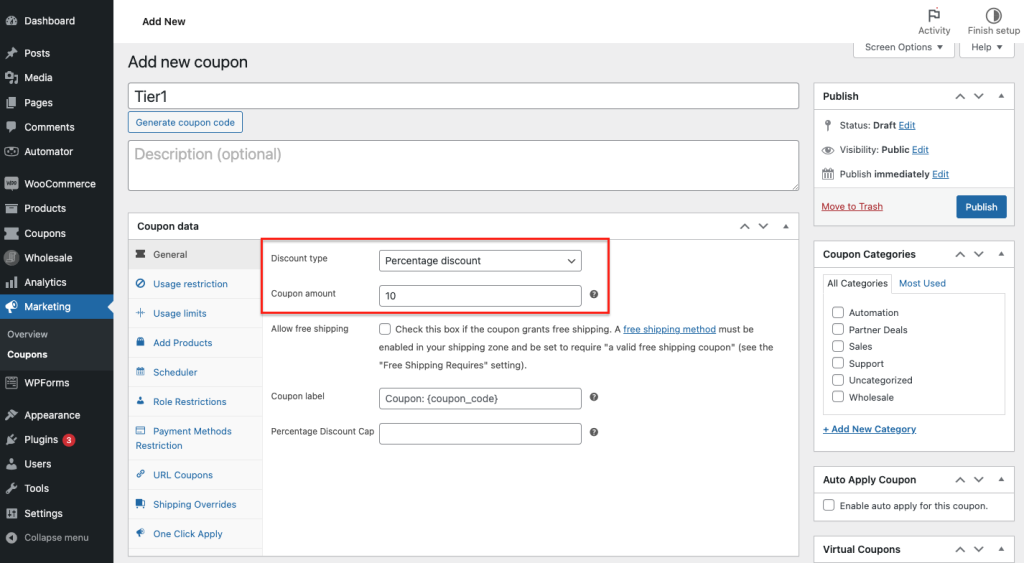
Step 1: Create multiple coupons
To create tiered coupons in WooCommerce, you need to use multiple coupons paired with cart conditions and the auto-apply feature (which we’ll be discussing more of later).
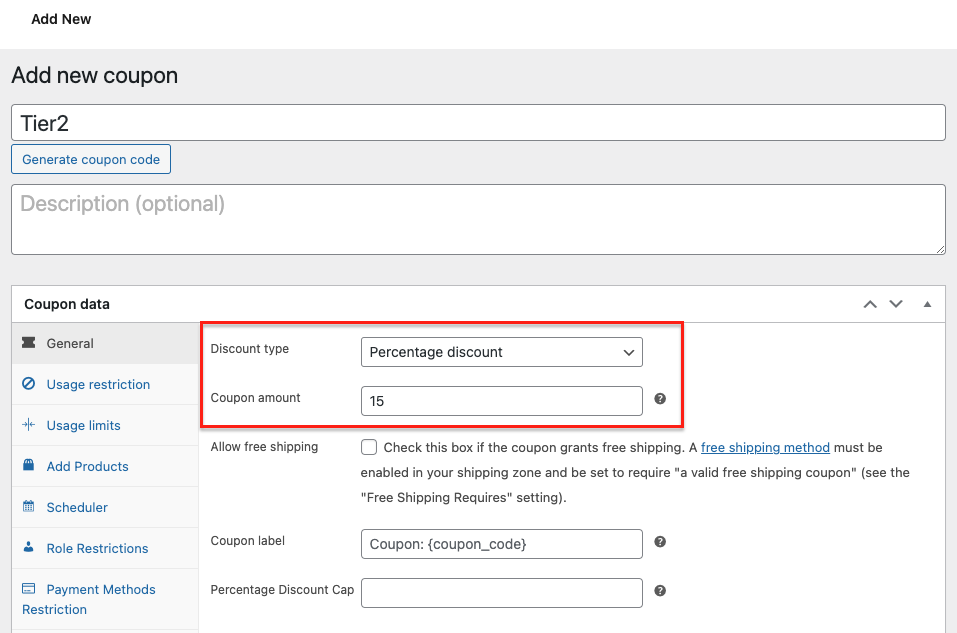
The first step in this process, therefore, is to create multiple coupons that reflect your tiered offer. Each coupon should correspond to a different tier of the discount, such as 10% off for purchases over $50, 20% off for purchases over $100, and so on.
Note that you need to have a clear understanding of the discount structure you want to offer to your customers. For instance, in this tutorial, we’ll consider the following tiered discount structure:
- $50 – $99 = 10% off
- $100 – $299 = 15% off
- $300 – $599 = 20% off
This means that you must set up coupons offering the same amount, which will be paired with the necessary cart conditions in the next steps.
Step 2: Apply cart conditions
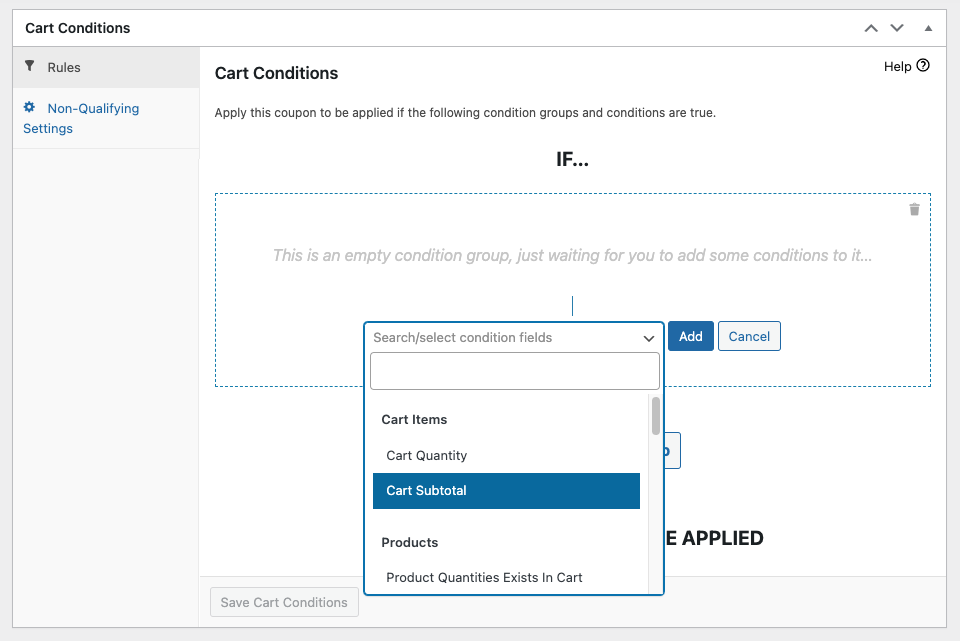
After you have created coupons offering the same amount for each tier, navigate to the Cart Conditions section just below the Coupon Data. Here, you will find a dropdown list where you can select “Cart Subtotal” as the condition:
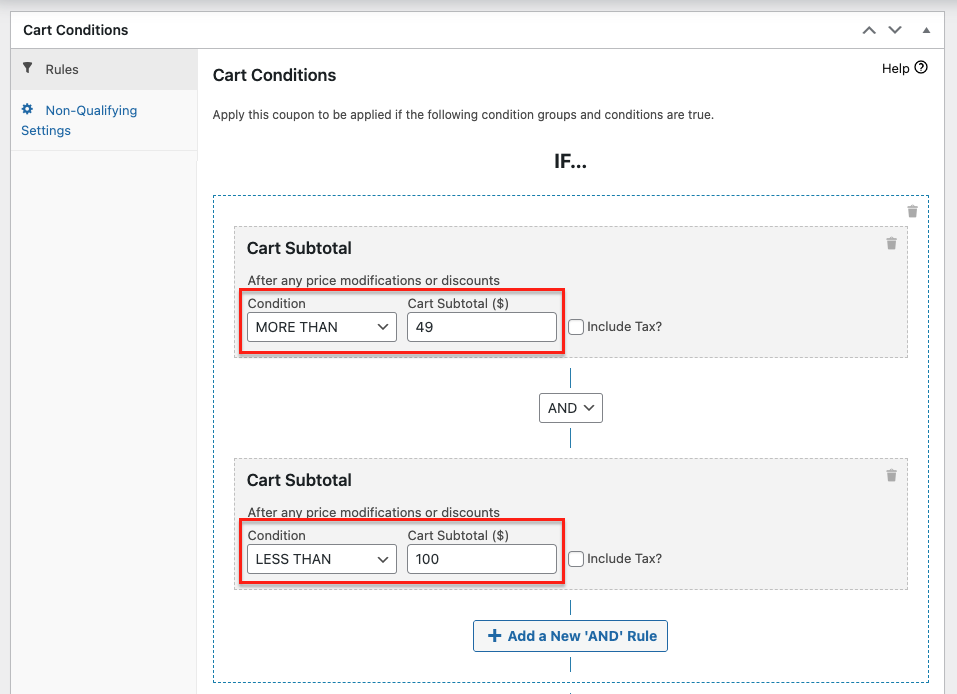
To continue creating tiered coupons, you need to define the conditions for each tier. Let’s take the first tier as an example:
If the purchase is more than $49 and less than $100, they will get a 10% off.
So, to set up this condition, set the “Condition” as “MORE THAN” and enter the minimum subtotal amount for that tier. You will also set the “Condition” as “LESS THAN” and enter the maximum subtotal amount for that tier:
Now, go ahead and apply the same process to the rest of the coupons. Remember, each tier will follow the same logic but with different numbers and discount rates.
Step 3: Enable the auto-apply setting
Finally, enable the Auto Apply Coupon feature in the Advanced Coupon settings.
This feature is especially useful for tiered coupons since the coupon will only be applied when the cart subtotal meets the minimum requirement for a specific tier:
Once this feature is enabled, the discount will be automatically applied to the customer’s cart when they meet the specified conditions for the coupon. By doing so, you eliminate the need for customers to manually enter the coupon code, ensuring a smooth and hassle-free checkout process.
Conclusion
Tiered discounts refer to a pricing strategy where the more a customer buys, the greater the discount they receive. This strategy urges customers to buy more in order to take advantage of the discounts.
Although the default features of WooCommerce are not capable of fully supporting this type of discount offer, by installing Advanced Coupons, you can easily set up tiered coupons in just three simple steps:
Do you have any questions about this article? Let us know in the comments!


