
Attracting new leads, getting repeat buys from existing customers, or simply reducing overstocked products are all things that are top of mind for a store owner. The good news is there’s a way you can achieve ALL of these things in one swoop. Using a strategically planned WooCommerce flash sale is your fast-lane ticket to glory.
There are a few steps involved in running a successful flash sale, but it isn’t hard and we’re going to take you through them in this article. Fortunately, as a WooCommerce store owner, setting up an effective flash sale promotion is quick and painless with one extra tool.
It’s so easy, in fact, that you’ll be wanting to run one of these every couple of weeks to bring you some of that sweet fast cash while attracting new customers to your store. Let’s get into it!
WooCommerce Flash Sale And Why You Should Run One
Customers love sales because it means reduced prices for the same products.
While it can be a great idea to run deals during festive periods, you can also surprise your customers with them at other times of the year.
A flash sale can help you increase sales and clear out excess stock. This kind of promotion will usually have the following qualities:
- Spans a short time frame
- Offers a big discount
- Might not be announced in advance
- May be limited to certain products

A flash sale could last for a few hours, or a day or two at most. In essence, it is a promotion or discount offered for a very short amount of time. This offers you a way to tap into your customers’ Fear of Missing Out (FOMO) and encourage impulse buying.
If you use WooCommerce, then half the work is already done.
The plugin enables you to create different types of sales easily. We’ll show you how to do that shortly, but first, you’ll need to know how to set up an effective event.
Tips For Creating A Successful Flash Sale
A successful sale doesn’t happen by chance. It takes some careful planning to execute one well. By following a few best practices, you can start your flash sale off on the right foot:
- Analyze buying habits. You’ll want to consider when your store has the most traffic when your email open rates are highest, and so on. This will help you determine the right time for a flash sale, which can depend greatly on your products and target customers.
- Streamline your target market. Your target audience for the sale will depend on your goals. For example, if you want to acquire new customers, you shouldn’t focus on promoting your existing customers. In other words, you’ll want to make sure that your flash sale is a meaningful part of your overall marketing strategy.
- Choose the right products. If you have a lot of products, you’ll need to carefully identify which ones are most appropriate for your flash sale. This could be items you need to clear out of your inventory, products that haven’t been selling well, or seasonal offerings.
You can find plenty of other strategies to help you make a success of your flash sale, but these tips should be enough to get you started.
How To Run A WooCommerce Flash Sale (2 Easy Ways)
Now that you know how a flash sale might come in handy, as well as some tips for making it successful, let’s move on to the steps involved in creating one.
To follow along, you’ll need to have both the WooCommerce and Advanced Coupons plugins installed and activated. Let’s get to work!
Option #1: Basic WooCommerce flash sale with a sales badge
The first way I’ll show you how to set up a WooCommerce flash sale is with the default core tools included in every WooCommerce store. It’s using the sale price feature which, on most themes at least, adds a nice sale badge to your product on the front end.
The first thing you want to do is ensure that the products going on sale will be visible and easily accessible to customers. You don’t want them to be confused about which products are discounted.
To add that sales badge all you need to do is set a sales price and schedule the deal.
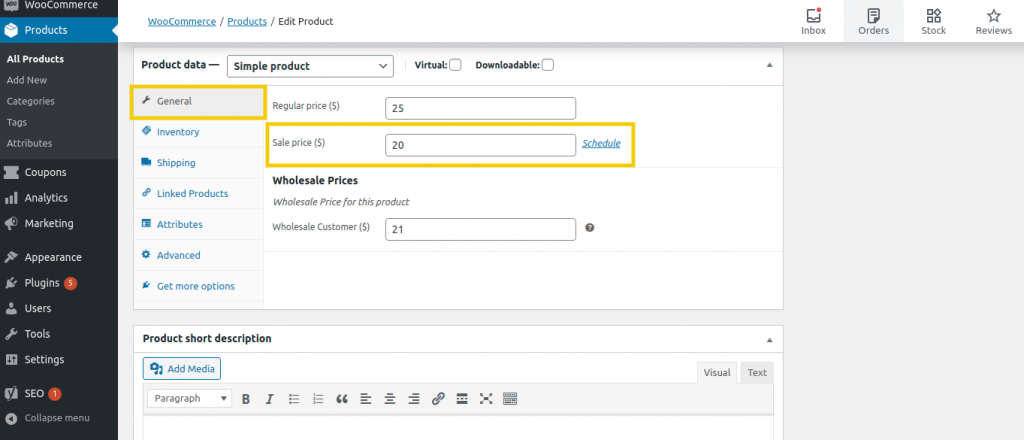
First, open a product to edit it, and locate the Product data meta box. Then enter a discounted price in the Sale price input field under the General tab:
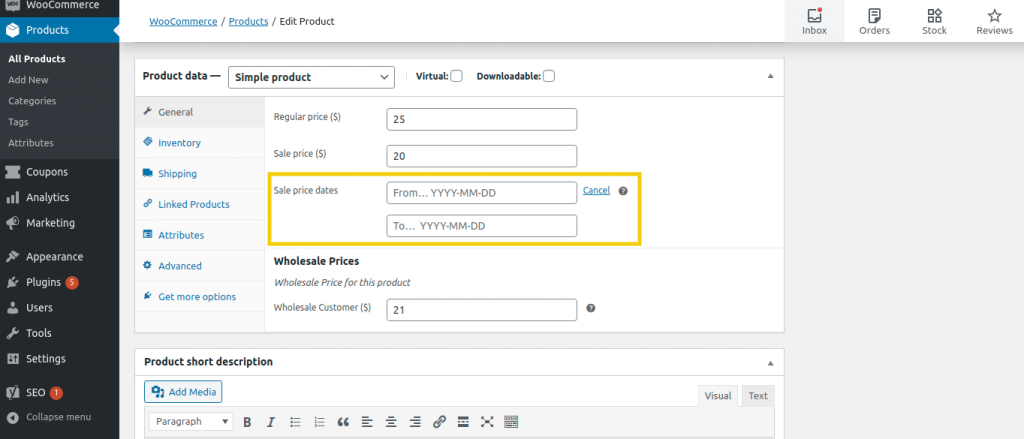
Next, click on Schedule right beside the Sales price input box. There, you can set the start and end dates for your sale:
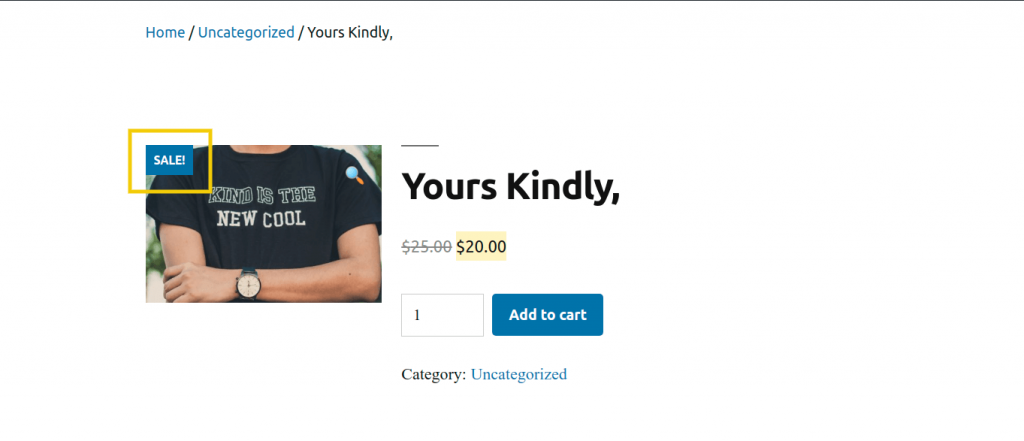
Once you’ve saved your changes, you can view the product. You’ll notice that it now has a sales badge:
Of course, you can always customize the look of your sales badge if you’re not satisfied.
Option #2: Use Advanced Coupons to create a WooCommerce flash sale with coupons
Next, you’ll want to create a coupon using the Advanced Coupons plugin. The basic plugin is free and things like advanced scheduling are included.
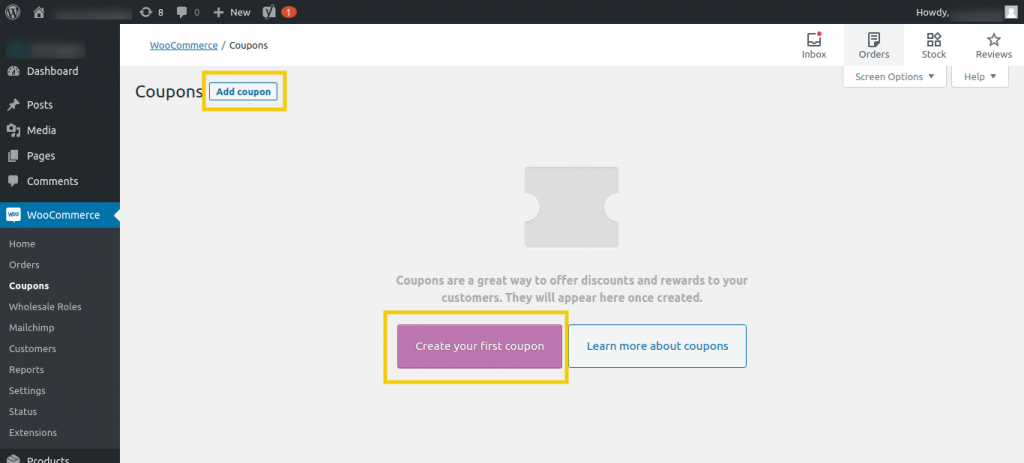
Once installed, navigate to WooCommerce > Coupons and click on the Add Coupon button:
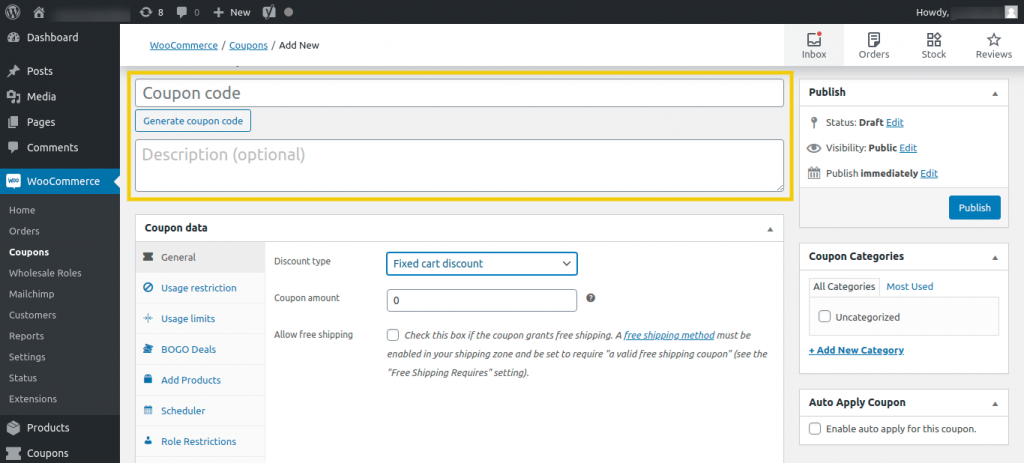
On the next screen, enter a name and description for your coupon:
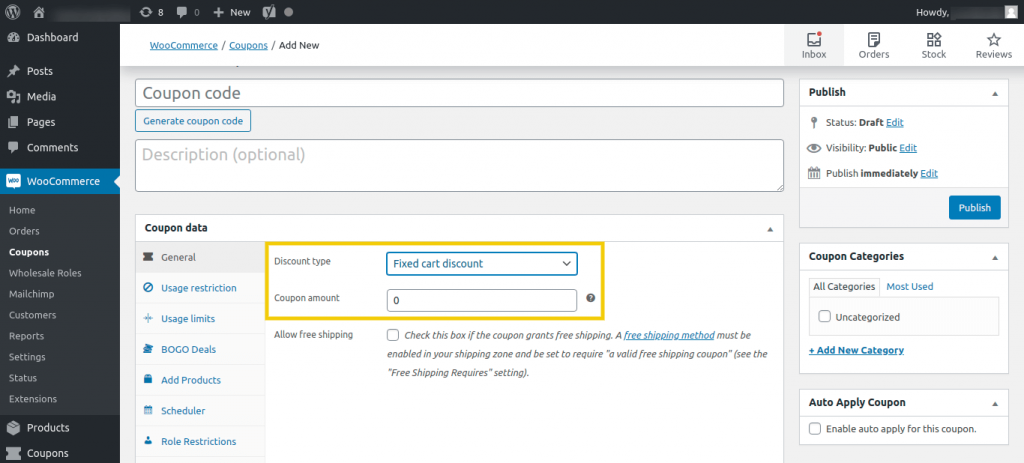
Under Coupon data > General, you can enter an amount and select a discount type from three available options – Percentage, Fixed cart, and Fixed product:
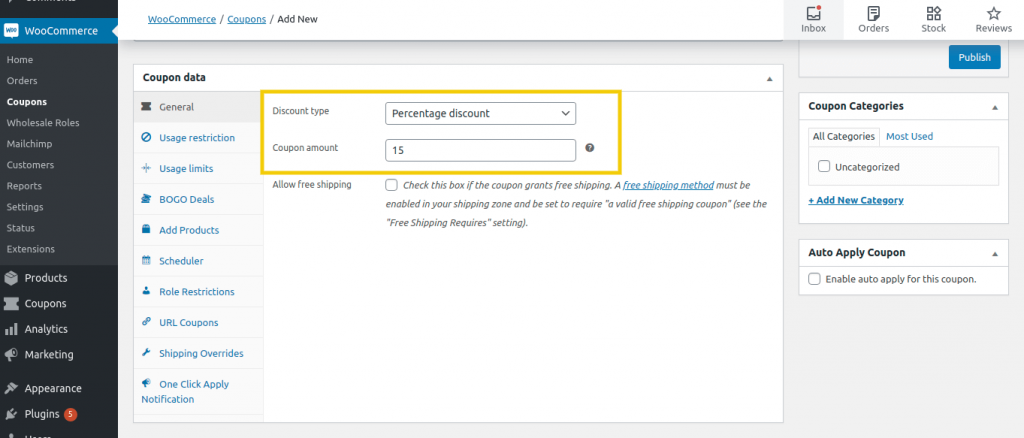
Fixed product discounts are appropriate for customers who will buy just one item, while percentage discounts work best when you’re giving quantity-based discounts (e.g., buy four get 15 percent off). You can use either for your WooCommerce flash sale.
Let’s see what this might look like in practice:
Depending on the type of discount you’re offering, you may need to set some cart conditions for your coupon. However, fixed product discounts applying to one-off purchases will not require any additional cart conditions.
Set usage limits for your deal
Next, you might want to consider setting usage limits for your coupon. This can create a sense of exclusivity and urgency for your deal. For example, you might set the coupon to only be available to the first ten people who visit your store in a day and reset the limit every day (this is an Advanced Coupons Premium feature).
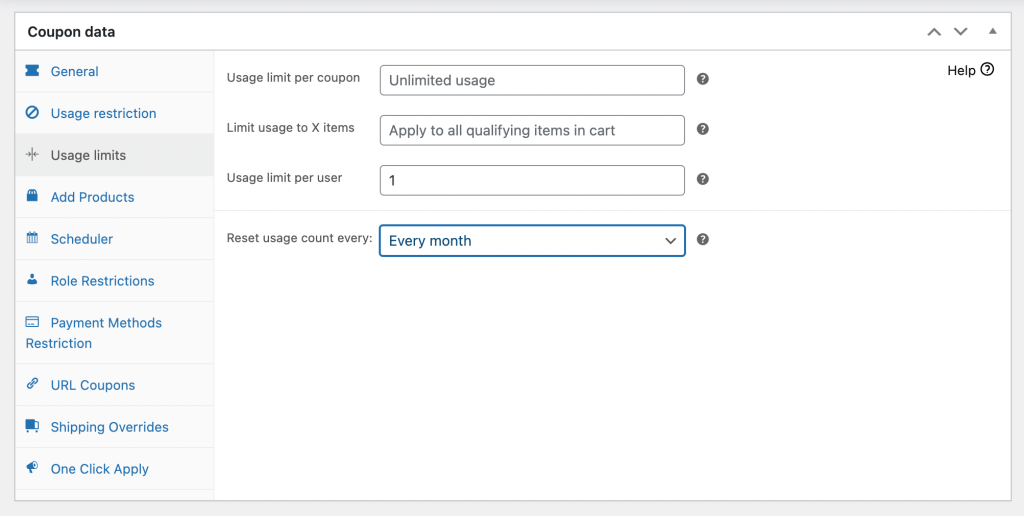
To do this, you can navigate to Coupon data > Usage limits:
The Reset usage count setting lets you further customize how often your coupon can be used and it’s really handy for setting up coupons that reset their usage count on a regular period (for example, max 10 uses per day and it resets daily). This helps you follow through on the “limited” aspect of your flash sale.
Enable auto-apply for your flash sale coupon
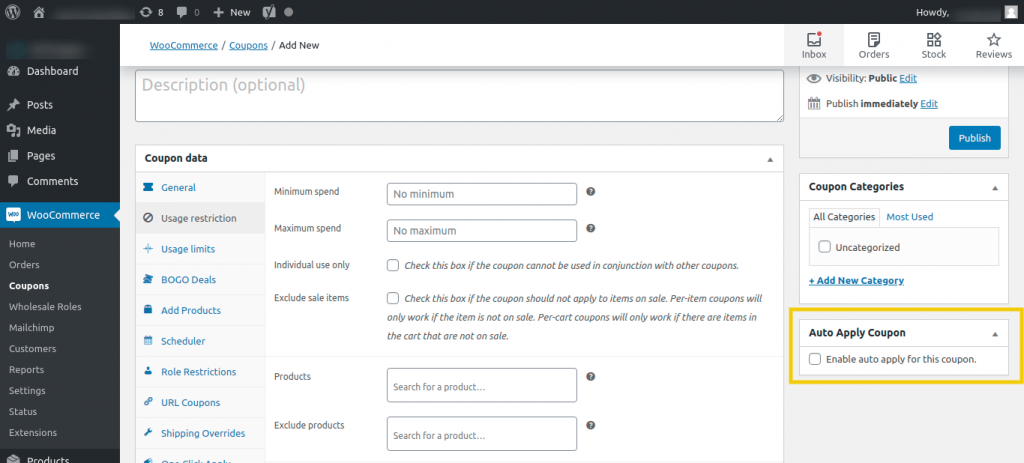
The next important step to take is to automatically apply your coupon. This is a Premium feature, but one you should seriously consider because it’s very powerful.
Auto apply is especially appropriate if your discount is fixed and based on one-off product purchases. It lets your customers concentrate on completing the checkout process, without needing to hunt down coupon codes.
Additionally, new visitors to your site can benefit from the deal immediately, which can help to encourage repeat purchases (first impressions last after all!).
To enable auto-apply, select the checkbox for “Enable auto apply for this coupon”:
Auto apply takes into account the Cart Conditions that you set as well, so you can create coupons that only apply in certain circumstances.
An alternative to auto-apply if you want customers to take a little bit of action instead of just giving them the deal automatically is to use the one-click apply feature.
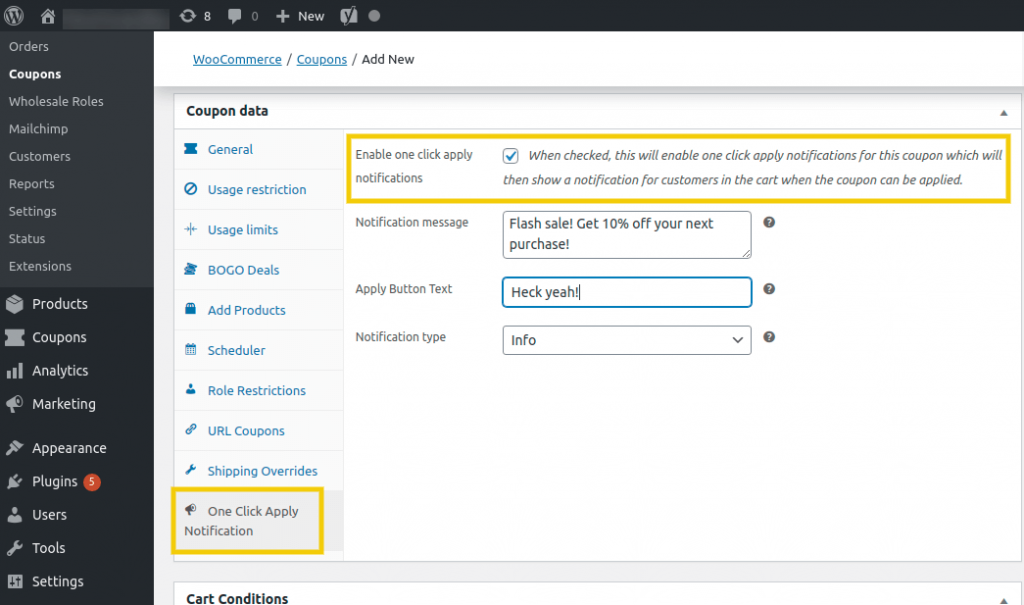
Enabling this option displays a notification on the cart and checkout to qualified customers, who can then apply the coupon by clicking on the button in the message.
Unlike with the auto-apply feature, your buyers can choose whether or not to apply your coupon. To activate this option, simply navigate to the One Click Apply Notification tab and select the checkbox for “Enable one click apply”.
You’ll then want to enter a custom notification message, as well as button text:
This does take some more effort on your end than auto-applying the coupon.
However, it’s important to make the checkout process as hassle-free as possible for your customers and what could be easier than just clicking a button? They still don’t have to remember a single coupon code.
Schedule your flash sale coupon
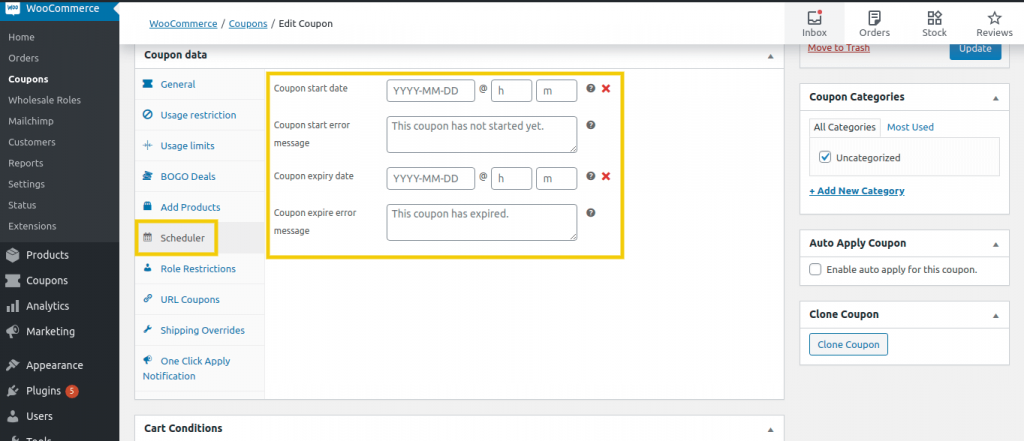
The final step is to schedule the time period when your deal will happen. This is a way to limit the amount of time in which your flash sale is active. You’ll need to set start and end dates and ensure that your deal is automatically disabled once the latter is reached.
Go ahead and navigate to the Scheduler tab to configure the dates and times it should be active.
You can also customize the error messages that people see when they try to apply the deal outside of those times which is a great way to interact with people and shuffle them towards some other offer.
At this point, you’re ready to run your deal. All that’s left is to hit that Publish button and let customers know when the promotion will take effect.
BONUS TIP: Use day/time schedules to really limit the WooCommerce flash sale period
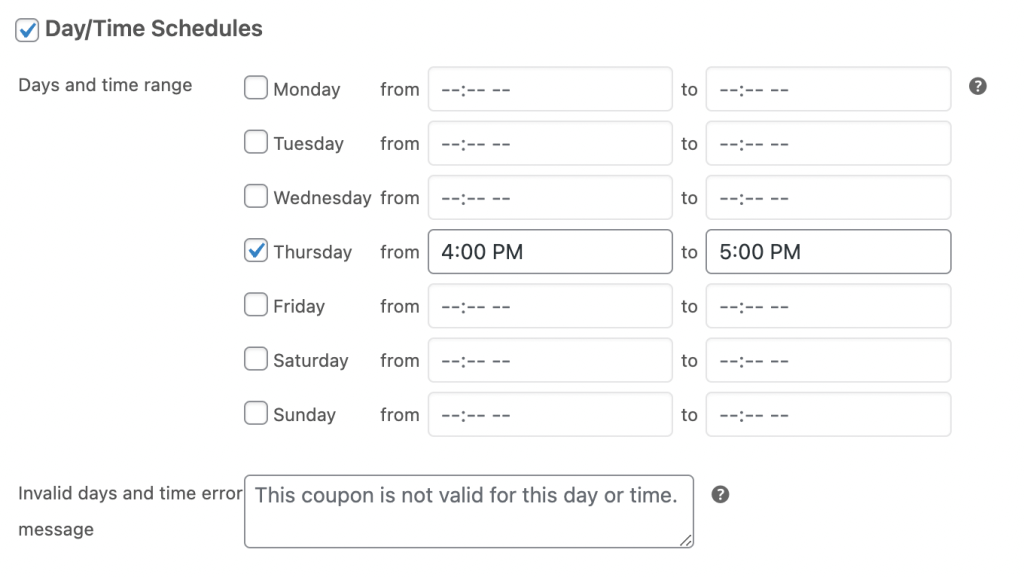
Since originally writing this article Advanced Coupons has released a new feature called Day/Time Schedules.
This is an important addition for WooCommerce flash sales since you can now limit the active period of a coupon to specific days and time periods on those days. Perfect for creating a limited window where people feel they MUST take action or risk missing out!
Using smaller windows lets you intensify the FOMO (Fear Of Missing Out) effect.
You can also use this as an “add-on” to your regular sale where during the highest volume day/time you can create a limited extra bonus just to push another percentage of people over the line.
Conclusion
Running a flash sale for your e-commerce business can be a smart way to decrease overstocked products, increase your profits, and attract new customers. However, it can take some effort to plan and carry out a successful sale.
In this article, we’ve discussed the key steps to take when running a flash sale. They involve using WooCommerce and the Advanced Coupons plugin to:
- Add a sales badge to selected products.
- Create a new coupon and set your discount type.
- Set usage limits for your deal.
- Enable auto-apply for your coupon.
- Schedule your deal.
Do you have any questions about how to run a WooCommerce flash sale? Ask away in the comments section below!




Very helpful, thanks!
You’re VERY welcome Very Black Cat!
This has been really helpful for me. Because Woo commerce involves a whole lot of branches that requires adequate attention and operation to work successfully and with this plugin, Life is definitely made easy for every business owner with an ecommerce website. Really great to hear all about this from Advanced Coupons, Thanks very much.
Cheers Edwin, yes some great tools here to help store owners. Always helps to have a trusted recommendation.
Thank you, Josh and the Rymera team, for making our life easier.
Thanks for the shoutout Jahanggir! Appreciate you 🙌
Thank you and your team for making our lives that much easier. Appreciate it.
Thanks for the kind words John! Great having you on board 🙂
well done, thanks for making this article
Thanks for stopping by Iulia!