Let’s be real, setting up flexible coupons that fit your promotional plans can be a headache without the right tools. And that’s why we’ve created a solution that’s not only efficient but also enhances your store’s operations – WooCommerce Coupon Templates!
No more stressing over setting up coupons in WooCommerce. With just a few clicks, you’re good to go! Plus, we’ve got a whole list of templates for common promotions, so you won’t have to overthink it. In this article, we’ll guide you through everything you need to know about this feature. So, let’s dive in!
The Challenges Of Coupon Creation And Management
Sure, coupons are fantastic for boosting sales, but let’s be real – setting them up and keeping track of everything can feel like a full-time job.
Store owners often find themselves buried in a maze of settings and configurations on their e-commerce platforms. It’s like a steep learning curve with plenty of room for mistakes.
Getting your coupons to fit your promotional strategies, reach the right people, and match your business goals can be tricky. And then there’s the whole deal of managing expiration dates, tracking how often coupons get used, and figuring out if your campaigns are even working. It’s easy to see how this can get overwhelming, especially if you’re working with a small team or limited resources.
Introducing Advanced Coupon Templates: Simplifying Coupon Creation And Management
Recognizing these challenges, Advanced Coupons has rolled out an amazing new feature: Coupon Templates. On top of the pre-existing cool features we offer, this game-changer makes creating coupons in WooCommerce super easy.
This time around, store owners such as yourself can easily design and launch unique promotions with unmatched speed and simplicity.
With WooCommerce Coupon Templates, you get a handy set of pre-designed coupon configurations for all your usual promotional strategies.
Whether it’s percentage discounts, buy-one-get-one deals, free shipping, role restricted discounts, or scheduled coupons, these templates give you a strong starting point for crafting campaigns that really connect with your customers.
For comparison, let’s say you’re setting up a Black Friday coupon. Previously, you’d need to edit between two tabs:
- Coupon Data
- Scheduler


But now, with the new WooCommerce coupon templates, everything is conveniently on one page! No more switching back and forth—just smooth and easy setup.
So, how do you access this? Let’s find out!
Accessing And Customizing Advanced Coupons’ Coupon Templates Feature
Accessing and customizing WooCommerce Coupon Templates is a seamless process. We’ve ensured that the process is super user-friendly so you can jump right in and start maximizing your promotional efforts.
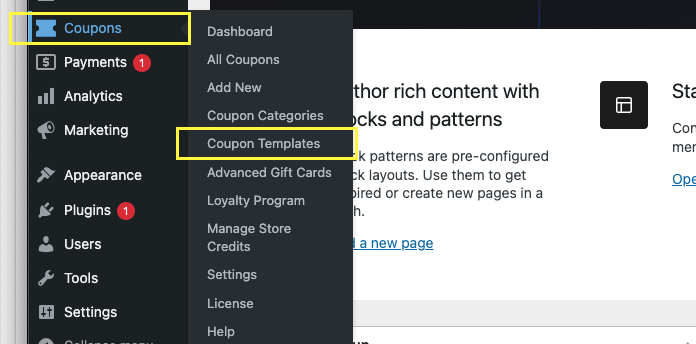
Take note, first make sure your Advanced Coupons plugin is updated to the latest version. This update will add a brand-new section under Coupons in your WordPress dashboard:
Next, once you’re up to date, here’s what you need to do:
Step 1: Access the Coupon Templates interface.
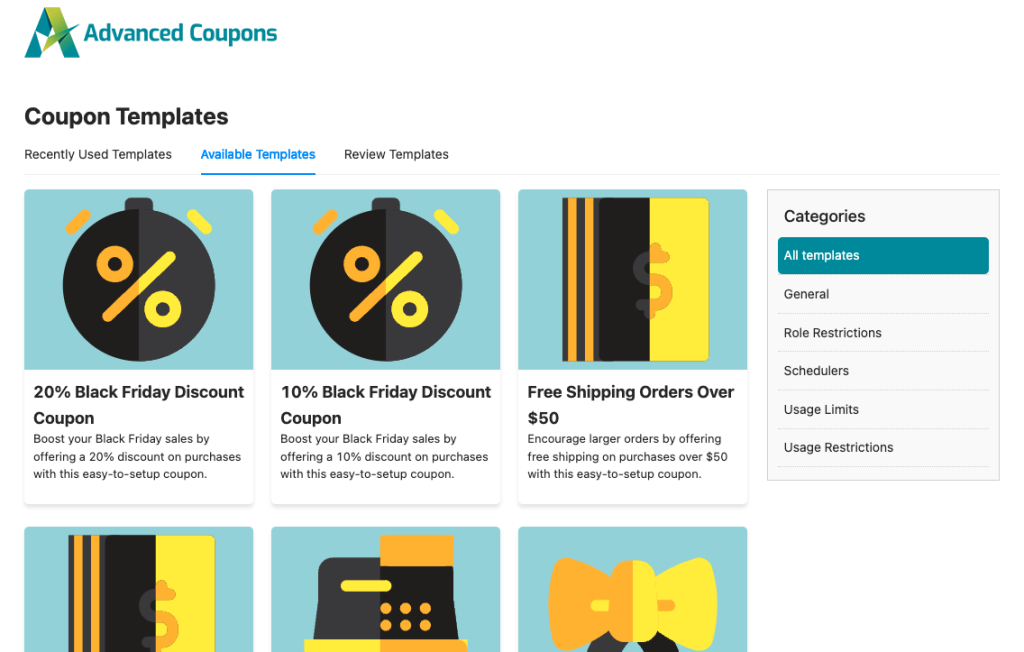
First, head to your WordPress dashboard and look for a new section under Coupons called “Coupon Templates.” Click on that, and you’ll be taken straight to the WooCommerce coupon templates interface:
Here’s what you’ll find:
- Recently Used Templates: This will be empty at first, but don’t worry! As you start creating coupons, this section will show your most recent templates.
- Available Templates: This section lists all the common coupon templates available in WooCommerce.
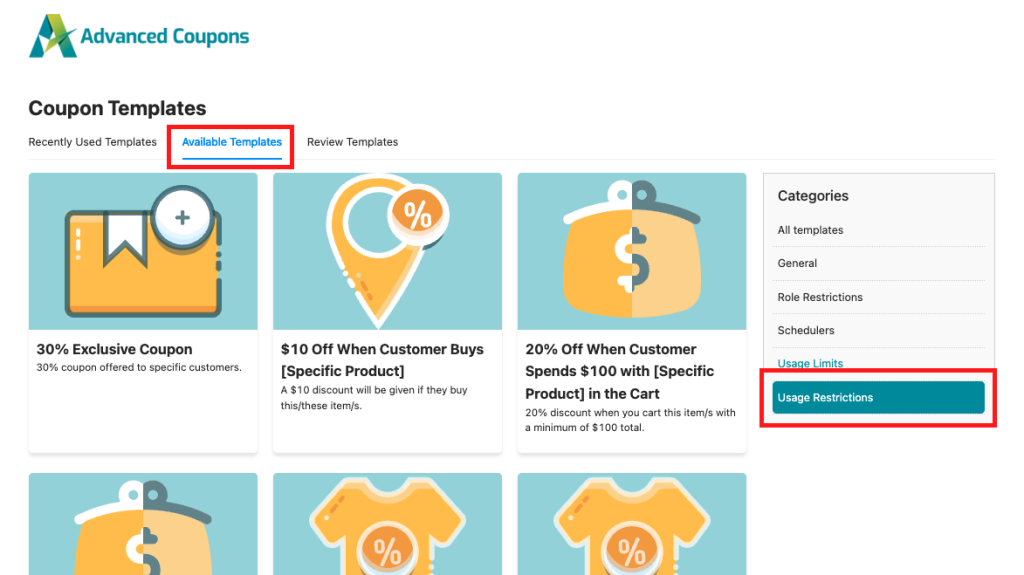
To make things even easier, there’s a Categories section within the Available Templates:
You can use it to filter templates based on different categories, helping you find exactly what you need in no time!
Step 2: Select a coupon template.
Now, it’s time to start setting up your coupon!
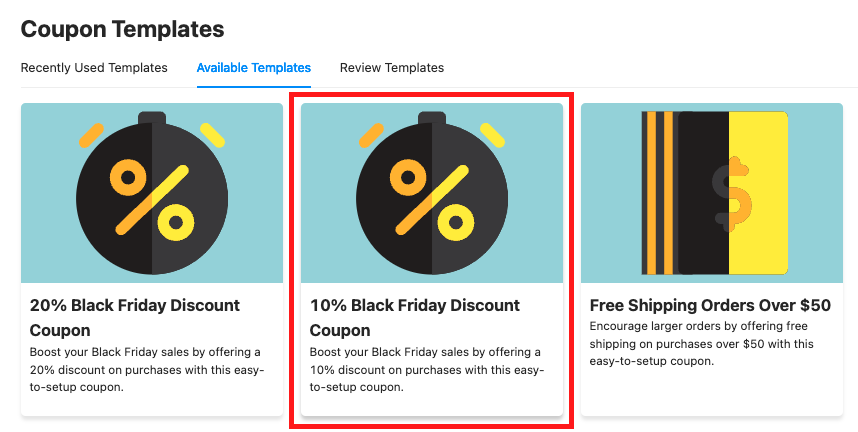
Let’s say you want to create a Black Friday discount coupon. For this, just pick a Black Friday WooCommerce coupon template that’s similar to what you want to offer.
For example, if you’re aiming for a 10% discount, simply choose the “10% Black Friday Discount Coupon” template.
But what if you’re planning a 40% discount and can’t find that exact option?
No problem!
You can easily tweak the coupon value in the next step. Just pick a template that’s close to what you have in mind, and you’re good to go.
Step 3: Configure your coupon.
Alright, you’re almost there! After picking a template, it’s time to fine-tune your coupon.
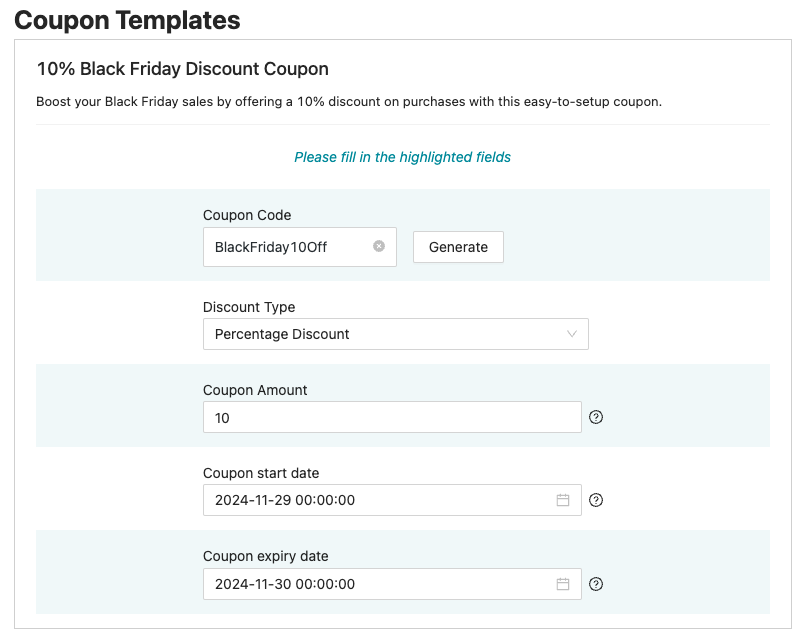
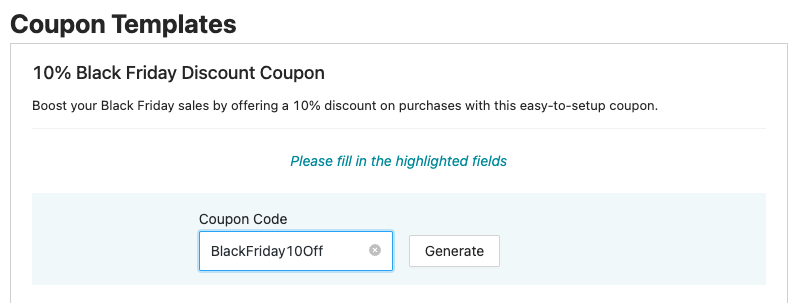
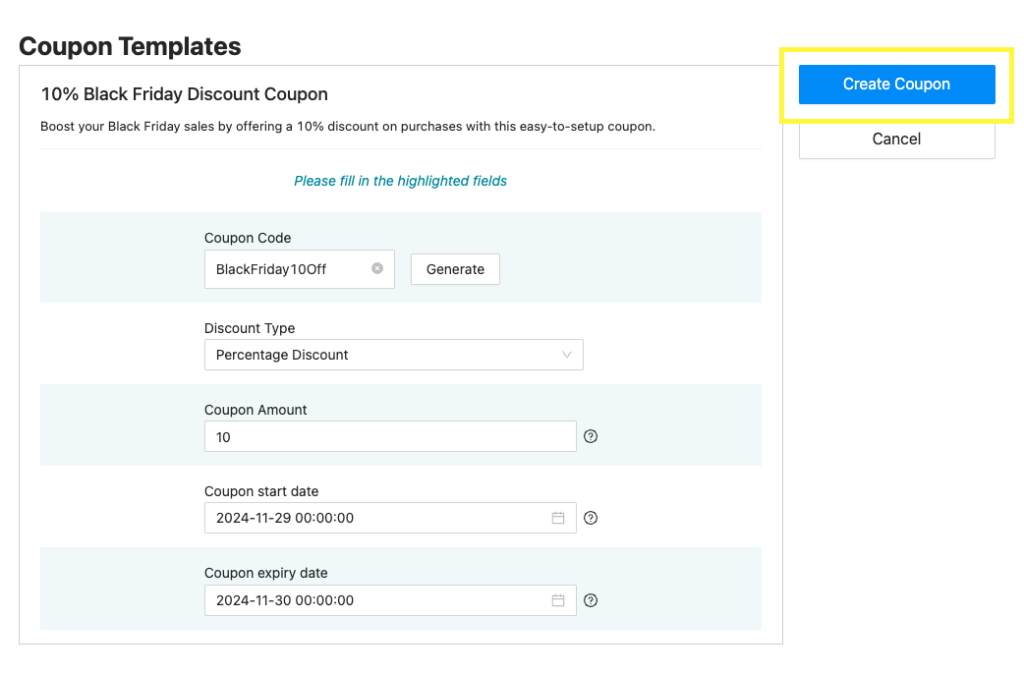
First up, you’ll need to add a coupon code. You can either come up with one yourself or let the system generate one for you:
Next, you’ll see a few fields you might want to review:
- Discount type
- Coupon amount
- Start date
- End date
Now, let’s say you’re planning a 10% Black Friday discount.
With the template ready, just hit “Create Coupon,” and you’re good to go.
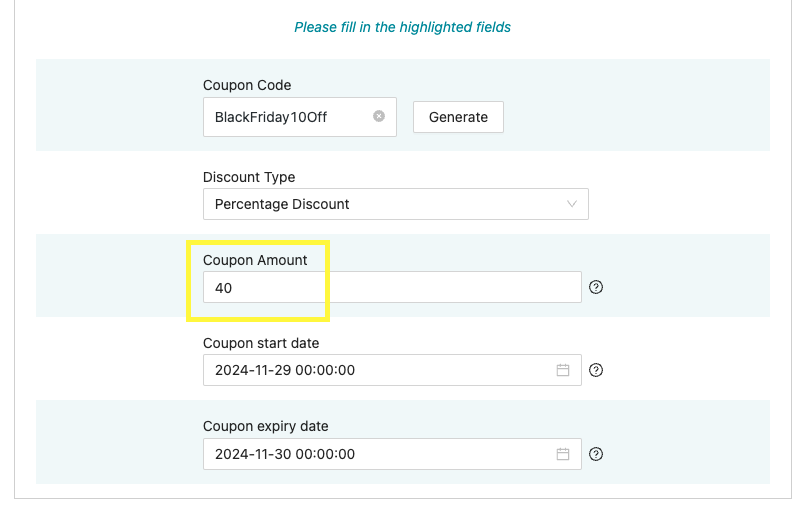
But if you want to change things up, like offering a 40% discount instead, simply adjust the “Coupon Amount” field:
Once you’re happy with everything, click “Create Coupon,” and you’re all set!
Step 4: Spread the word about your coupon!
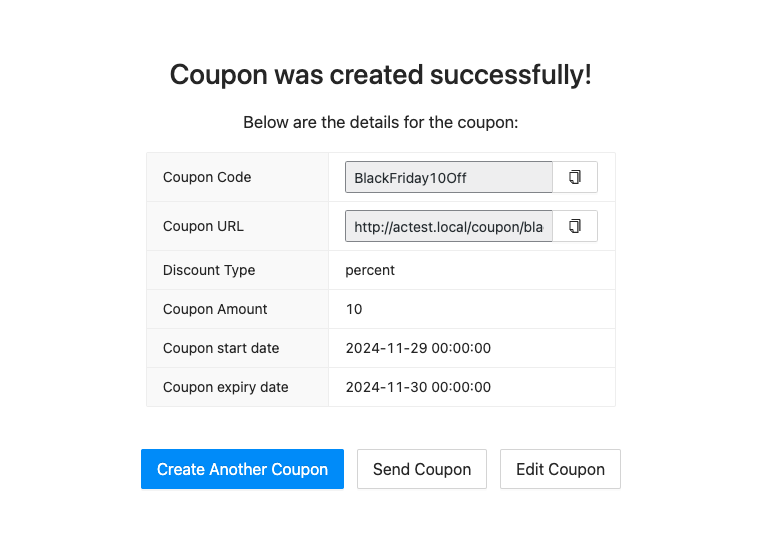
Great job! You’ve clicked the “Create Coupon” button and received the confirmation that your coupon was successfully created. Now, it’s time to share it with the world.
You’ll see a preview of your coupon details. Here’s what you can do next:
- Copy the Coupon Code: Grab the code and start using it in your marketing materials.
- Send Directly to Customers: Use the Advanced Coupons’ “Send Coupon” feature to send it straight to specific customers.
Now you’re all set to get those discounts rolling and attract more customers!
Step 5 (Bonus): Dive into Advanced Settings
Got your coupon all set and happy with it? Great! You can wrap it up at Step 4.
But what if you want to fine-tune it a bit more, like adding cart conditions or restrictions?
No worries, we’ve got your back!
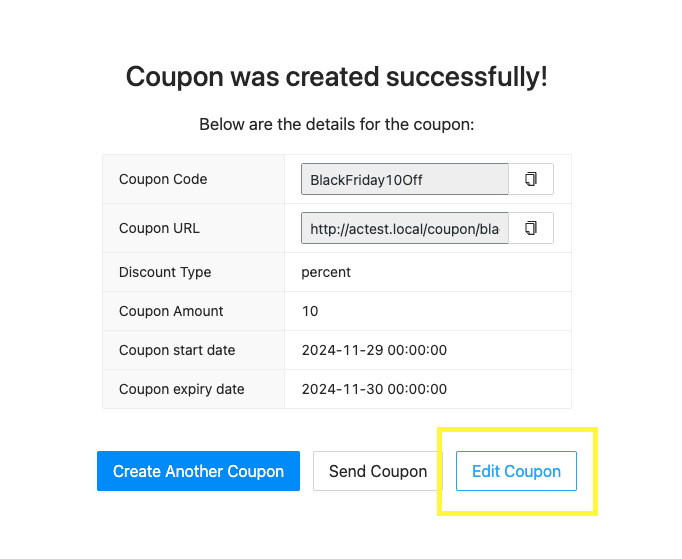
Once your coupon is created, you’ll spot an “Edit Coupon” button right next to “Send Coupon.” Click on it, and you’ll be whisked away to the Advanced Coupons’ editing interface:
Here, you can play around with more settings for your coupons, including:
- Usage Limits: Control how many times the coupon can be used.
- Role Restrictions: Limit which user roles can use the coupon.
- Cart Conditions: Set specific conditions that need to be met for the coupon to apply.
Go ahead and explore all the other settings available to make your coupons work just the way you want! Then, once you’re done, simply click “Publish” to make sure everything’s saved.
Conclusion
Advanced Coupons has taken things to the next level with their WooCommerce Coupon Templates. Now, creating effective promotions is easier and more efficient than ever for store owners.
Ready to get started? In this article, we shared 5 easy steps to navigate through this new feature:
- Access the Coupon Templates interface.
- Select a coupon template.
- Configure your coupon.
- Spread the word about your coupon!
- Dive into Advanced Settings.
Do you have any questions about WooCommerce Coupon Templates? Let us know in the comments!




Hi, thank you so much! Can I make customized templates as well according to my company’s needs?
Hi Anna, what did you have in mind?