
Running a BOGO promotion across an entire brand is now much easier with Advanced Coupons Premium! The new Product Brands targeting option lets you create WooCommerce BOGO deals by brand without selecting every product individually. Choose a brand for the Customer Buys: side, the Customer Gets: side, or both, then set the quantity and discount for your offer.
Let’s go through the setup, then take a quick look at the other BOGO targeting options available in Advanced Coupons.
What BOGO Brand Targeting Does
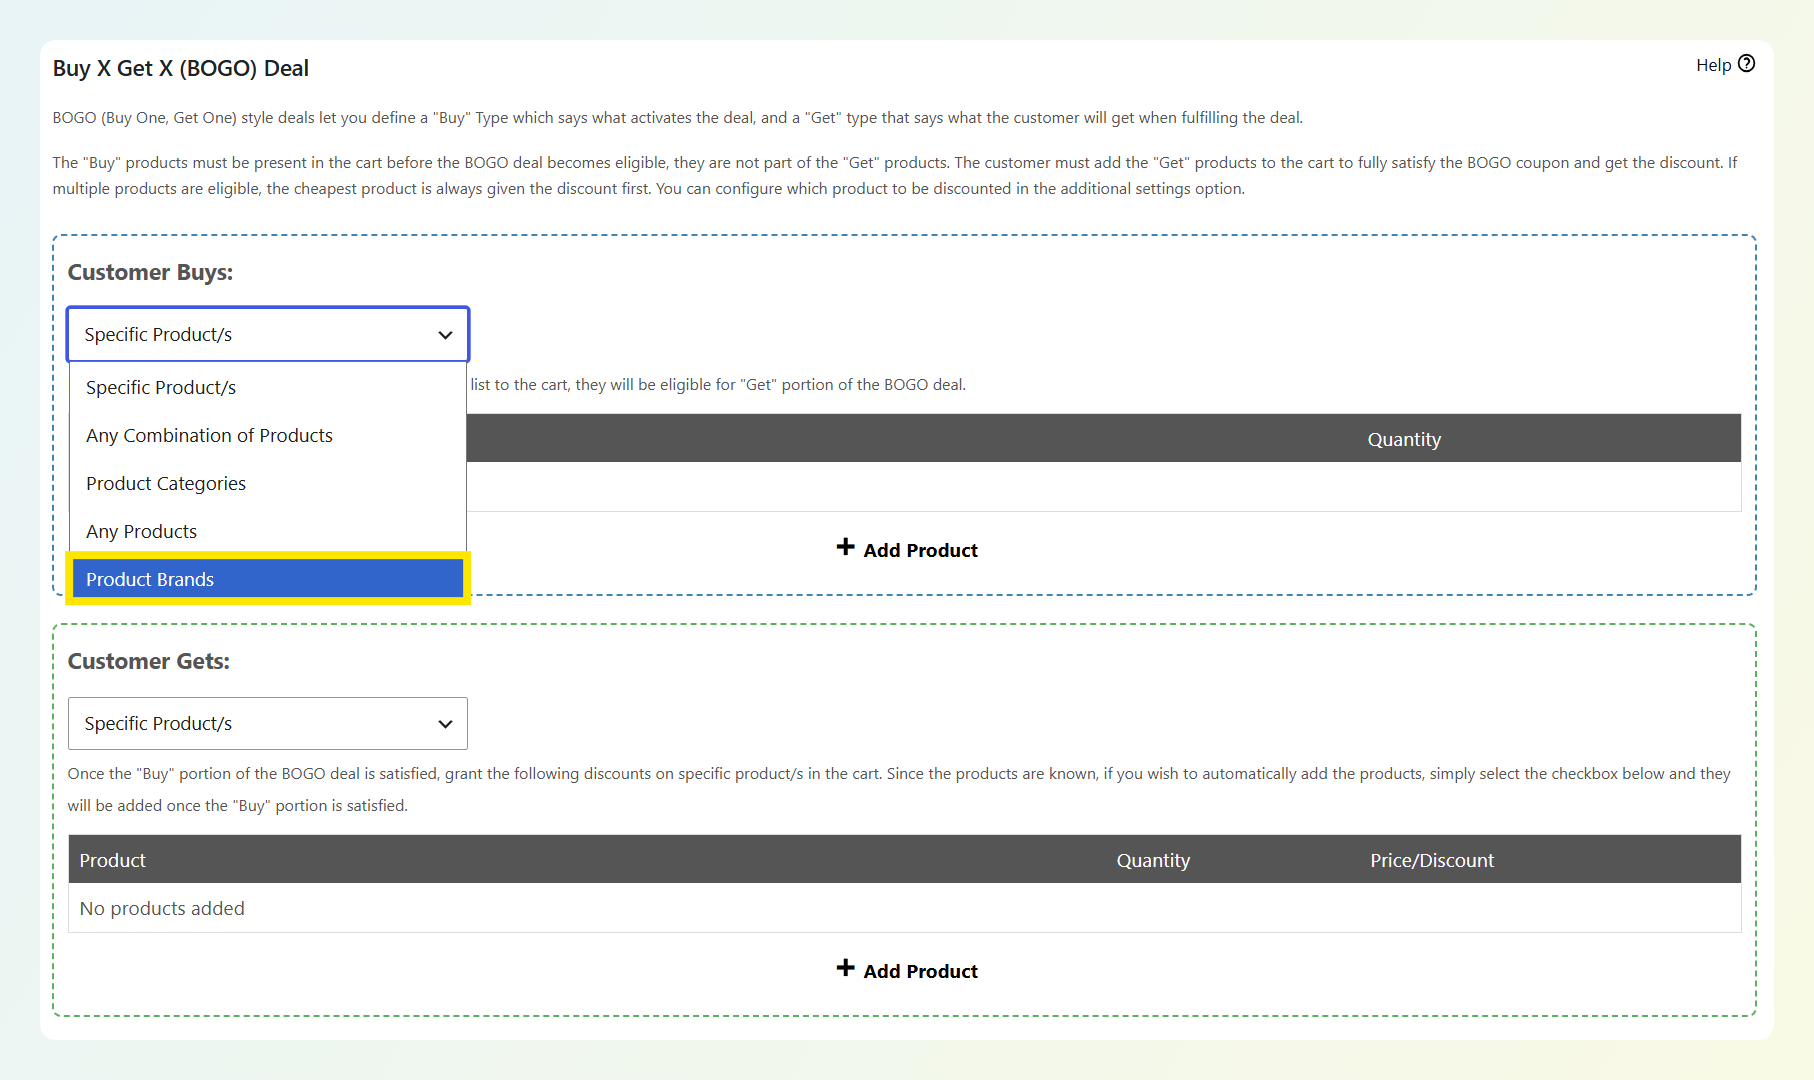
Brand targeting adds Product Brands as an option on both halves of a BOGO deal. Every BOGO deal in Advanced Coupons has a “Buy” portion, which is what the customer needs in their cart to qualify, and a “Get” portion, which is what they receive once they do.
You can now point either side at a brand:
- Brand on the Buy side: Any product from the brands you select counts toward qualifying for the deal.
- Brand on the Get side: Once the deal is triggered, products from the brands you select receive the discount.
Because both sides are independent, you can require products from one brand and discount products from another. For example, a shopper could buy coffee from one brand and receive a discount on filters from a different brand. You can also point both sides at the same brand for a classic brand-wide buy one get one free offer.
Each side also has its own quantity setting, so you can create offers such as “Buy 2 from this brand, get 1 from another brand.”
How the discounted item is chosen
When several products from the selected brand are eligible, Advanced Coupons discounts the cheapest one first by default. You can switch this to the most expensive eligible product under Additional Settings.
The Customer Gets: side can do more than make an item free. You can override the price, apply a percentage or fixed discount, or leave the price unchanged.
How Advanced Coupons detects brands
The Product Brands option only appears when Advanced Coupons detects a supported brand taxonomy on your store.
WooCommerce Brands became part of WooCommerce core and was enabled by default in WooCommerce 9.6 in January 2025. Advanced Coupons can also recognize supported third-party brand taxonomies. If your store does not have a supported brand taxonomy available, the Product Brands option stays hidden.
How To Set Up WooCommerce BOGO Deals By Brand
Before you begin, make sure Advanced Coupons Premium is installed and updated, with at least one brand assigned to your products. Need the plugin first? You can view the available plans.
We’ll use a coffee brand called Cafe Organica as our example throughout, so swap in whichever brand you’re promoting as you follow along.
Step 1: Create your coupon
Head to your WordPress dashboard > Coupons > Add New and give your coupon a code.
Under Discount type, choose Buy X Get X Deal (BOGO). That’s what brings up the BOGO settings further down the page.
Step 2: Find the BOGO deal settings
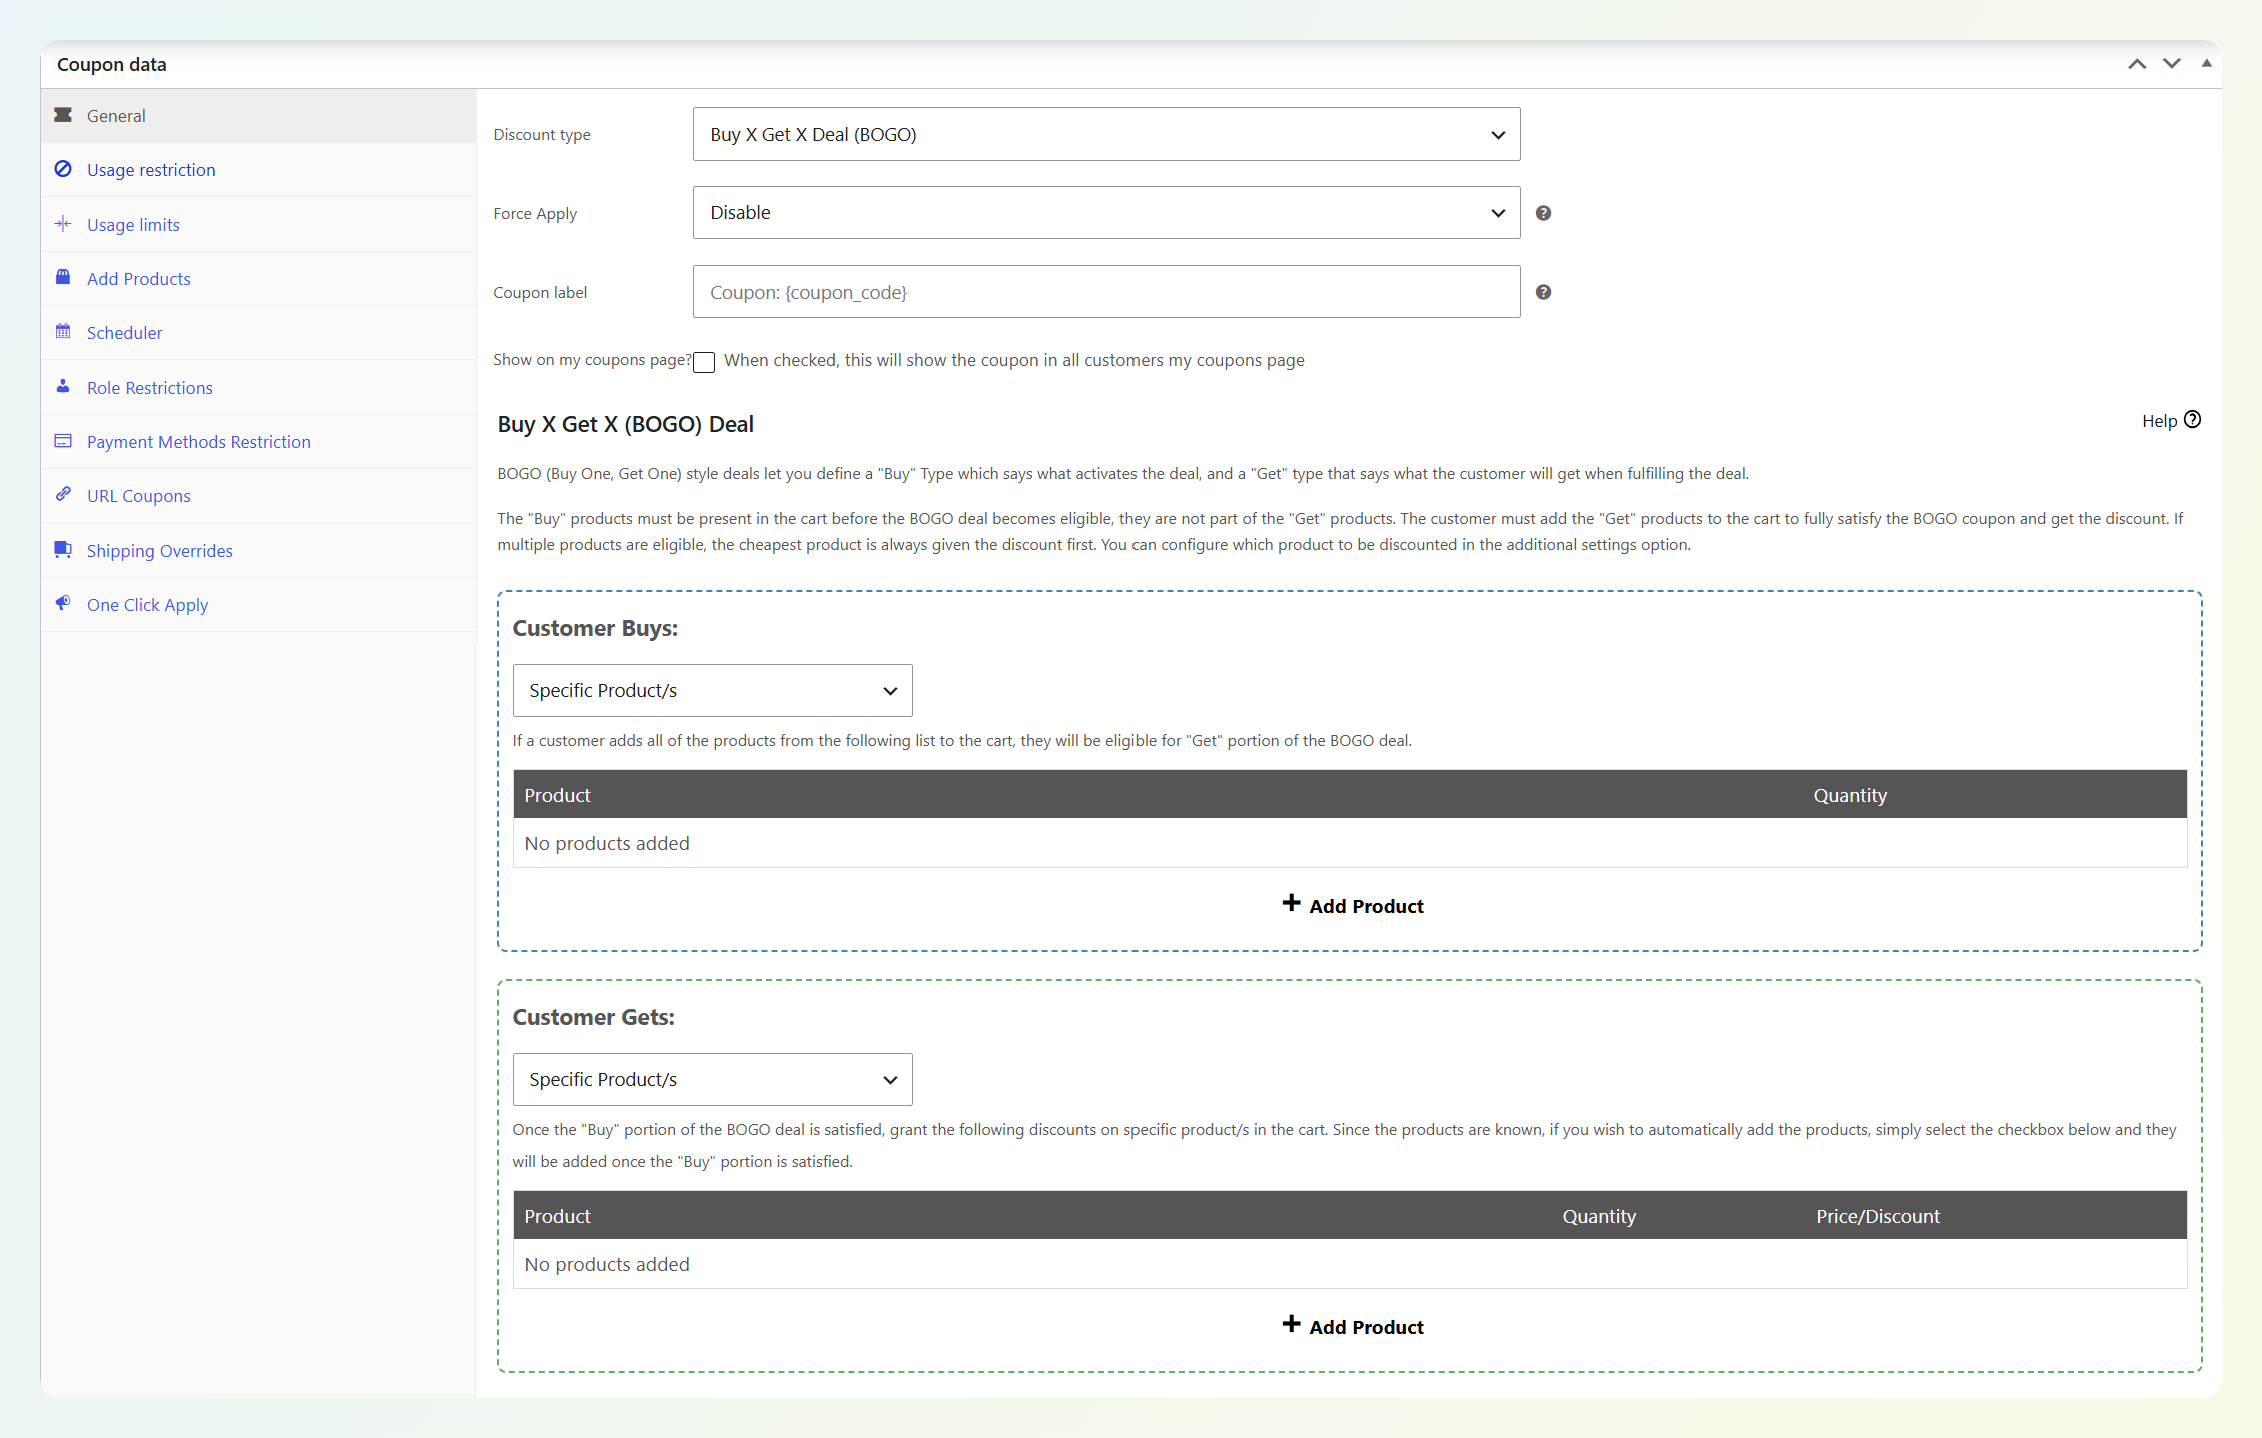
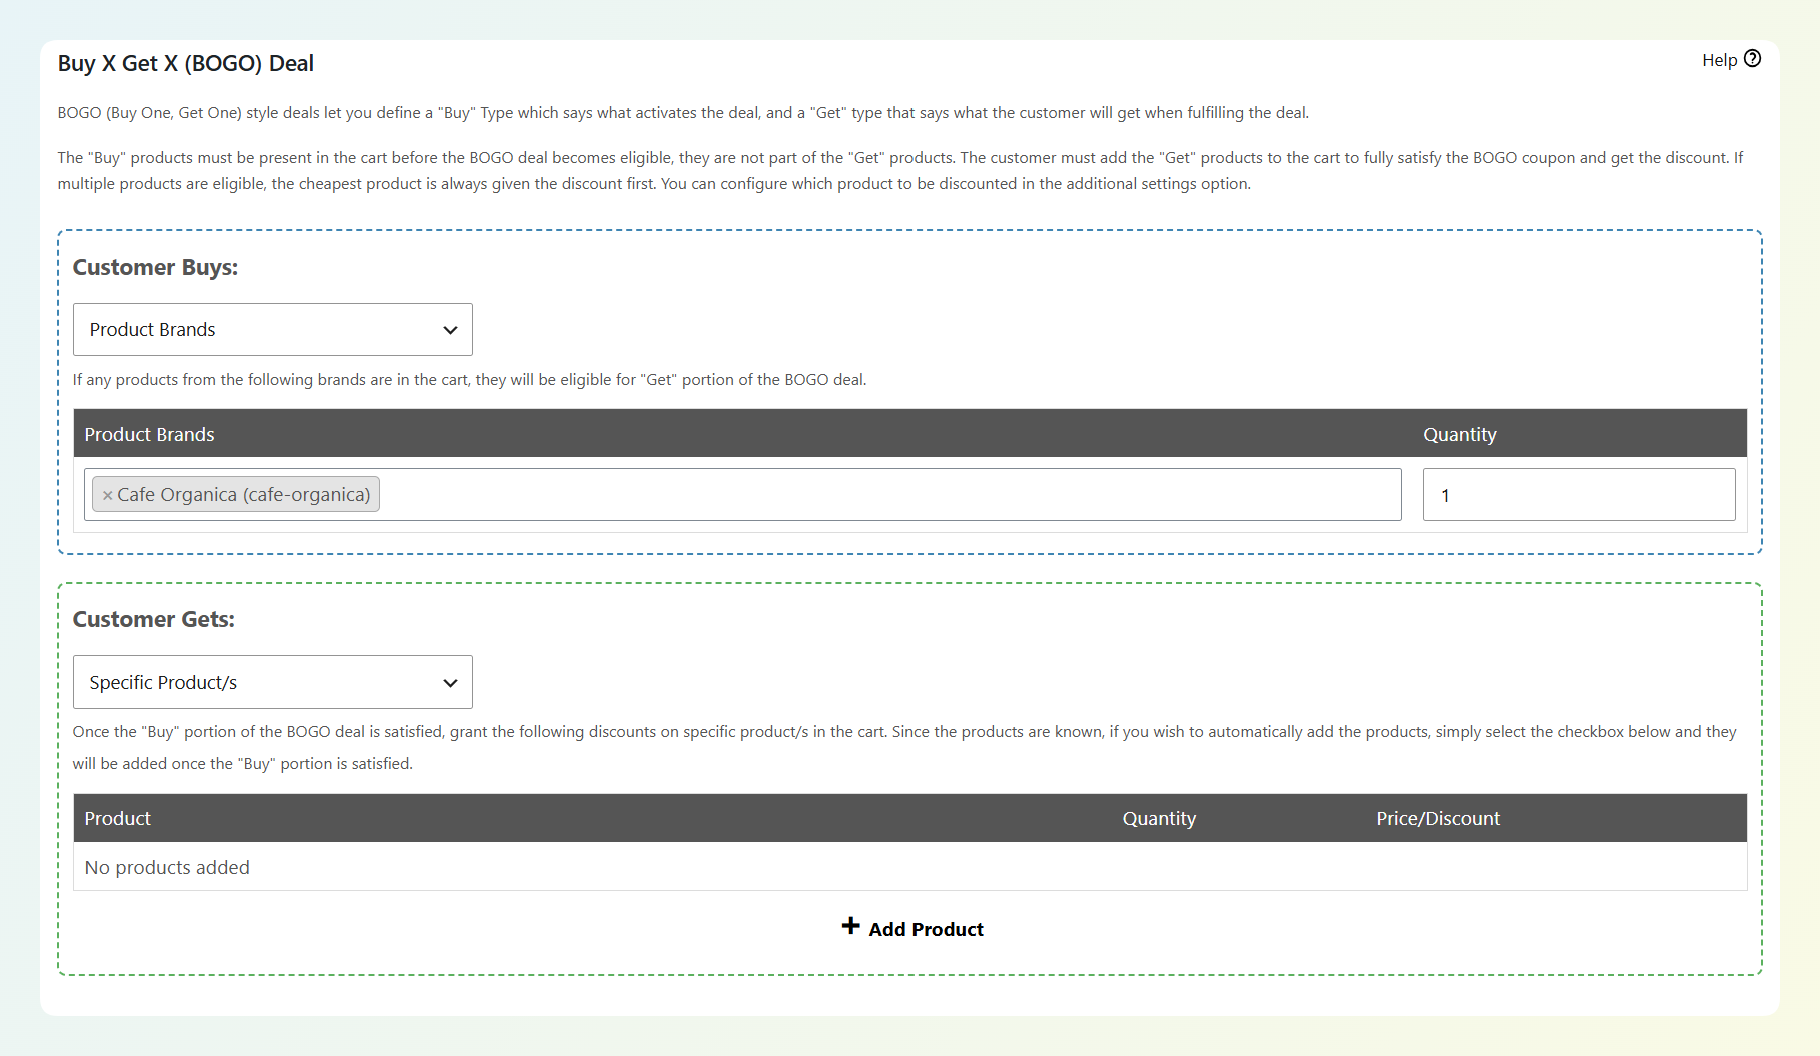
With that discount type selected, a Buy X Get X (BOGO) Deal section appears in your coupon data panel. It’s split into two halves: Customer Buys: and Customer Gets:.
Step 3: Set what the customer buys
In the Customer Buys: section, set the dropdown to Product Brands. A brand search field appears, with a quantity box beside it. Search for the brand that should trigger your deal, then set how many of its products a shopper needs in their cart before they qualify.
In our example, we’re selecting Cafe Organica and leaving the quantity at 1, so a single product from that brand is enough to trigger the deal.
Step 4: Set what the customer gets
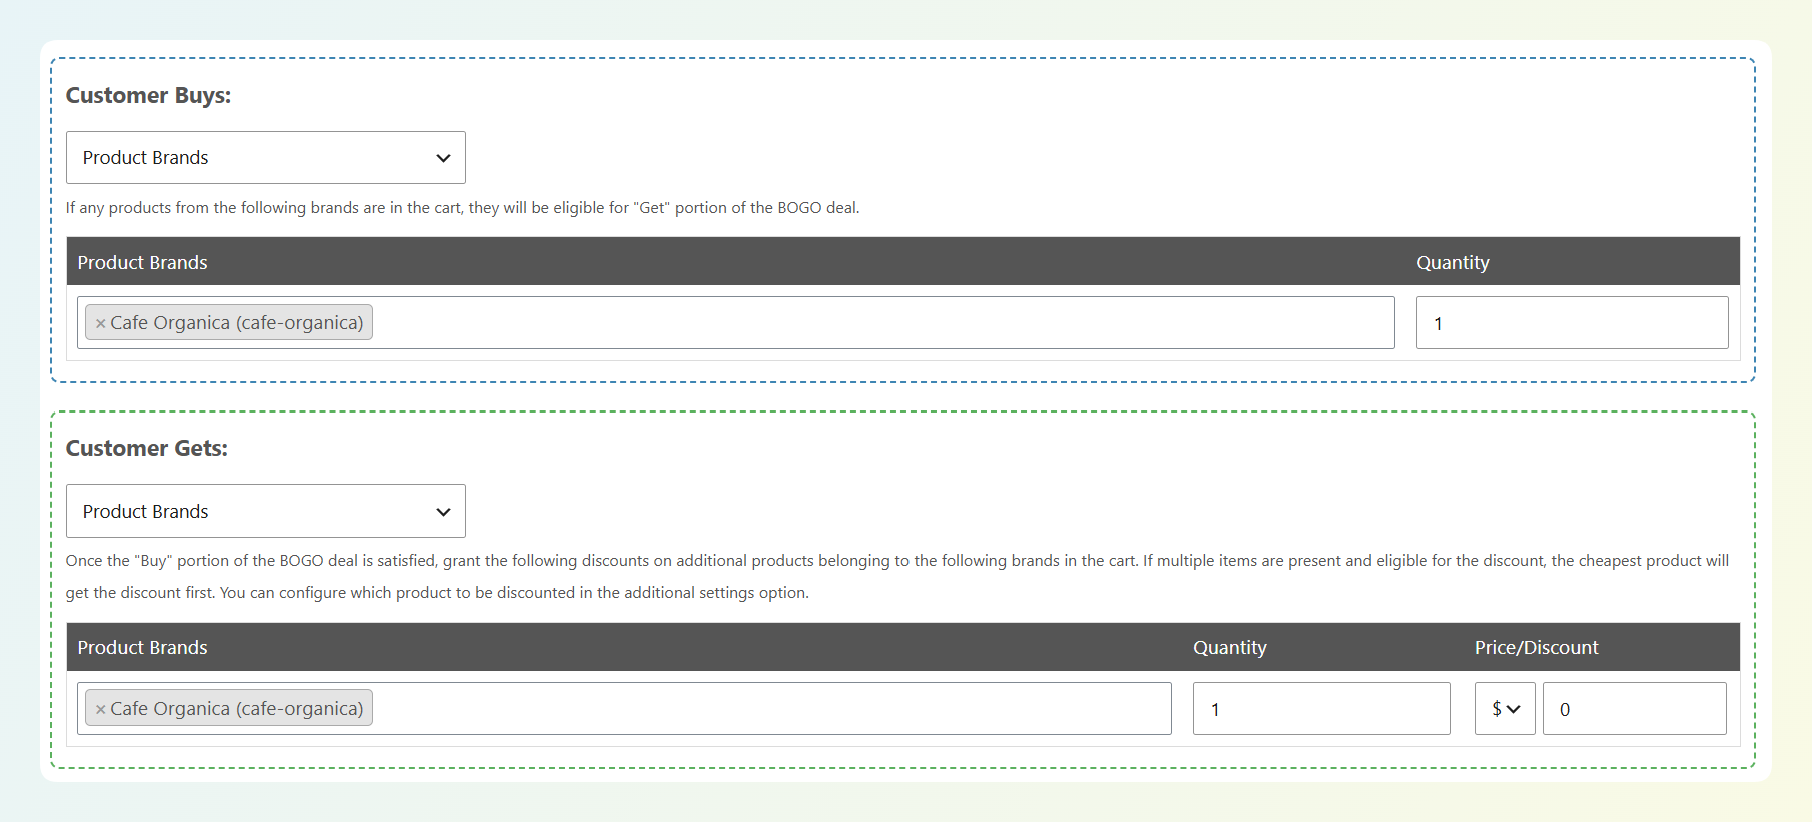
The Customer Gets: section works the same way. Set the dropdown to Product Brands, search for the brand whose products should be discounted, and set a quantity.
Use the Price/Discount column to choose how the qualifying product is discounted. The selector beside the value field gives you four options:
- Override price: Replace the product’s price with whatever amount you enter. Setting this to 0 makes the item free.
- Percentage discount: Take a percentage off the price. 100% also gives you a free item.
- Fixed discount: Take a set amount off the price.
- No discount: Leave the price as it is.
In our example, we’re choosing Cafe Organica again with a quantity of 1, then leaving the price override at 0 so the shopper’s second Cafe Organica product comes free.
Step 5: Fine-tune the additional settings
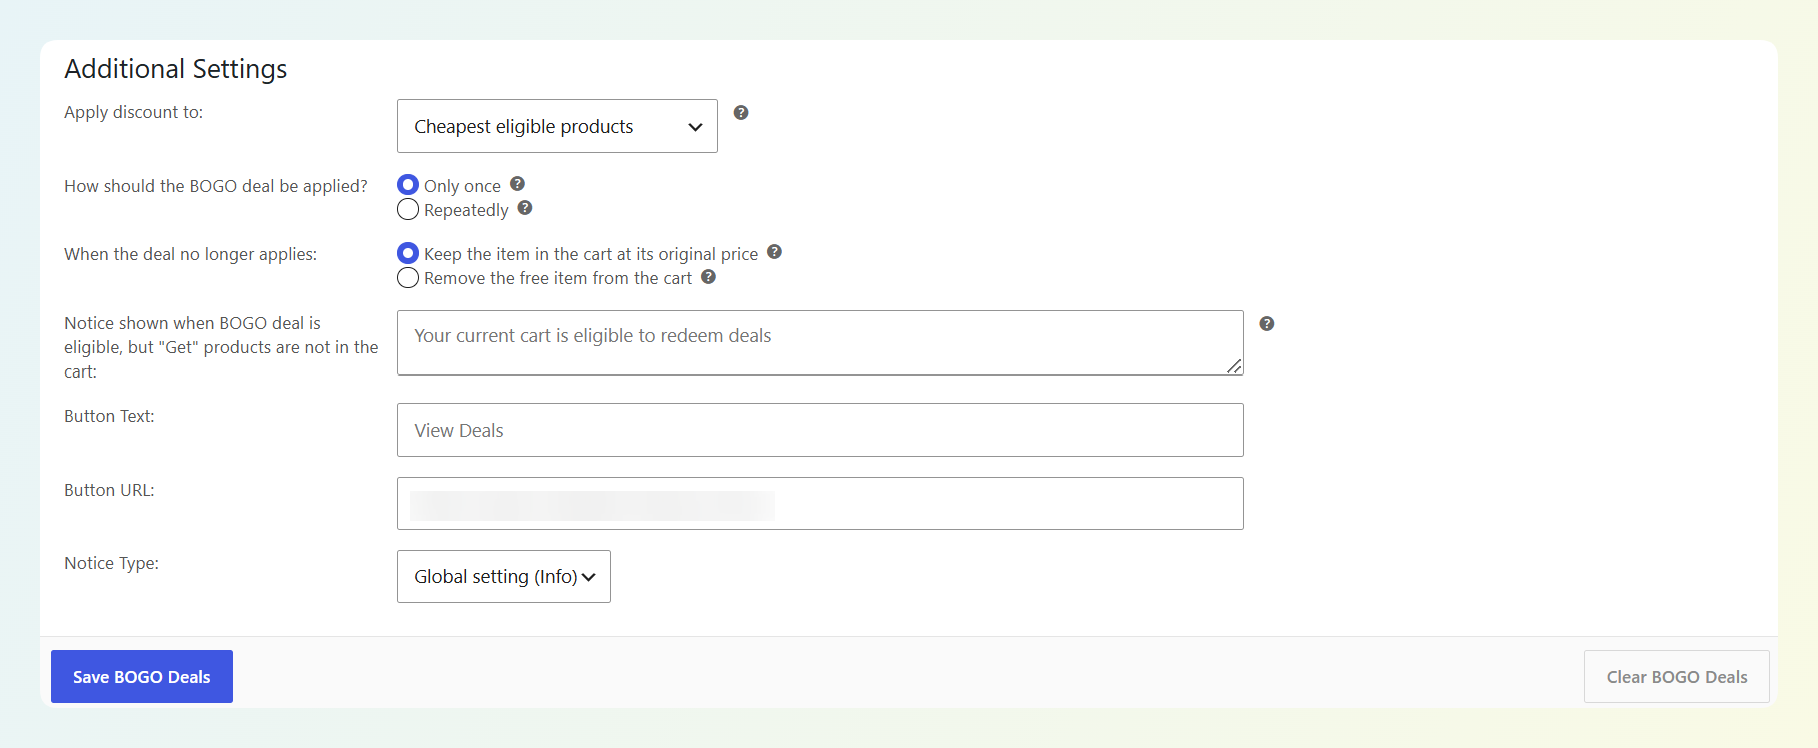
Underneath both sections, you’ll find Additional Settings. You can leave these unchanged for a simple brand BOGO, or adjust them when you need more control over which product is discounted and how often the deal applies:
- Apply discount to: Choose Cheapest eligible products or Most expensive eligible products. This decides which item gets discounted when a shopper has several qualifying products from the brand in their cart.
- How should the BOGO deal be applied? Only once applies the deal a single time no matter how many times the shopper meets the condition. Repeatedly applies it every time they meet it, and you can cap that with a maximum limit.
- When the deal no longer applies: Keep the item in the cart at its original price is the default, so the product stays put and simply reverts to full price. Remove the free item from the cart takes the deal quantity back out instead, while leaving anything the shopper added themselves.
- Notice settings: The message, button text, button URL, and notice type shown when a shopper qualifies but hasn’t added the “Get” products yet. Handy for brand deals, since your customer may not realize which products count.
Step 6: Save and test it
Click Save BOGO Deals at the bottom of the section, then publish or update the coupon. Save the BOGO configuration first so the complete deal is stored with your coupon.
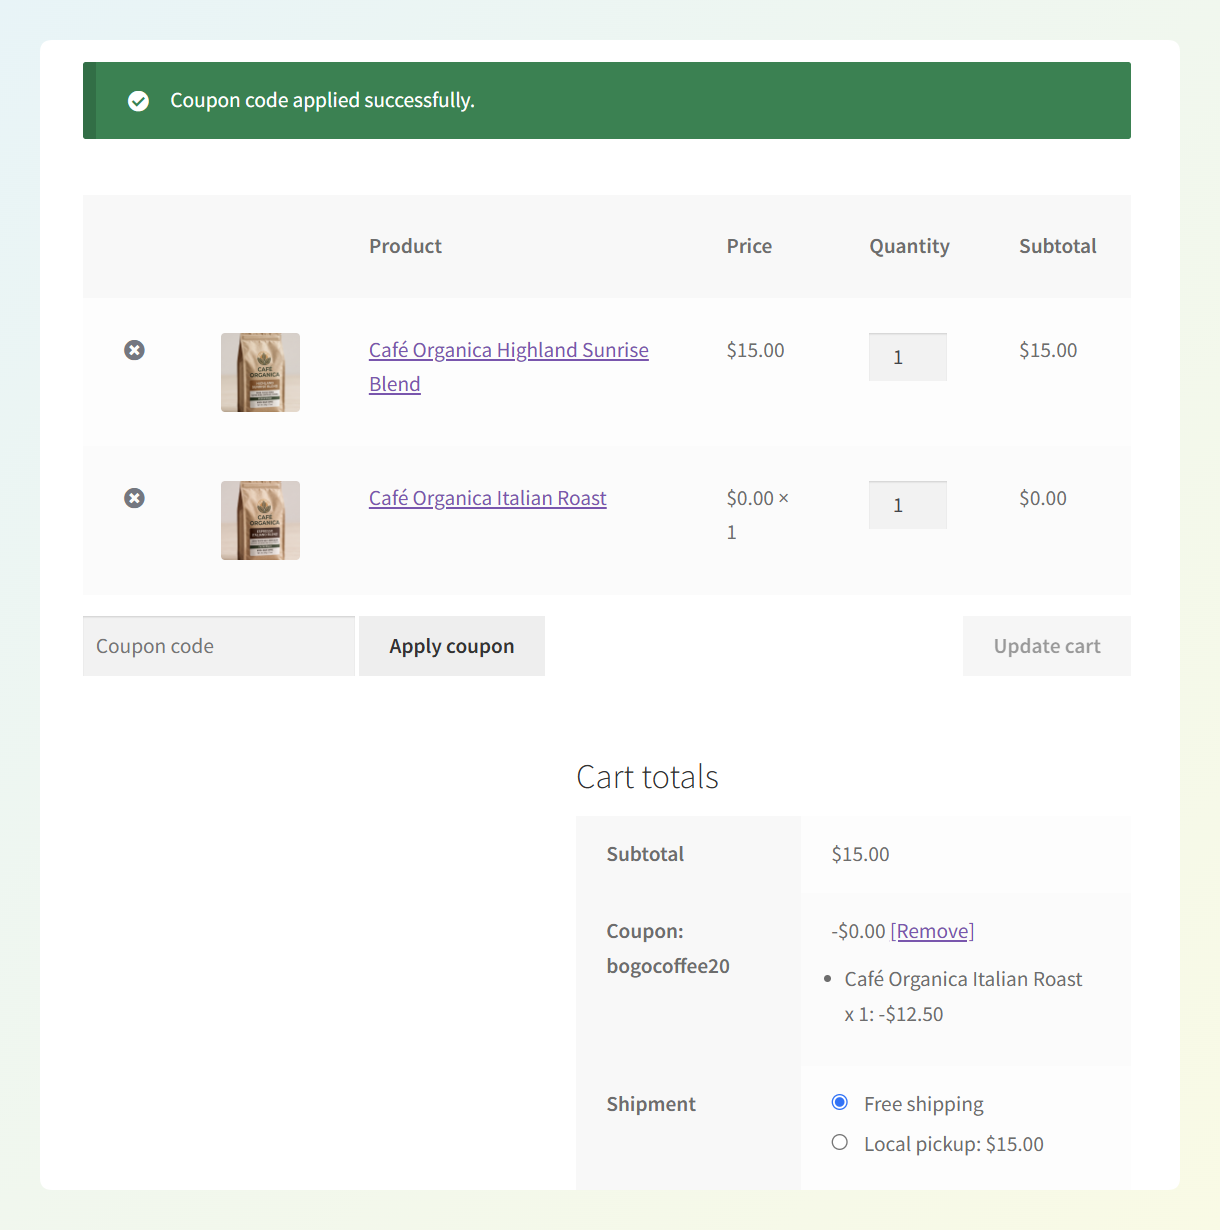
To test the deal, add two Cafe Organica products to a test cart and apply the coupon. With Cheapest eligible products selected and the price override set to 0, the cheaper item should become free, while products from other brands should remain unchanged.
🎯 POWER TIP: Brand targeting isn’t only for BOGO. You can also create coupons for specific brands using the Product Brands settings under Usage Restriction, which is handy when you want a straight percentage off a supplier’s range rather than a buy one get one free offer.
BOGO Targeting Types At A Glance
Product Brands joins five other ways to target a BOGO deal. Here’s the full set and where each one is available:
| Targeting type | What it matches | Free | Premium |
|---|---|---|---|
| Specific Product/s | The exact products you list | ✅ | ✅ |
| Same Products | The same products already in the cart (Customer Gets only) | ❌ | ✅ |
| Any Combination of Products | Any product from a list you build | ❌ | ✅ |
| Product Categories | Everything in the categories you choose | ❌ | ✅ |
| Any Products | Anything in the cart | ❌ | ✅ |
| Product Brands | Everything under the brands you choose | ❌ | ✅ new |
Brand-based promotions can be especially useful when shoppers already have clear favorites. In a January 2025 survey of 3,300 shoppers, Attentive and CITE Research found that 38% were loyal to five or fewer brands, compared with 22% in 2023. The same study found that 44% felt appreciated or valued by their favorite brands.
That gives you a practical reason to build offers around brands your customers already seek out.
Frequently Asked Questions
Which brand setups does this work with?
This works with the Brands feature built into WooCommerce, which has been enabled by default since WooCommerce 9.6. Advanced Coupons can also recognize supported third-party brand taxonomies automatically. When one is available, the Product Brands option appears in the BOGO settings without any separate taxonomy setup inside the coupon.
Why can’t I see the Product Brands option?
The option only appears when Advanced Coupons detects a supported brand taxonomy. If you use WooCommerce Brands, check under Products > Brands and make sure your products have brands assigned. You’ll also need Advanced Coupons Premium, since Product Brands targeting is not available in the free plugin.
Can I require one brand and give away a different one?
Yes. The Buy and Get portions are configured separately, so you can set them to different brands. This is useful for cross-promotion, for example requiring a purchase from a premium range before discounting an entry-level one. You can also mix targeting types, with a brand on one side and a category on the other.
Does this work with variable products?
Yes. Brands are assigned at the product level, so a variation in the cart is matched using its parent product’s brand. If your Cafe Organica coffee comes in three grind options, all three count toward the deal without you doing anything extra.
What about sub-brands?
Choosing a parent brand automatically includes any brands nested underneath it, in the same way parent categories include their children. So if you’ve organized a supplier’s ranges as sub-brands, selecting the top-level brand covers all of them.
Wrapping Up
WooCommerce BOGO deals by brand make it easier to build promotions around a supplier’s range. Instead of selecting products one by one, you can choose the brand for the Buy and Get sides and let the coupon match eligible products assigned to it. Products added to that brand later can be included without rebuilding the deal.
In this guide, we learned:
- What BOGO brand targeting does
- How to set up a BOGO deal by brand
- Which BOGO targeting types are available
Ready to try it? Open your coupon settings and build a brand-targeted BOGO for your next supplier promotion.
Have questions about the update? Let us know in the comments. We’re happy to help!