Coupon codes are one of the most powerful tools at your disposal to increase sales and get repeat business. The only danger of coupons is that you may leave the door open for customers to use them repeatedly or otherwise abuse them – hence, the need for coupon restrictions.
Fortunately, with the help of Advanced Coupons, setting up coupon restrictions is a straightforward process that can be done easily. Once set up, these restrictions work automatically, meaning you don’t have to manually monitor the use of your coupons.
In this article, we will show you how to set up a comprehensive coupon system in WooCommerce using this powerful plugin in 3 steps. By following our step-by-step guide, you can implement various restrictions and create a coupon system that prevents abuse. Let’s get into it!
What Are WooCommerce Coupon Restrictions?
The term ‘restrictions’ may sound a bit too negative, but think of them as safety measures. With Advanced Coupons, you can create coupons and implement the following safety protocols:
- Set minimum and maximum spend values for your coupons. By setting a minimum value, you avoid losing money on orders.
- Disable coupon combos. In many cases, it’s smart to limit the number of coupons customers can use on a single order.
- Exclude items on sale. If products are already on sale, you can disable coupons for them.
- Limit the number of times a coupon works. Ideally, a coupon should work only a limited number of times and only once for each user.
Setting up coupon restrictions in your WooCommerce store is an important step in preventing coupon abuse and ensuring that your promotions are used fairly. By combining different types of restrictions, you can create a coupon system that prevents any potential misuse or exploitation.
How To Implement WooCommerce Coupon Restrictions
Before you can add any restrictions to your deals, you need to set up some coupons, so let’s start there.
Step 1: Create a new coupon
Cart Conditions are an advanced way to create WooCommerce coupon restrictions so you can protect your coupons from being used incorrectly.
Once you have Advanced Coupons activated, you can navigate to WooCommerce > Coupons and click on Add Coupon at the top of the screen.
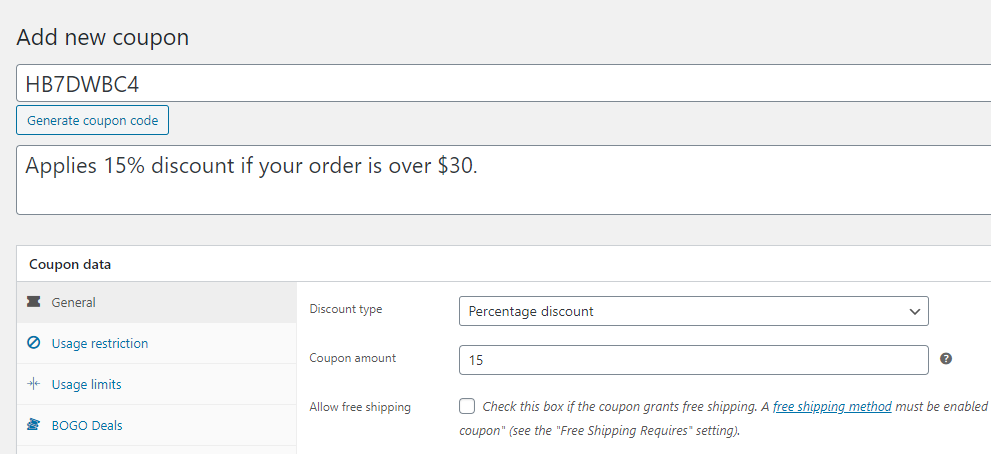
On the next page, get started by clicking on Generate coupon code and then adding a description to it, for internal identification purposes. For this example, we’re going to set up a basic coupon that gives 15% off for purchases over $30:
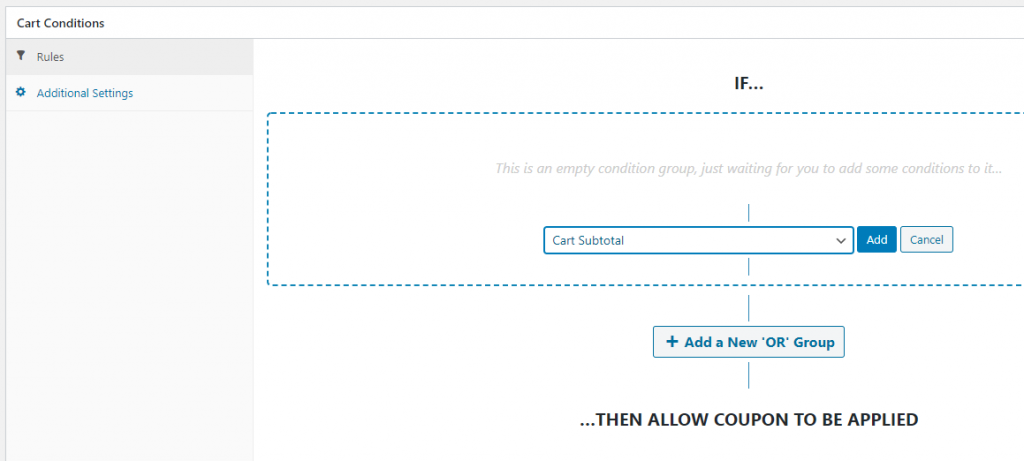
Once you set a percentage-based discount and specify the number you want to use, scroll down to the Cart Conditions section.
And here’s where the magic happens.
Cart Conditions let you set the criteria that will enable customers to use that coupon. This means if they don’t meet these coupon restrictions/conditions, they will not be able to use the coupon.
As an example, we’re going to demonstrate the Cart Subtotal coupon restriction but there are many other Cart Conditions you can choose to use as well.
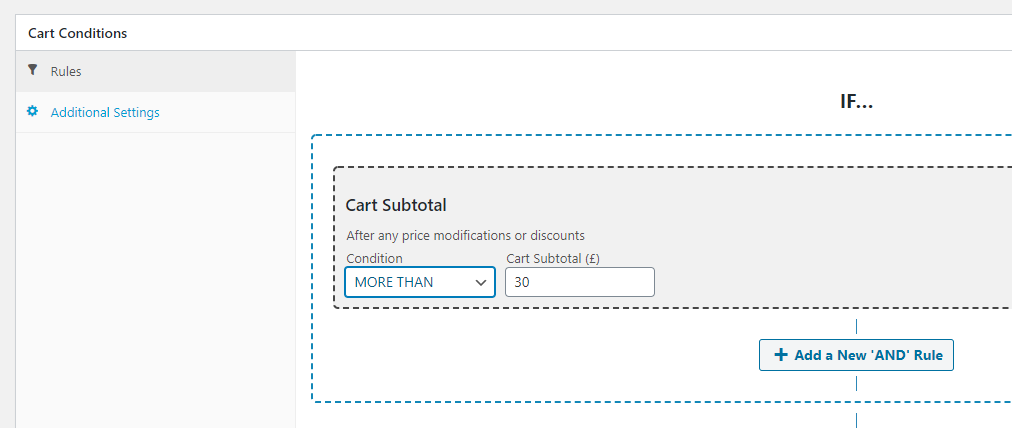
Select the cart condition Cart Subtotal and click on add. Now select MORE THAN under Condition and set the Cart Subtotal value to 30:
Click on Save Cart Conditions and your coupon will be ready to use. Before you begin distributing it, though, you can also use some of the WooCommerce-provided coupon usage restrictions in place as well, just for extra safety. Here’s how they work.
Step 2: Configure usage restrictions
Usage restriction settings enable you to configure situations where your coupons won’t work. That applies even if those situations fall within the parameters you configured during step one.
Let’s say, for example, you have an order worth $200. Since it’s over $30, the coupon you set up before would account for a 15% discount (also worth $30). At some point, though, if an order becomes expensive enough, the numbers won’t add up on your end.
If you go to the Usage restriction tab, you can set both minimum and maximum spend values. We already have a minimum, which is $30, and we set $300 as the maximum to give you an example:
Within this tab, you can choose whether your coupon will work in combination with other discount codes and if the offer excludes items on sale:
Those two options are up to you. Keep in mind, though – if you tend to offer a lot of coupons simultaneously, it can pay off to tick the Individual use-only option. That way, you can protect yourself against potential abuse of the coupon system.
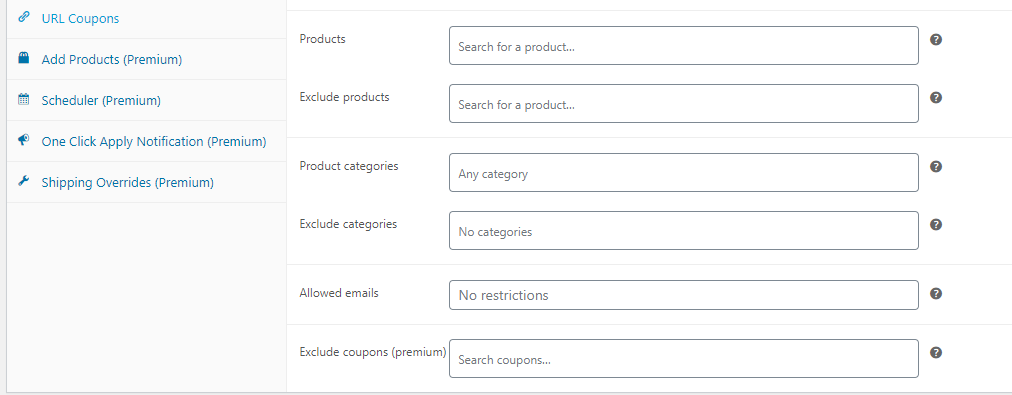
The Usage Restrictions screen also enables you to exclude specific products and categories from your coupons. Additionally, you can whitelist specific emails, in case you’re creating one-off coupons for valuable customers:
Once you configure your usage restriction settings, it’s time to move on to the next step, where we’ll talk about setting limits for your deals.
Step 3: Set usage limits for your coupons
By default, new coupons you create have an unlimited number of uses. You can disable them at any time, though, when you feel their purpose has run its course.
An alternative is to configure usage limits from the get-go. That way, you can avoid customers re-using the same coupons over and over. To do this, go to the Usage limits tab within your coupon and look for the Usage limit per coupon option:
For our coupon, we set a usage limit of 100. Coupon limits are an amazing tool to create a sense of urgency, so feel free to experiment with other values.
From this screen, you can also limit your discounts to a specific number of items within a cart. Since our coupon is supposed to apply a 15% discount across the board, we left that field blank:
To prevent abuse, though, we did set a one-use limit for each customer. Advanced Coupons can identify buyers by their email if they’re not registered and through their client ID if they are.
Once you take care of those settings, your new coupon should be ironclad, so feel free to start distributing it via email or social media. You can also apply it automatically for customers, which is something they’re sure to appreciate.
Conclusion
Configuring WooCommerce coupon restrictions is essential if you run a high-volume store or you’re operating on small margins. If users abuse your coupons, then you can face heavy financial losses. The smart move is to set a few safety measures in place before you start distributing new coupons.
If you’re using Advanced Coupons, setting restrictions in place is easy. Here’s what you have to do:
Do you have any questions about WooCommerce coupon restrictions? Let’s talk about them in the comments section below!


