
WooCommerce’s default “Sale!” badge tells shoppers that a product is discounted, but not how much they’re saving. A 10% discount and a 40% discount can look exactly the same on the shop page, even though they represent very different savings.
That extra context matters when shoppers are actively looking for value. According to Deloitte’s 2025 Holiday Retail Survey, 89% of surveyed consumers planned to search for deals to stretch their budgets. Showing the actual discount gives them more useful information at a glance than a generic sale label.
With Advanced Promo Kit, you can make WooCommerce show discount percentage badges using live product data, so the number updates when the price changes. You can also show the amount saved, limit badges to bigger markdowns, and display coupon or BOGO deals directly on the product grid.
What The Default WooCommerce Sale Badge Can And Can’t Show
Out of the box, WooCommerce shows a generic sale badge on products that are currently on sale. It can appear on shop and product pages, but the default badge doesn’t tell shoppers how large the discount is.
That’s by design. WooCommerce decides whether a product is on sale, then the default badge outputs a generic “Sale!” label. It doesn’t calculate the percentage or amount saved for the shopper, and it doesn’t represent coupon discounts.
If your theme doesn’t offer the badge wording you need, two common options are a code snippet that rewrites the sale badge text or a label plugin that generates the text from product data. Both approaches are covered below.
The Snippet Method And Its Limits
A common snippet approach for classic WooCommerce templates hooks into the woocommerce_sale_flash filter and replaces “Sale!” with a calculated percentage. Newer block-based sale badge output uses woocommerce_sale_badge_text instead, so a classic-template snippet may not affect every badge surface. In either case, the code reads price data, calculates a percentage, and returns it as badge text.
For a simple product with one price pair, this approach works well.
A basic snippet gets more complicated in three places:
- Variable and grouped products: there is no single regular and sale price for the whole product. The code has to decide how to represent multiple prices or variations in one badge, so a single percentage can be misleading.
- Theme updates: if you add the snippet directly to a parent theme’s functions.php file, a theme update can overwrite it. A child theme or a snippets plugin keeps the custom code separate.
- Coupons: a basic sale-price snippet only compares product prices. It doesn’t automatically know about a 20%-off coupon code or a BOGO deal stored in the coupon settings.
Add a threshold (“only badge items over 25% off”) or a scheduled end date, and the snippet becomes more complex to maintain.
How Advanced Promo Kit Generates Discount Badges
Advanced Promo Kit generates badge text from placeholders that resolve against product data when the page loads. You write the label once, with {discount_percent} where the number goes, and the placeholder calculates the figure from the product’s current price data when it resolves.
Three features are especially useful for this workflow:
- Placeholders resolve live: {product_price}, {regular_price}, {sale_price}, {discount_percent}, and {discount_amount} pull from the product at render time, formatted with your WooCommerce currency settings. On simple products, changing the price updates the discount placeholders automatically.
- Empty placeholders hide the label: if a placeholder resolves to nothing (say, {discount_percent} on a product that isn’t on sale), the whole label is hidden on that product. You never get a badge reading “Save !” on a full-price item.
- Conditions decide where it shows: the Conditions tab includes On Sale (Is / Is not) and a Discount Percentage condition with Equals, Not equals, Greater than, Greater than or equal, Less than, and Less than or equal operators, grouped with AND/OR logic.
Advanced Promo Kit also has an optional Advanced Coupons integration. With the free Advanced Coupons plugin active, the {ac_coupon-COUPONCODE} placeholder renders the discount from an Advanced Coupons coupon, including BOGO deals. That’s outside what a basic sale-price snippet handles.
This guide assumes you’ve already built a basic label. If you haven’t, start with our guide to create custom product badges and come back. From here on it’s placeholders and conditions only.
Step 1: Show A Percentage Badge On Sale Items
For simple products, you can show the discount percentage on sale items with one label whose text is -{discount_percent} and whose only condition is On Sale with the Is operator. Here’s the sequence.
- Go to Promo Kit > Create Label. Give the label a name you’ll recognize in the Manage Labels list, such as “Percent off”.
- In the Badge Label field, type a hyphen. Then expand Variable: Product in the Variables panel beneath the field and click {discount_percent}. Placeholders are case-sensitive, so use the panel or copy the exact lowercase code.
- Check the Badge Preview on the right. With no product chosen it reads -25%, from fixed example values ($39.99 regular, $29.99 sale). Pick a product from the dropdown above the preview, and it resolves against that product’s live prices instead.
- Open the Conditions tab and add On Sale with the Is operator. It takes no value.
- Pick a badge style and position on the Style tab (more on that below). New labels start as Inactive, so switch the toggle at the top of the screen to Active, then Save.
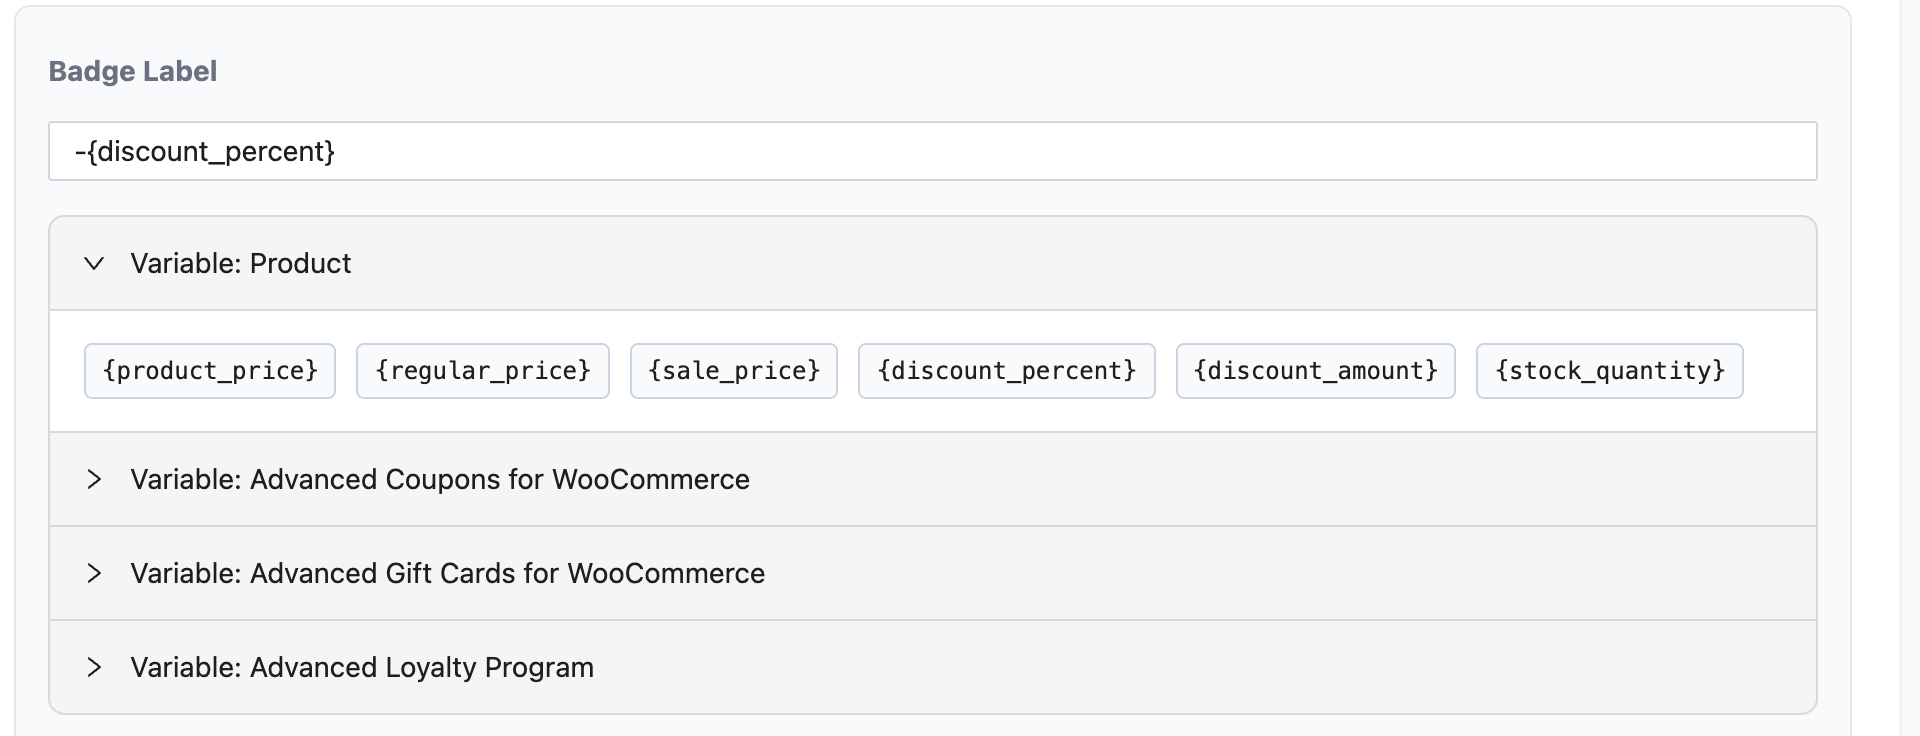
Select a real product in the preview, then confirm the same value on the storefront after you save.
Visit a category with a few simple sale items. Each one shows its own percentage, and full-price items show nothing, because {discount_percent} is empty for them. Strictly speaking, the On Sale condition is an extra safeguard here, since the auto-hide rule would already keep the label off full-price products. Keep it anyway, so the label list reads clearly at a glance.
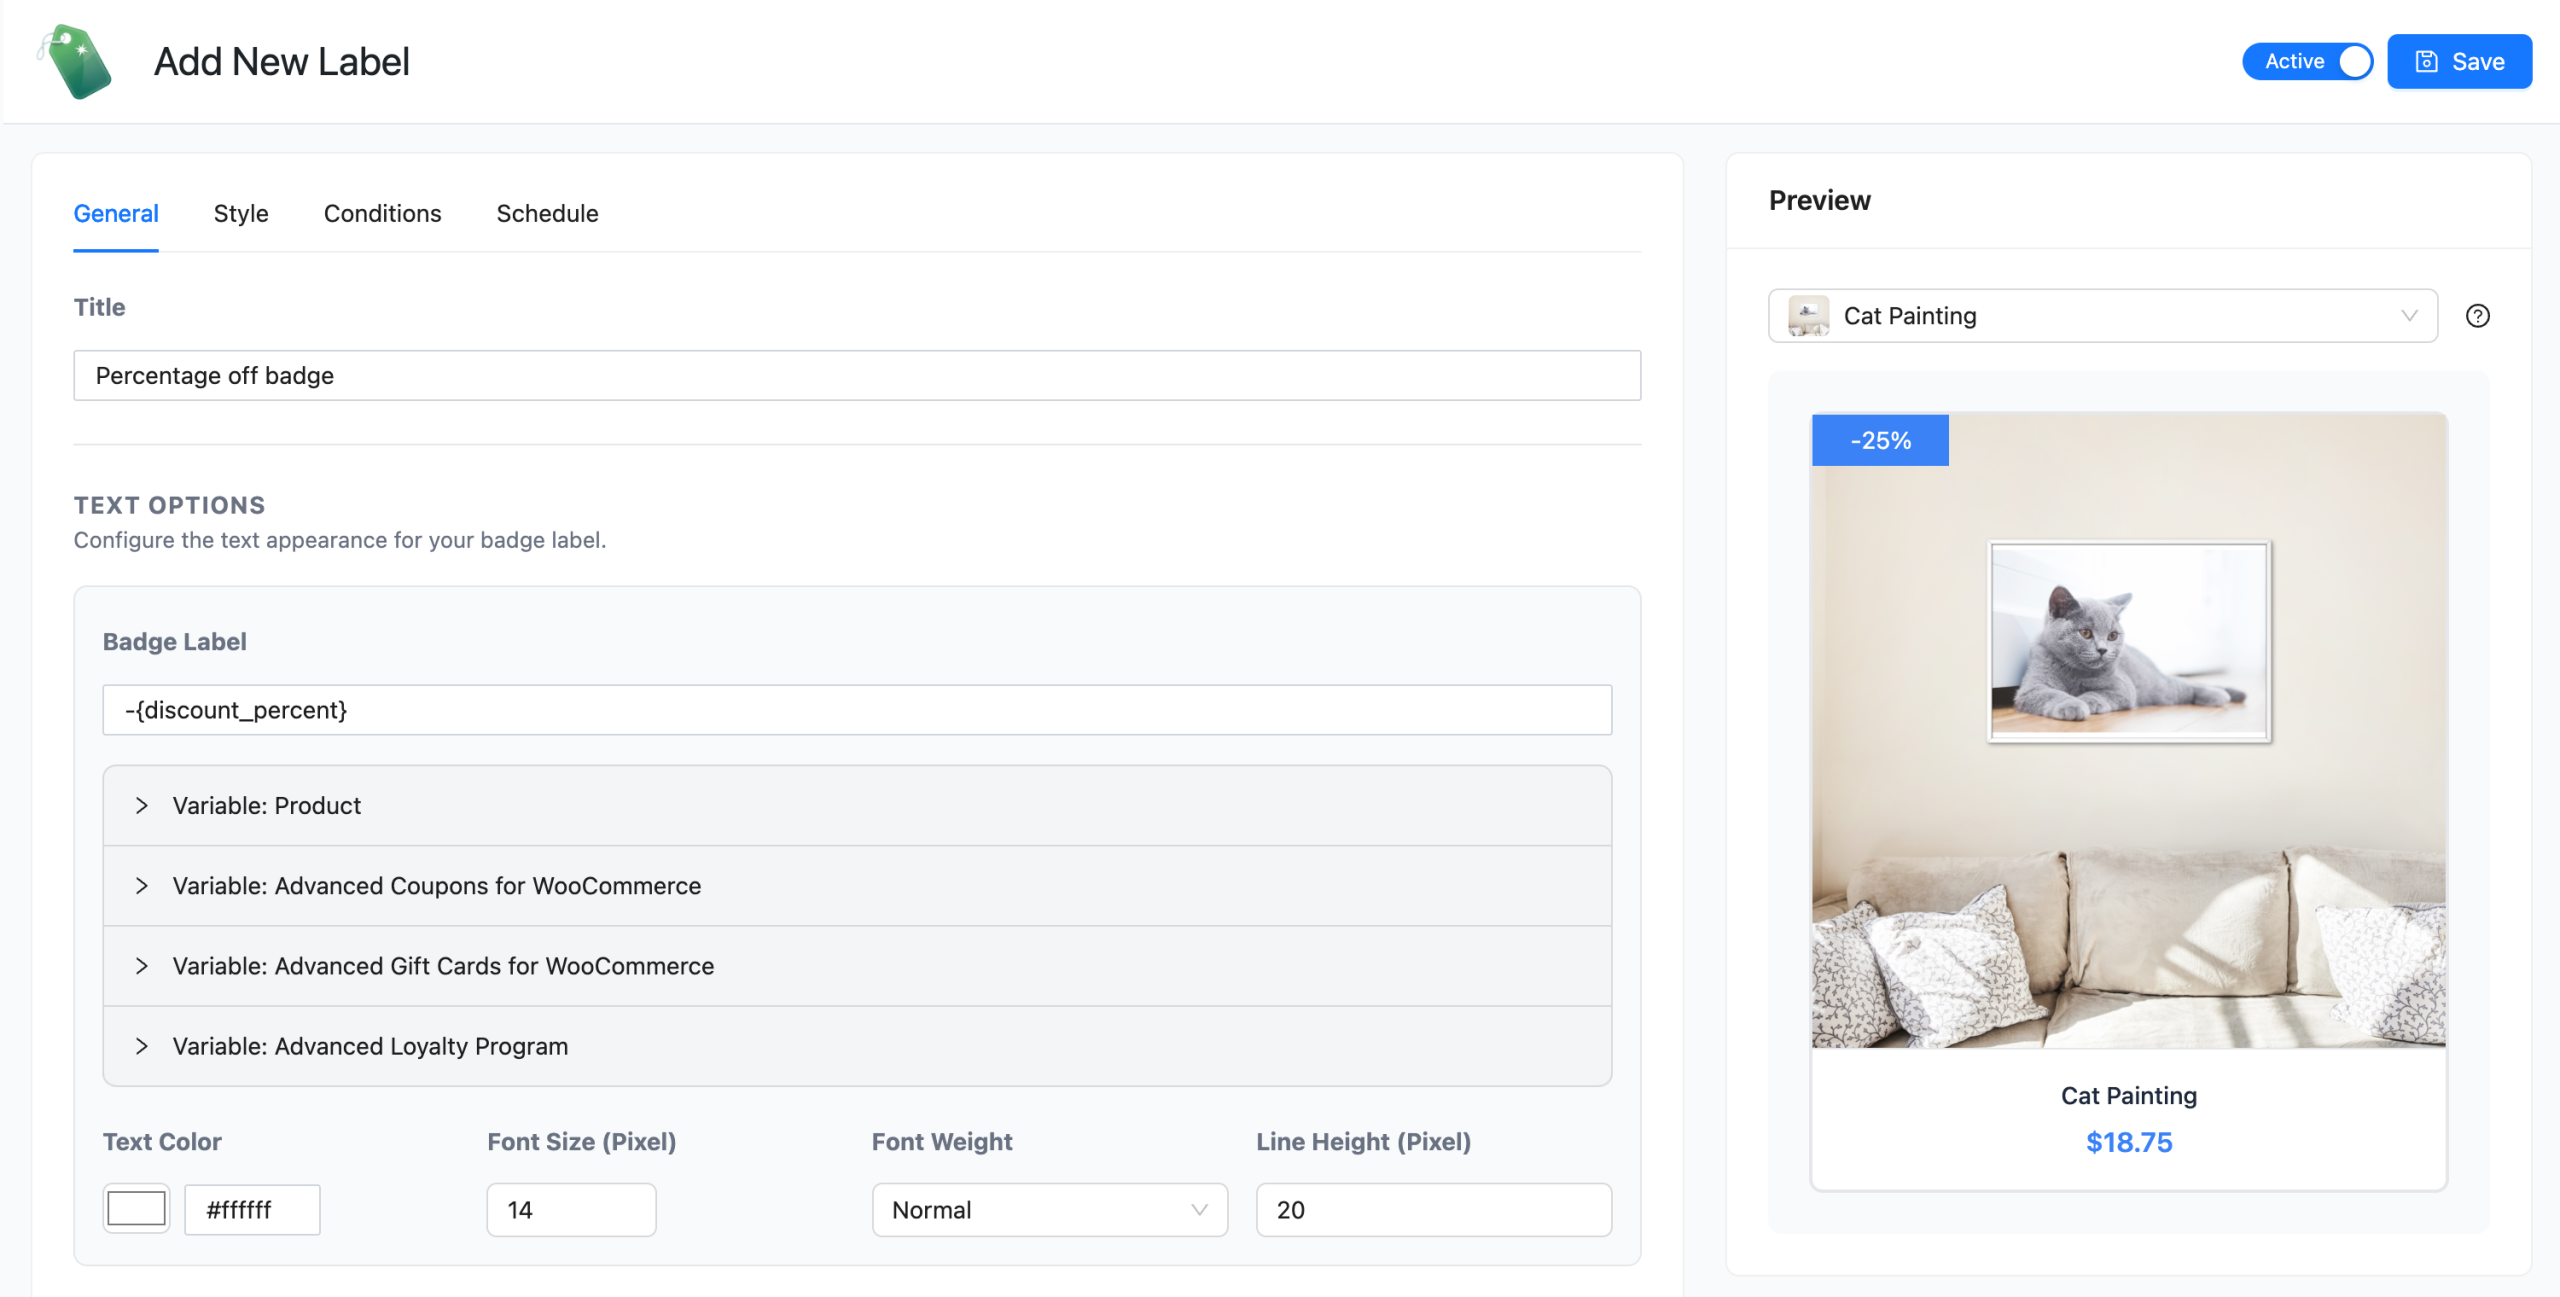
One easy mistake is typing {discount_percent}% off, which renders “25%% off” on the storefront and makes the placeholder look broken. The placeholder already carries the percent sign, so write -{discount_percent} or {discount_percent} off. A percentage can also look unexpectedly large on a steep fixed-amount markdown: a $10 markdown on a $12 product renders as “-83%”. For those items, use the amount placeholder in Step 2.
The full list of built-in placeholders, with the exact case each one needs and when each resolves to empty, is in our dynamic content placeholders reference.
Step 2: Show The Amount Saved Or Only Above A Threshold
Use {discount_amount} when you want to emphasize the amount saved, and add a Discount Percentage condition when you only want badges above a specific discount threshold.
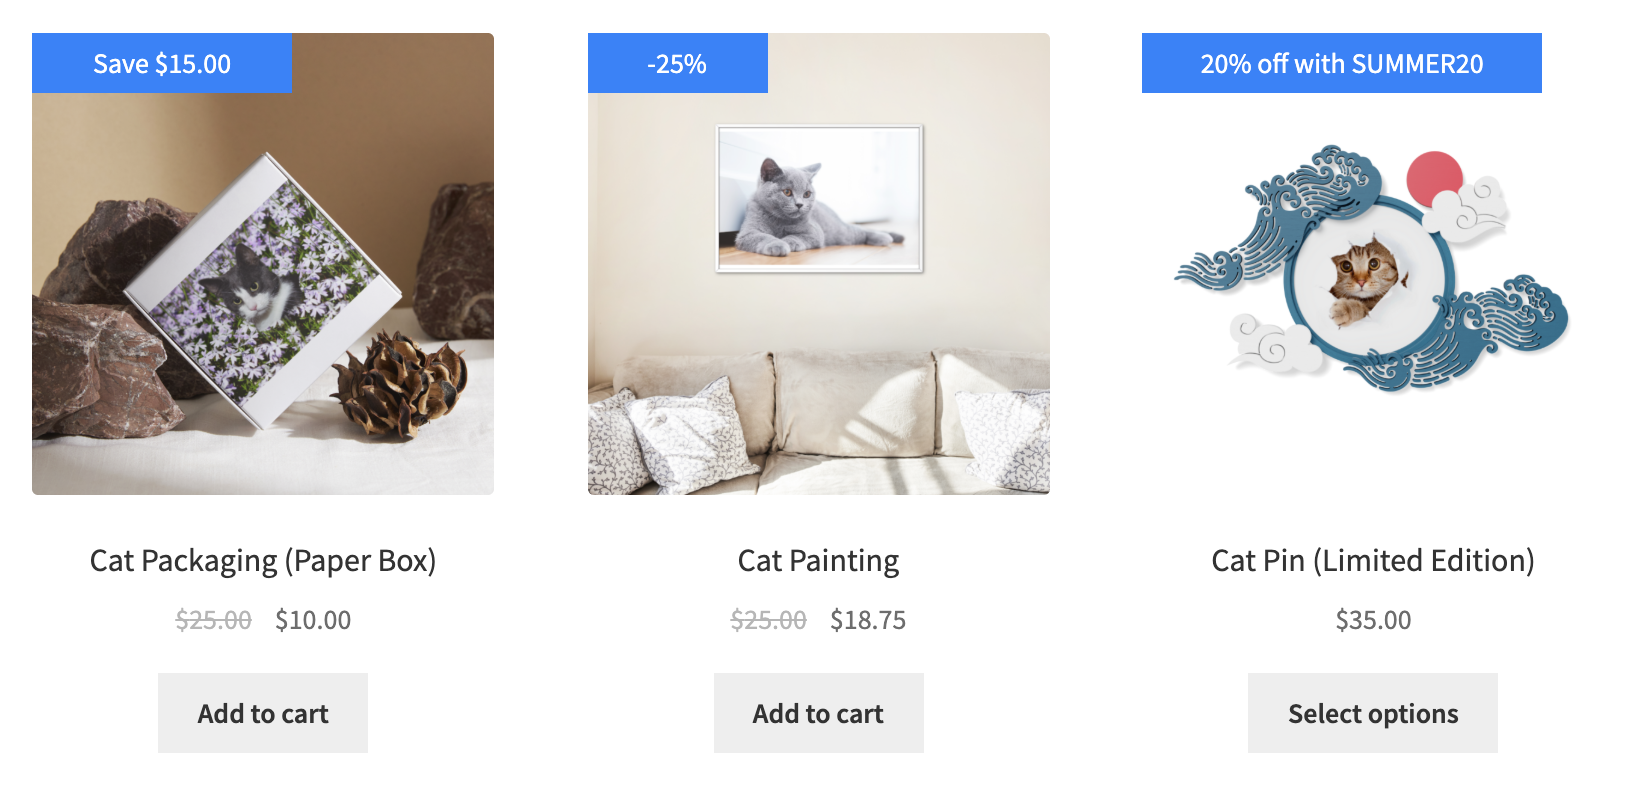
According to Baymard Institute (2022), 18%+ of e-commerce sites fall into at least one of four pitfalls when showing price discounts on the product page, and in their large-scale testing, displaying both the absolute and the relative discount works best. They also point to the “Rule of 100”: a percentage for items under $100 and a dollar figure above it, so “$100 off” a $1,000 item can feel more substantial than “10% off.” A second label with the text Save {discount_amount} renders as “Save $10.00” in your store currency, and nothing else about the setup changes.
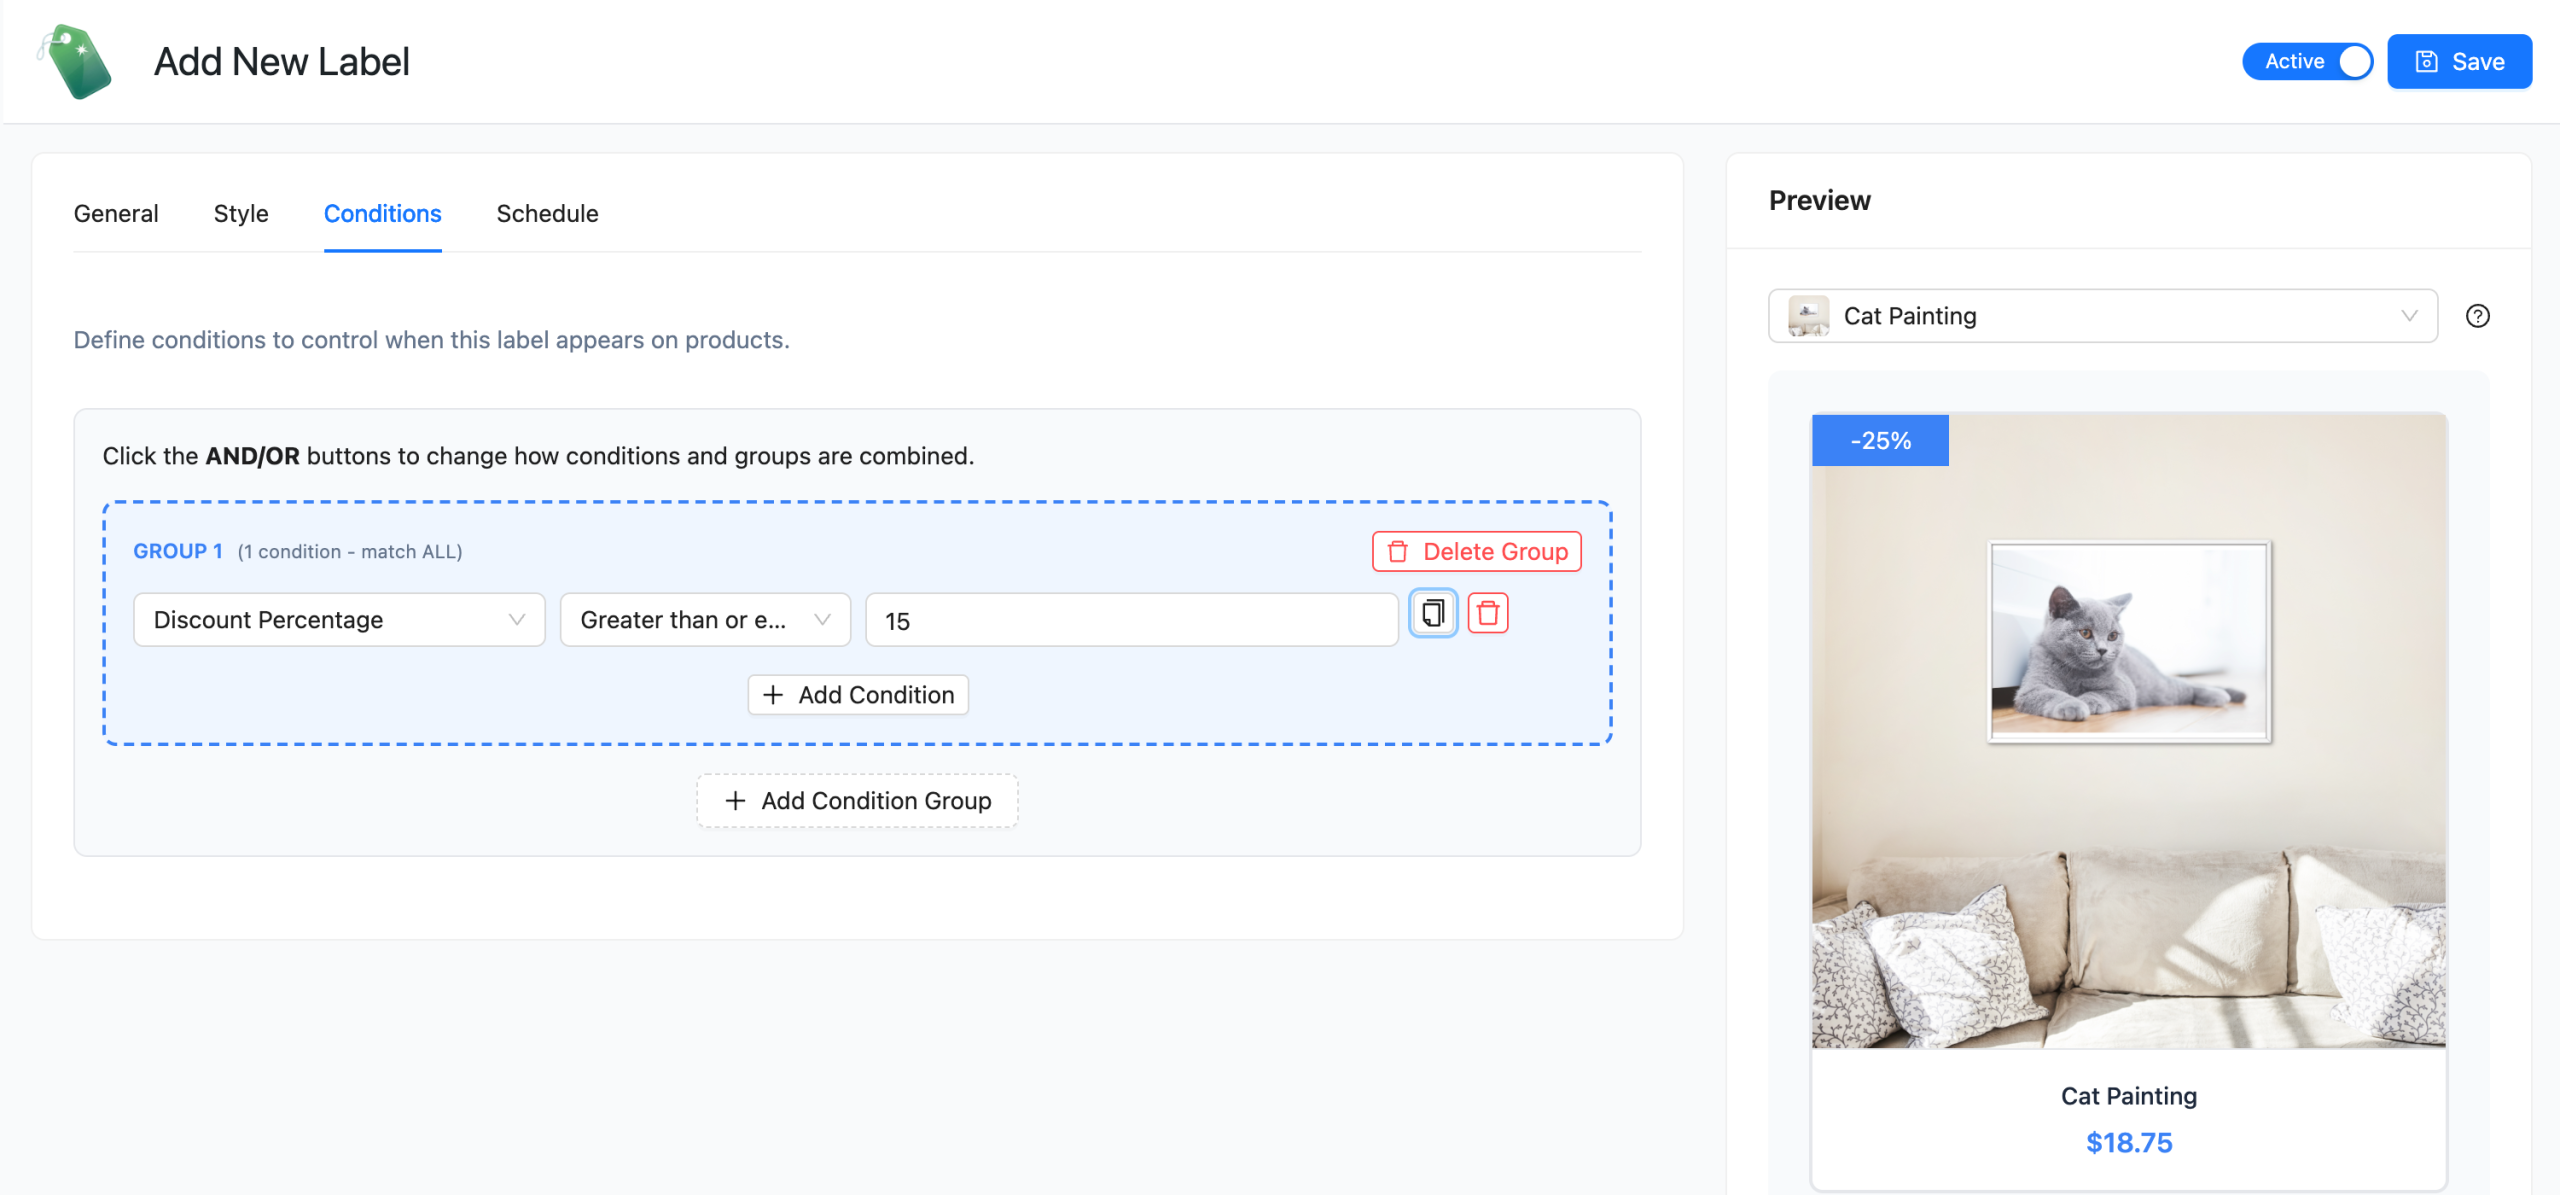
For a threshold, open the Conditions tab and add Discount Percentage with the operator Greater than or equal. For example, enter 15 if you only want the badge on products discounted by at least 15%. Choose a threshold that fits your promotion. For context, Adobe’s analysis of the 2025 holiday season reported peak discounts of 30.9% in electronics and 29.6% in toys. If you’re deciding how large a discount to offer, our data post on the most effective discount percentage covers that separately.
For variable products, use fixed text such as “Selected options on sale,” keep the Discount Percentage condition, and add a Product Type condition. Then set Variable Product Matching (Promo Kit > Settings > General) to Match any variation, so the label appears when at least one variation meets the threshold.
Here’s what this looks like in practice (example data):
| Goal | Placeholder / condition | Badge text you type | What shoppers see |
|---|---|---|---|
| Percentage off a simple sale item | On Sale, Is + {discount_percent} | -{discount_percent} | -25% |
| Amount saved | {discount_amount} | Save {discount_amount} | Save $10.00 |
| Only big markdowns | Discount Percentage >= 25 + {discount_percent} | Clearance -{discount_percent} | Clearance -40% |
| Coupon deal on the grid | {ac_coupon-SUMMER20} | {ac_coupon-SUMMER20} off with SUMMER20 | 20% off with SUMMER20 |
| BOGO coupon | {ac_coupon-BOGO2FOR1} | {ac_coupon-BOGO2FOR1} | Buy 1 Get 1 Free |
Example badge text. The resolved output is generated from each product’s live prices and the coupon’s settings.
Step 3: Show Coupon And BOGO Deals As Badges
A coupon badge uses the {ac_coupon-COUPONCODE} placeholder, which renders the discount from a specific Advanced Coupons coupon on your product badges. A basic sale-price snippet doesn’t produce this because the deal lives in the coupon rather than the product price.
- Go to Promo Kit > Settings, open the Integrations tab, and switch on the Advanced Coupons for WooCommerce row. The toggle is grayed out if Advanced Coupons isn’t active. A Validate Coupon sub-option appears; leave it off for now.
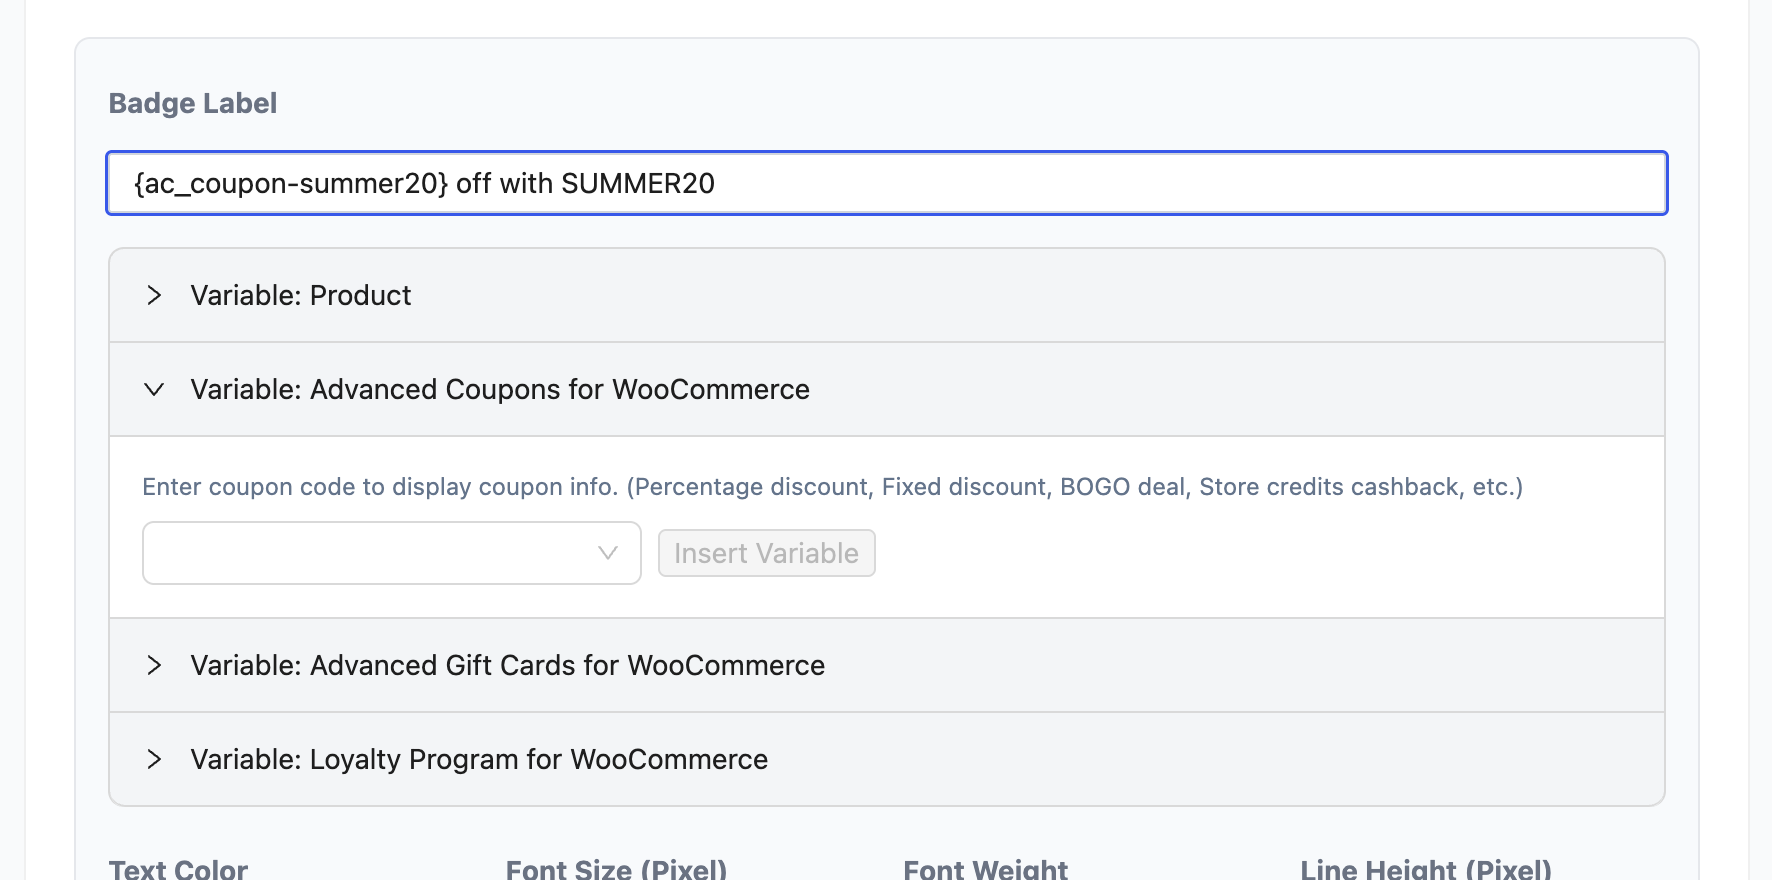
- Create or edit a label. In the Variables panel, scroll to the Advanced Coupons for WooCommerce section, type at least two characters of the coupon code, pick the coupon from the dropdown and click Insert Variable. The placeholder, for example {ac_coupon-SUMMER20}, is added to the badge text.
- Build the wording around it, such as {ac_coupon-SUMMER20} off with SUMMER20. The preview resolves it straight away.
What the placeholder prints depends on the coupon type:
- Percentage coupon: 25%
- Fixed cart discount: $10.00
- Fixed product discount: $5.00, and only on products the coupon applies to
- BOGO deal: Buy 2 Get 1 Free, or Buy 2 Get 1 at 50% off, and only on the deal’s “buy” products. The deal needs specific products or product categories as its trigger; deals triggered by any product, or set to give the same product, don’t render a badge
- Store credit cashback (Advanced Coupons Premium): 15% Cashback or $10.00 Cashback
Fixed product and BOGO badges only appear on the products the deal covers; everywhere else the placeholder is empty and the label is hidden, the same rule as before. Percentage, fixed cart, and cashback coupons don’t check product restrictions, so their badge shows on every product the label reaches. If one of those coupons only covers a category, add a matching Product Category condition to the label. If you’re using a WooCommerce BOGO coupon built with the free Advanced Coupons plugin, the badge can announce the deal wherever a supported “buy” product appears.
The Validate Coupon option is optional and off by default. Turn it on and Advanced Promo Kit checks that the coupon is valid and not expired before showing the label, and a coupon that fails the check hides the label. That suits codes with expiry dates. Leave it off for evergreen codes you want advertised regardless.
If your promotion has fixed dates but you want the badge to appear before the coupon goes live, use the Schedule tab instead. Each label takes an optional Start Date and End Date, compared in your site’s timezone, and hides itself outside that window. Related integrations add two more placeholders: {lp_points} shows the loyalty points a product earns through Advanced Loyalty Program, while {agc_gift_card_value} shows a gift card product’s value through Advanced Gift Cards. The type-by-type reference for coupon output is in our guide to display coupon discount info on product labels.
Styling, Stacking And Testing Your Dynamic Badges
Dynamic values can take up more space than the placeholder text you see in the editor. For labels such as “Save $10.00,” a practical starting point is roughly 240 to 280 pixels wide and 36 to 40 pixels tall. You can fine-tune the dimensions in the Style tab once you see the resolved text.
Twelve badge shapes sit on the General tab (Rectangle Horizontal, Rectangle Vertical, Pill, Circle, Square, Ribbon Left, Ribbon Right, Tag, Hexagon, Star, Banner, and a Custom Image), alongside text color, font size, and weight. The Style tab adds badge color, width, height, border radius, padding, opacity, and rotation, all with a live preview. Gradient backgrounds, shadows, animations, a clickable URL, and a hover tooltip are there too. Placement is On Image or Out of Image, in any of the four corners with pixel offsets. For shape and color ideas, our roundup of sale badge designs that convert has fifteen worked examples.
Stacking is on by default. Maximum Labels Per Product defaults to three, and Label Spacing defaults to five pixels; both can be adjusted under Settings > General. Priority is a drag-and-drop order under Settings > Priority Order, where labels higher in the list show first, so drag “Percent off” above “Coupon deal”.
Before you call it done, check five products on both the shop grid and the single product page:
- Simple product on sale: shows its own percentage
- Variable product with mixed discounts: shows your fixed-text label if a variation qualifies
- Full-price product: shows nothing at all
- Product your coupon doesn’t apply to: no BOGO or fixed product badge, and no percentage, fixed cart, or cashback badge if you scoped it with a condition
- Product that qualifies for every label: respects your Maximum Labels Per Product setting and the priority order you set
Frequently Asked Questions
How do I show the discount percentage on the WooCommerce sale badge?
WooCommerce’s default sale badge doesn’t show the discount percentage. To add one, you can use code or a label plugin. For simple products in Advanced Promo Kit, create a label with the text -{discount_percent} and add an On Sale condition with the Is operator. The percentage is recalculated from the product’s live prices each time the page loads.
Can the sale badge show the amount saved instead of the percentage?
Yes. Use the {discount_amount} placeholder, which prints the difference between the regular and sale price formatted in your store currency, so Save {discount_amount} renders as “Save $10.00”. Baymard points to the “Rule of 100”: when you only show one format, percentage savings can feel more compelling below $100, while dollar savings can feel more compelling above $100. You can run one label of each with a Product Price condition to split them.
Can a WooCommerce badge show a coupon or BOGO deal?
Yes, through the Advanced Coupons integration in Advanced Promo Kit. Switch it on under Promo Kit > Settings > Integrations, then insert {ac_coupon-YOURCODE} into a label. Percentage, fixed cart, fixed product, BOGO, and store credit cashback (Premium) coupons each render their own wording, such as “Buy 2 Get 1 Free”. Fixed product and BOGO labels only appear on the products the deal covers; for percentage, fixed cart, and cashback coupons, add a condition to limit where the label shows.
Will the badge update when I change the price?
Yes. On simple products, price placeholders resolve against the product’s current regular and sale price when the page renders, so editing a price changes the badge with no label edit. If you remove the sale price entirely, {discount_percent} resolves to empty and the label disappears from that product on its own.
Getting Your Discount Badges Ready
The goal is to keep each badge aligned with the promotion it describes. Dynamic placeholders reduce the badge text you need to update manually when product prices change.
Here’s what to do next:
- What The Default WooCommerce Sale Badge Can And Can’t Show: decide whether the default “Sale!” label gives shoppers enough discount detail.
- The Snippet Method And Its Limits: if you already run a snippet, check it on a variable product before trusting it.
- Show A Percentage Badge On Sale Items: build the percentage label, and remember the placeholder carries its own % sign.
- Show The Amount Saved Or Only Above A Threshold: add an amount label and a Discount Percentage >= threshold.
- Put Coupon And BOGO Deals On The Grid: switch on the integration and badge your best coupon.
If you want WooCommerce to show the discount percentage without a custom snippet to maintain, set up Advanced Promo Kit dynamic sale badges and keep your badge text tied to your product data.